Detecting Apple Intelligence and ChatGPT Integration Status

Run a Jamf shop? Would you like to collect stats on who’s turned on Apple Intelligence so far? That is, if your company hasn’t already had you put the kibosh on it! Personally I think Apple Intelligence and it’s Private Cloud Compute are a secure and private way to use things like the Writing Tools to proofread, make list or tables, etc. without wondering if your corporate data is being used in further LLM training. If your company is so enlightened and you’d like to see which Macs have Apple Intelligence enabled, read on! Or perhaps, you’d just like to see how it’s done. It’s not as straightforward as you might think, Apple engineers are really into obfuscation these days!

Finding the Suspects

The first part of the fun is hunting down which file might indicate the status of Apple Intelligence. I closed all other apps except System Settings, toggled Apple Intelligence on and off and tried a few things: Looking at /Library/Preferences in Finder sorted by date (in this case make sure to show hidden files), running FSMonitor to see things visualized, running fs_usage -w -f filesys | grep plist while screen recording in Quicktime to see the exact moment I enabled/disable Apple Intelligence. After some toggling it is determined that ~/Library/Preferences/.GlobalPreferences.plist is our target. A few days later I re-discovered Bob Gendler’s excellent post about using the command log stream --debug --predicate 'process == "cfprefsd" && eventMessage CONTAINS "wrote the key"' to help narrow things down and this also confirmed this is the file (as well as many others) being written to when it’s enabled.

Obfuscation Investigations

Let’s look at ~/Library/Preferences/.GlobalPreferences.plist and see if we can find the exact key name. This file is a bit special in that you can do the same thing 5 6 different ways with defaults! Run one of these commands as the console user not root:

  • defaults read ~/Library/Preferences/.GlobalPreferences.plist
  • defaults read ~/Library/Preferences/.GlobalPreferences
  • defaults read NSGlobalDomain
  • defaults read -globalDomain
  • defaults read -g
  • defaults read "Apple Global Domain"
    • Bonus update: 👆Shows up in defaults read and nowhere else

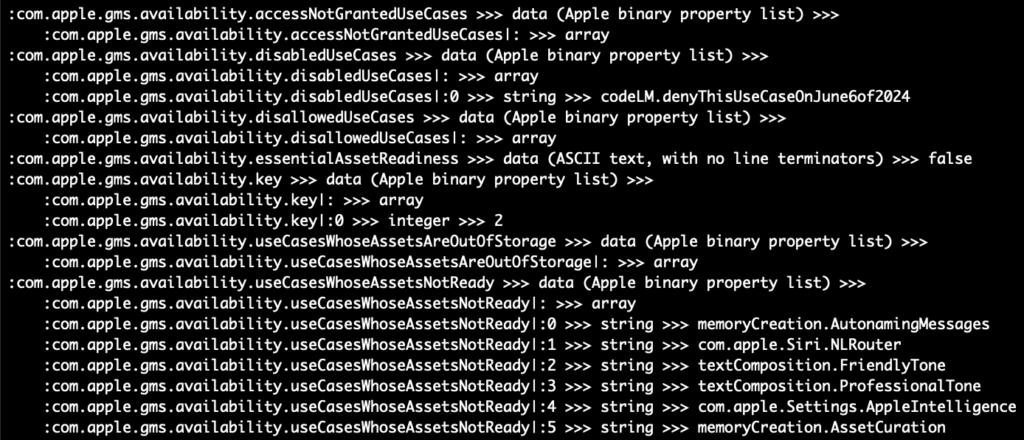
Regardless of how we do it though, the output for the com.apple.gms.availability keys is abridged and useless to us in this form.

What’s going on? What is this halting hexadecimal hodgepodge? Let’s use defaults export -g – to print the contents to in XML1 format (BTW you won’t find export documented in the man page, after a decade it still only exists in defaults -h help).

Ah, OK, these keys are <data> types which contain base64 encoded strings. The contents are possibly binary data. We’ve already established that defaults is not going to be useful to us. In my previous post Respecting Focus and Meeting Status in Your Mac scripts (aka Don’t Be a Jerk) we are able to extract the data using plutil -extract however because these key names contains periods (aka “full stop” U+2E) this clashes with plutil’s shoddy “keypath” parsing, which uses periods to delimit the path but doesn’t respect escaping periods with a backslashes (which is not hard to do as my JSON tool ljt can handles this). So all we are left with is /usr/libexec/PlistBuddy let’s give that a try: /usr/libexec/PlistBuddy ~/Library/Preferences/.GlobalPreferences.plist -c "print :com.apple.gms.availability.key (Spoiler alert the key is: com.apple.gms.availability.key)

OK! There we go, it’s a binary plist inside the key of a plist! “Brilliant” Apple, really. 🙄 Alright then, let’s pipe this through plutil -convert xml1 - -o - and get some ASCII XML yeah?

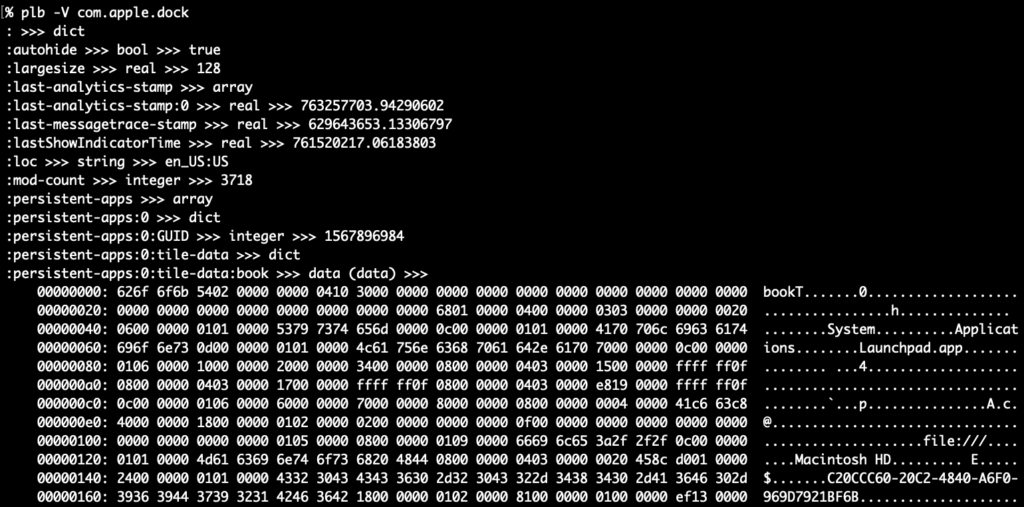
Pardon moi, but what the shit is this!? 💩 file said it was an “Apple binary property list” – according to those first bytes. Let’s look at it run through xxd to see if we can find more clues.

Aha! There is an extraneous newline (0x0a) that PlistBuddy is outputting (annoying but at least consistent!). Why can’t that just be ignored? Because apparently the last byte of a binary plist is the offset table, mess that up and it all falls apart. So what we need to do is trim this dangling newline. For this I consulted ChatGPT and perl -pe 'chomp if eof' is the magic we need. BTW ChatGPT does well for me to ask very targeted and direct questions like this, I don’t ask it to write entire scripts but sometimes it will have insights into different methods I’d never considered.

OMG. SRSLY? Apple is writing data encoded binary plist data containing a single integer value in an array?! ATTN: Craig Federighi: Please tell your engineers to stop junking up an otherwise elegant system with these obfuscation games. Alright, let’s bring it home and get the value with this: /usr/libexec/PlistBuddy ~/Library/Preferences/.GlobalPreferences.plist -c "print :com.apple.gms.availability.key" | perl -pe 'chomp if eof' | plutil -convert xml1 - -o - | plutil -extract 0 raw - -o -

There we go: 0 (zero), which means Apple Intelligence is on. When it’s 2, it’s off. Yet another key like PrivateMACAddressModeSystemSetting which has the opposite meaning of what you might expect. BTW I’ve yet to see the value as 1, except for this June Tweet where someone writes a 1 to turn on Writing Tools on a beta. BTW this key only indicates the state, in my testing it does not affect the state, meaning if you change the value (and even do a killall cfprefsd) all it will do is blank out the Apple Intelligence toggle for a moment and then it’ll sort itself out and display the true state.

And yes there is another way to get the state of Apple Intelligence however it makes the assumption that you only have one account in MobileMeAccounts.plist to determine your AccountDSID and then query yet another file but if you have more than one Apple Account, you know like for all your purchases in: iTunes/Music/App Store there may be multiple accounts (** cough** merge accounts Apple! **cough**) so it may return an erroneous results if you have more than one account.

The ChatGPT integration is actually a cinch to determine. I used the same method above to find the plist and then, because the engineers on this didn’t play games with encoded binary plist data within a plist, all you need to do is simply ask: defaults read com.apple.siri.generativeassistantsettings isEnabled and amazingly 0 means off and 1 means on, imagine that!

Usable Extension Attributes

You’ve made it this far, here’s the goods: OS-Apple Intelligence Availability.sh and OS-Apple Intelligence ChatGPT Status.sh they are fully commented and when you run them here’s what they return. I’m trying out a new way to output both values and their interpretations, because let’s be honest, we are “reading tea leaves” here. 🍵 None of this is officially documented by Apple and always subject to change. If a new value pops up, it will still be reported in the output. You won’t have to scramble to fix the extension attribute right away, just adjust the criteria in your Smart Group to match the value in the parentheses if there’s a policy that depends on it.

Closing Thoughts

What an absolute pain it was to get a single numerical value from a single key! To that end after I had written these extension attributes I went to work over the Thanksgiving break and wrote a tool to make this effortless. I’ll be releasing this tool, which will work as both a standalone tool and a shell script function in the coming days!

Getting Ahead of Private Wi-Fi Address Changes in macOS Sequoia

It’s been a busy 2 weeks since Apple released macOS Sequoia! One of the new features is private Wi-Fi addresses aka “MAC address randomization”. While this all well-and-good and can “improve your privacy”, it has been causing headaches for folks in the environments where random MAC address are not a good thing.

Now, Apple did think about this somewhat as evidenced by: About private Wi-Fi addresses and enterprise networks and Wi-Fi MDM settings for Apple devices but they didn’t really do a complete “dress rehearsal” of what would happen: You can’t deploy an MDM WiFi profile with the DisableAssociationMACRandomization key until the Mac is already upgraded to macOS Sequoia and once upgraded to Sequoia the MAC randomizes and that could break your connectivity to get the new config profile! It’s a real “chicken and egg problem” 🐣 that is laid out in great detail here.

Seeing the angst created, the contortions required, and overall FML vibes this was causing I did some investigations to see what could be done and guess what? You can pre-populate the PrivateMACAddressModeUserSetting value to off in the wifi.network.ssid.<SSID> dictionary of /Library/Preferences/com.apple.wifi.known-networks.plist before a Mac upgrades to Sequoia! 🎉 Note: When you set this via script (versus GUI), the change does not take effect until reboot, the MAC stays randomized and the UI does not reflect this. This doesn’t matter if it’s for an upgrade to Sequoia but just letting you know if you try it on Macs already on Sequoia, it won’t take effect until a reboot. If there’s some clever kill -HUP that can be sent let me know. I tried killall cfprefsd but that wasn’t enough. Update: Thanks to boberito in the MacAdmins Slack, he figured out that killing cfprefsd and airportd would update the UI and power cycling the Wi-Fi would cause this change to take effect! I’ve added an option to the script to do this, set restartWiFi_HC="1" to restart Wi-Fi, just be aware you better make sure your Wi-Fi reconnects!

If that’s all you need to know, then god-speed and good luck to you! If you’d like a Jamf script and extension attribute read on…

You can use the script setPrivateMACAddressMode to set the mode of one or more SSIDs on a target Mac. As it is, the SSID must have been previously connected to so the wifi.network.ssid.<SSID> gets filled out. I tried writing the value to an un-populated dictionary and Wi-Fi just wigged out (like nothing in the SSID list kinda weirdness!). Keep that caveat in mind. If you can figure out a minimum viable set of keys that are needed then good for you but for this script, it’ll just skip the SSID if it’s not in alrready in com.apple.wifi.known-networks. This script can be used with Jamf and its policy script parameters or if you are on another MDM, just hard-code the SSIDs, I’ve made allowances for that.

Next, this is a Jamf extension attribute OS-Private MAC Address Mode it will report the mode and the SSID (example: off|My Cool Wifi). You can have it report all known networks or just hardcode the value for specific SSID(s). It can be useful when used in a Smart Group. You could deploy a Major Update deferral config profile to block Sequoia then make a Smart Group for exclusion using OS-Private MAC Address Modeis likeoff or ‘matches regex^off\|for more precise matching . When someone becomes a member the Smart Group it excludes them from the Major Update deferral config profile and can then upgrade to Sequoia.

Lastly, if you don’t have Jamf but want to see what the values are getPrivateMACAddressMode will spit out a a human readable list of SSIDs and modes (off, static, rotating, and NOT_SET)

I usually try to put more pictures and illustrations in my posts but every moment I spend not publishing this, the more weekends that are possibly ruined by thinking about the suck that is macOS Sequoia Private Wi-Fi addresses in managed environments. I think this pic will sum things up! 😄

UPDATES: A couple things to keep in mind: 1) If you deploy Config Profiles with Wi-Fi payloads, then it will blow away everything about the SSID com.apple.wifi.known-networks every time the config profile is redeployed! 2) That means if you do deploy a Wi-Fi config profile with the Sequoia-only DisableAssociationMACRandomization key it will blow away the manually set key PrivateMACAddressModeUserSetting in com.apple.wifi.known-networks. The EA OS-Private MAC Address Mode currently does not attempt to resolve if an SSID has a corresponding config profile profile with the DisableAssociationMACRandomization key set, so it will be blank. 3) As of 15.0.1 a user can still change the setting even when deployed via MDM, contrary to Apple’s stated behavior: “This value is only locked when MDM installs the profile. If the profile is manually installed, the system sets the value but the user can change it”. 3b) Actually I found that if you killall airportd before rebooting, it’ll lock the value – until reboot. 4) Apple also draws user attention to setting with a caution icon ⚠️ in the Wi-Fi dropdown rather than a “check” icon like they use for managed Login Items in System Settings (the whole thing is an inconsistent mess)

Update 2: Steven Xu over in the Jamf Nation forums found that setting the PrivateMACAddressModeSystemSetting key to 1 (integer, not boolean) within /Library/Preferences/SystemConfiguration/com.apple.airport.preferences.plist will disable Private MAC Addresses by default. Newly joined networks or networks where the PrivateMACAddressModeUserSetting key for an SSID is off or not already set to static or rotating will use their actual MAC address. I’ve added support for setting this key in setPrivateMACAddressMode and it too will not take effect in Sequoia+ until either a reboot or setting the variable to restartWiFi_HC="1". Just keep in mind, perhaps you want your users to have Private MAC addresses by default when joining new and unknown networks? Why should the free Wi-Fi at the food court or coffee shop get your real MAC address anyway!? The getPrivateMACAddressMode script and extensions attribute OS-Private MAC Address Mode have been updated to report on (disable)PrivateMACAddressModeSystemSetting also.

Code in this post:

Exploring Unicode in macOS with clui

My new tool clui, pronounced “clue-ee” offers Command Line Unicode Info with the ability to export to a variety of formats like CSV, JSON, YAML, RTF and more. While I’ve written a few macOS command line tools geared to the Mac Admin like jpt the JSON power tool, ljt the little JSON tool, shui for easily adding AppleScript dialogs to your shell script, and most recently shef a Unicode text encoder and formatter for shell scripters. This is one is almost “just for fun” although you might find some practical uses for it. Writing shef opened my eyes to the stunning amount of detail and craftsmanship in macOS’ Unicode-aware fonts, which comprise not just the alphabets of the world but signs, symbols, and even Egyptian hieroglyphics! While macOS’s built-in Character Viewer does a pretty good job to group and display these characters it’s a painstakingly manual process if you want to get info on a range of characters. I hope clui makes it fun and easy to poke around the vast Unicode neighborhood.

If you don’t feel like reading you can watch this.

Starting with Character Viewer

First let’s take a look at Character View, perhaps you don’t know some of it’s features. If you quickly press the dedicated “globe” 🌐 button on newer Macs (or the keyboard combo Control-Command-Spacebar on older models) it will likely open up Character Viewer in it’s default mini-sized version with preset categories along the bottom. You can click on a symbol or character and it will insert the text in your current app. The real fun begins when you click the little icon in the upper right to expand the view.

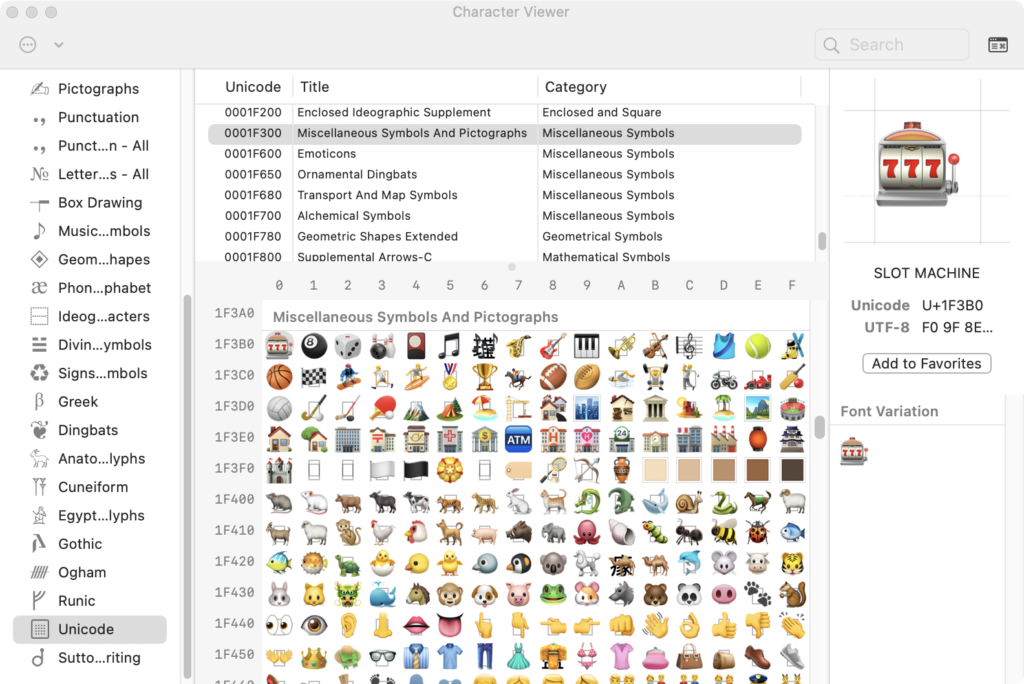
The window will expand to show more information: The code point(s) in hexadecimal (U+hhhh), the UTF-8 encoding bytes, and related characters. You will need to double-click these to insert them into your current app.

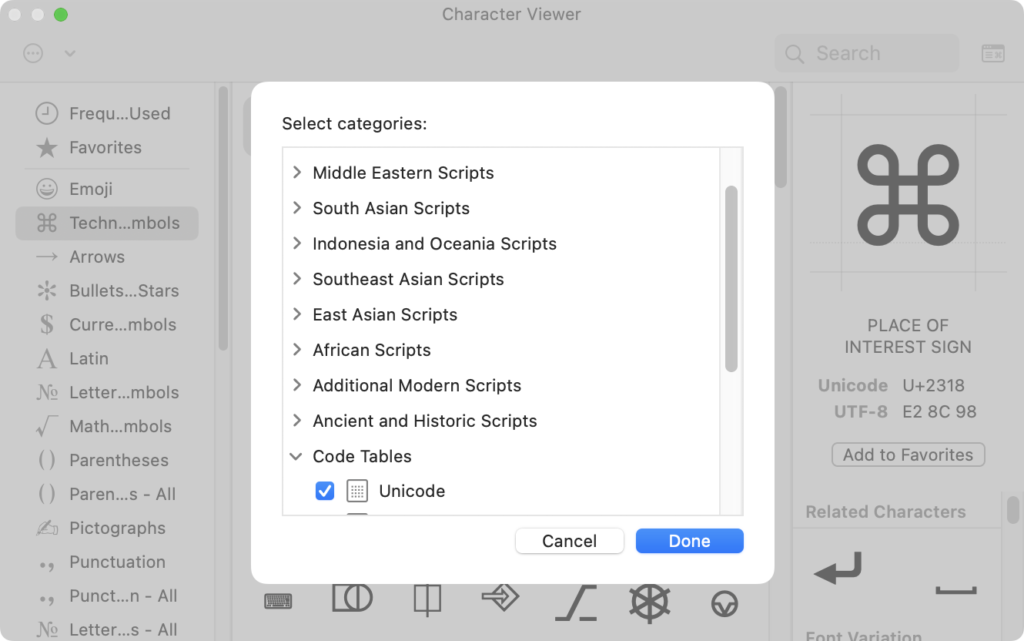
You can also Customize the List of categories that appear in the left column by clicking the encircled ellipsis…

The one that has everything in it is Unicode under the Code Tables group at the bottom of the list.

Jackpot!

You can right-click or control-click on a character to Copy Character Info into the clipboard. In the example below, we discover that what most Mac folks would call ⌘ “Command” is also known as the “Place of Interest Sign”. Whaddya know!

This is all well and good but who’d want to do that for thousands of characters?! What if someone wanted this info at the command line? It got me thinking: There’s Got to Be a Better Way!™

Searching for the Source

The first order of business was looking for where macOS kept it’s naming information and if it was possible to extract that information with command line tools. It ended up being in two files, a SQLite database and a plist. Here’s their full paths:

#Single code point characters and Unicode symbols
/System/Library/Input Methods/CharacterPalette.app/Contents/Resources/CharacterDB.sqlite3
#plist of single and multiple code point Emoji
/System/Library/PrivateFrameworks/CoreEmoji.framework/Versions/A/Resources/en.lproj/AppleName.strings

There is some overlap with CharacterDB.sqlite3 and AppleName.strings where Apple choose to use different phrasing for an Emoji vs. Unicodes name, but in general the former has single code point entries, while the latter has both single and the multi-codepoint Emoji sequences. clui will report on both, putting a semi-colon in between each version, you can also output discretely with the -D option. Descriptions/info fields are converted from uppercase to lowercase BECAUSE WHO LIKES GETTING YELLED AT?! 🙉 Although you can preserve case with -p which can help with deciphering the internal (and unlabeled!) columns Apple uses in the descriptions of the CJK Ideographic ranges.

clui in Action: Practical Examples

Simple Lookups

If you’d like to see what all the options and modes run clui -u to get the “usage” output, or take a look at on clui’s GitHub page. To start with, clui is built to ingest both “regular” characters and also representation of Unicode code points in hexadecimal in the style of: U+hhhhh or 0xhhhhh. Ranges can also be specified by simply adding a hyphen between to characters or codepoints and it can both ascend and descend. The default output is CSV.

Apple doesn’t want to call anyone a nerd apparently, but that’s OK I embrace it.

For multiple code point emoji you can enclose the code point representations in quotes. Spaces within quotes are only used delimit each code point and are not part of the composite character.

The -X expansion option will display the all the code points together, then break out each component

-x will expand the input and break out each code point without showing the composite character

Working with Categories and Groups

clui can tap into categories and groups by leveraging the the plists inside the Resources folder of CharacterPallette.app. These plists contain a mix of 0x code point representations and literal characters. The list option -L takes the upper and lowercase arguments of c or g for exactly what you think, categories and groups! -Lc gets categories marking those with internal subsections with an asterisk * and -LC will expand those categories to include the subsections within. All list outputs are CSV and includes a header row, -h will suppress headers. In this excerpted example below you can see Arrows contains a number of subsections:

clui acts on a categories when you use the -C option and input one or more categories. If no subsection is specified the complete category will be output. Some can be quite large and take several minutes to output! If you are outputting RTF or JSON and redirecting to a file, if you interrupt with Control-C the output will be properly closed up, so it will still be valid.

As you can see at the bottom of the list, not all characters have renderings. However, if you double click those question mark glyphs ⍰ to select and copy them (CSV is nice that way), you will get that exact character. I used the apl “quad question” character (U+2370) above to get something close to it for this example, but don’t let the generic visual representation fool you, it is unique. You can use Character Viewer to see if any other fonts have alternate graphical representations, since Terminal is using only the currently selected font to display output. Update: It will fall back to a font that has a representation if needed. I recommend the free GNU Unifont for “Glyphs above the Unicode Basic Multilingual Plane”, which fills in some of the gaps of Apple fonts (like the LCD-like segmented numbers U+1FBF0-U+1FBF9)

Groups are about the same thing as categories except groups are comprised of multiple categories. -Lg lists all groups and -LG will expand the constituent categories within.

You can use -G like -C specifying one or more groups. If you include a category name (comma delimited) after the group, it’ll simply report that category as if you’d used it solely with -C. Here’s an example of the first group AdditionalModernScripts and the member category CanadianAboriginalSyllabics . For variety I’ve added -h to hide the header row from the CSV output.

CSV Looks Great in QuickLook

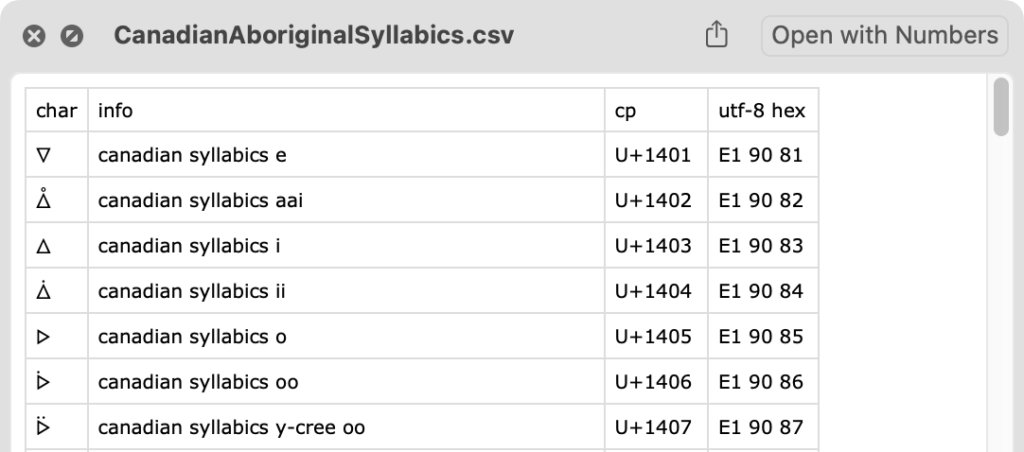
Just in case you didn’t know, Quicklook will display files with a csv extension really nicely. Here’s the CanadianAboriginalSyllabics above as seen in Quicklook, you can even select characters from within Quicklook, pretty nice!

CSV Can Look Even Better in Numbers

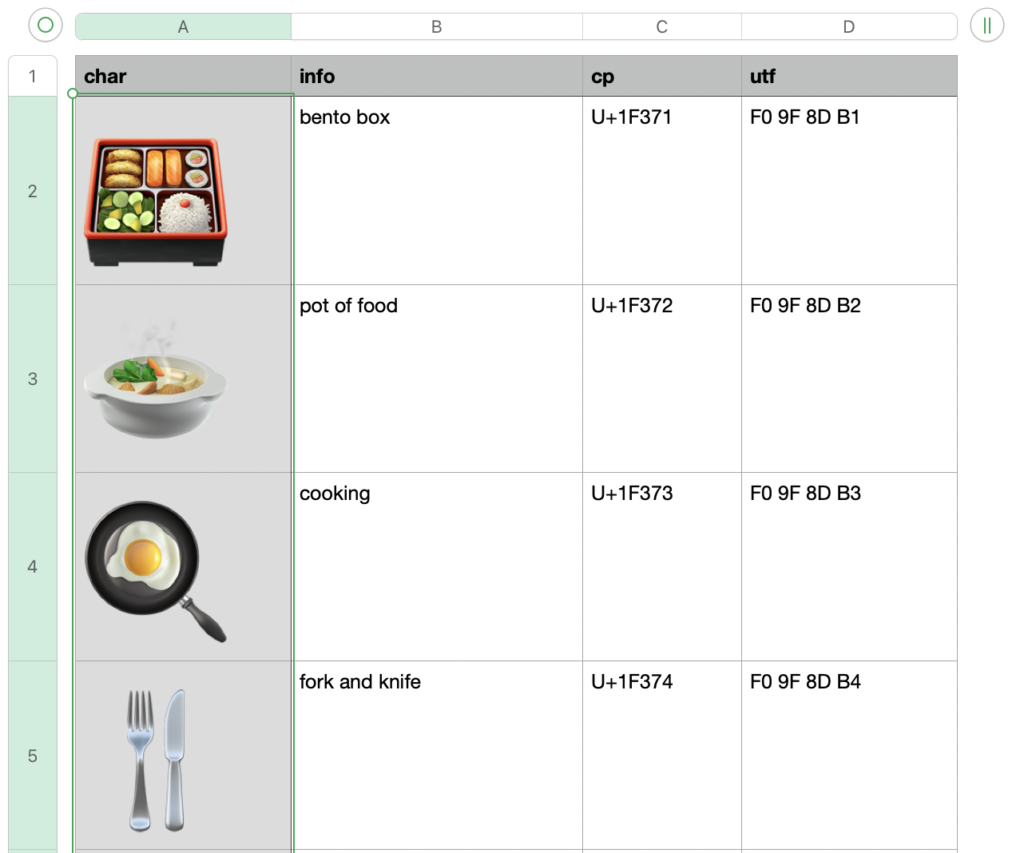
If you want to work with CSV in Numbers it will do quite nicely. Here’s a little tip for better legibility:

  • Select column A from the top of the column
  • Command ⌘ click on A1 to deselect it
  • Format the text to a larger size (like 50 points or higher)
  • Adjust the column width a bit wider
  • Save it as a .numbers file to retain formatting
Some of these Emoji will make you hungry

Pro Tip: Quicklook will not let you select any text from a Numbers document! However if you click and drag anywhere in the Quicklook contents to the Desktop (or into Preview), it will export a seamless PDF with no page breaks! Then you can select text from the PDF in QuickLook. Who knew?! Now back to clui features!

Get a Good Look at Those Emojis in Rich Text Format!

A late entry feature to clui is RTF (Rich Text Format) output. This enables clui to present the characters in larger sizes without requiring additional work from you (as seen above in Numbers)! The format is the same as the “plain” output (-Op) which does not label the fields, simply use the -Or option

Your best bet with RTF output is to either redirect it to a file like this: clui -Or -C Emoji > Emoji.rtf or pipe it into pbcopy like so: clui -Or -C Emoji | pbcopy. There’s a neat feature in pbcopy that detects the RTF header data and allows you to paste into TextEdit as rich text. You can also specify the font sizes withthis option: -f <char size, info size>

Searching by Description

clui can also search descriptions for multiple words and phrases. In this example I’ll search for magic, castle, and “clock face” using the -Sd (search descriptions) option. If I had searched just for clock I’d have also gotten hits for “clockwise arrows” since it search for substrings.

Searching by Character

Now, if you search for the usage of a single alphabetical character you’ll probably get one hit but macOS also has a database of “related characters” which are similar look-alike letters. You know, like the Subject lines of spam: “𝔅𝗢𝔾𝕆 𝐒𝖆𝓵𝙚 ‼”. Let’s use -SC to search for "a" plus related characters. I’ve trimmed the output to get some of the more interesting characters in this screenshot

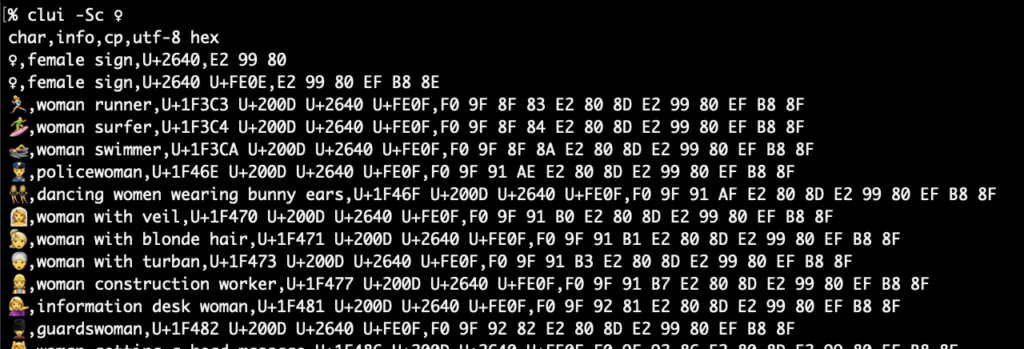
When you start searching for symbols you’ll start discovering Emojis constructed using existing symbols and zero-width joiners (ZWJ, U+200D), these are called ZWJ Sequences (and ZWJ is apparently pronounced “zwidge”) . Let’s use -Sc to search for anything with the female sign ♀.

Let’s examine “woman surfer” (BTW: 100 Foot Wave Season 2 is awesome!) with the -X option to expand all component code points with the complete glyph as-is at the top:

The first line has the Emoji sequence as-is, then each individual component that comprises it: a gender neutral surfer (U+1F3CF), a ZWJ (U+200D), the female sign (U+2640), and variation selector 16 (U+FE0F). You may also notice one of the quirks of Terminal: Sometimes pasted input does not fully render as a unified Emoji!

Fitzpatrick Modifiers for Skin Color

To be honest I’d never heard of the Fitzpatrick scale before working on clui! It’s simply a scale of 6 types of skin color. The Unicode modifier combines Types 1 & 2 into U+1F3FB. Let’s demonstrate a search by description and then again with their ranges. Simply specify the range using standard Unicode notiation U+hhhhh with a hyphen in between.

If you search for an Emoji with a Fitzpatrick Modifier you won’t get a hit in the databases. As a convenience clui will detect this and remove the modifier to get the description. Using the -F will also display the sequence without the modifier. We can combine it with -X for expanded output with a a summary.

As you can see the sequence without the modifier is shown, then the original sequence with the Fitzpatrick modifier then each component part: surfer, Fitzpatrick modifier type-6, a ZWJ, female sign, and a variation selector.

On Variation Selectors

To be honest I’d never known about variation selectors before working on this, more info on Emoji Presentation Sequences can be found here. The two most common variation selectors are pretty easy to understand: U+FE0E is “variation selector 15” and it is used to explicitly specify the text/non-graphic version and U+FE0F, “variation selector 16” gives you the emoji/graphic version. Watch (U+231A) is a good example of this. It’s at the discretion of the OS on how to render a glyph. In this case U+231A is rendered in the emoji style of an Apple Watch⌚️by default. When combined with U+FE0E, it turns into ye olde Mac OS watch ⌚︎, this is the “text version”. Adding U+FE0F does nothing to change the appearance since it was already rendered in the emoji style without it.

If you’d like to search for every character with a variation selector that is tracked in macOS’s database, you can run this query: clui -Sc U+FE0E U+FE0F A definitive list can be found here.

Encoding Options

So far we’ve just seen the default uppercase hexadecimal (-Eh) UTF-8 encoding. In the vein of shef, clui can output in various styles of encoding: \x hex escapes (-Ex), octal \nnn (-Eo), leading zero octal \0nnn (-E0), UTF-16 Javascript encoding (-u) and zsh style UTF-32 \U code points (-EU).

Surfing safari, encoding party! 🤙

Formatting output

Besides the beautiful RTF output and functional CSV output, clui can also output characters simply space delimited, without any other data (-Oc).

JSON (-Oj) and JSON Sequences (-OJ) can be had as well. The difference between JSON and JSON Sequence is that JSON will be an array of objects, whereas JSON Sequences are JSON objects delimited with U+1E the “record separator” as ASCII calls it or “information separator two” as Unicode knows it to be and newlines. Both jq and jpt can handle JSON sequneces.

JSON (-Oj)
JSON Sequence (-OJ)

Lastly we have YAML (-Oy) the superset cousin of JSON. My JSON string encoder jse gets some use in clui to encode strings and descriptions for these output modes.

YAML, cousin of JSON

Making it work for you (and me)

I spent a lot of time trying to make clui work in an intuitive way, it replicates the core features of Character Viewer with plenty of bonus functionality thrown in. It may not be something you use daily, but it might come in handy when you get an email from let’s say, tim@аррlе.com. You could run that string through clui in “expand” mode (-x) to analyze on each letter in the string. You might be surprised and perhaps disappointed that perhaps “Tim Apple” did not send you that email.

Cyrillic look-a-likes! 🔎

Or maybe you’d like to figure out the secrets of Zalgo Text or perhaps what characters are in ¯\_(ツ)_/¯ or make a catalog of Emoji in RTF: clui can do it! Head on over to the clui Github page and download the Release if you’d like to try it out on your (Monterey+) Mac, thanks!

Bonus

Since you made it down here, how about a one-liner that will create RTFs of all the Unicode categories? It will likely take several hours and will open a Finder window when finished.

#make RTFs of every Unicode category, this might take a few hours, if you want to cancel close the Terminal window
mkdir ~/Desktop/clui-rtfs; cd ~/Desktop/clui-rtfs; IFS=$'\n'; for category in $(clui -LC | grep Unicode,); do clui -Or -C "$category" > "$category.rtf"; done; open -R .

Avoid Unicode Mangling in Jamf with shef

Computers are “the equivalent of a bicycle for our minds” as Steve Job once said. Sure enough, like a bicycle, they also require maintenance! Sometimes that requires soliciting the user to take action. Asking at the right time is very important (see my post Don’t Be a Jerk) and so is brevity. I’ve found a sprinkling of emoji and other symbols can help your message cut through the noise. A bright red stop sign 🛑 can convey its meaning with only a glance, especially for non-native speakers of your language. Your tooling however, may trip you up and mangle your text.

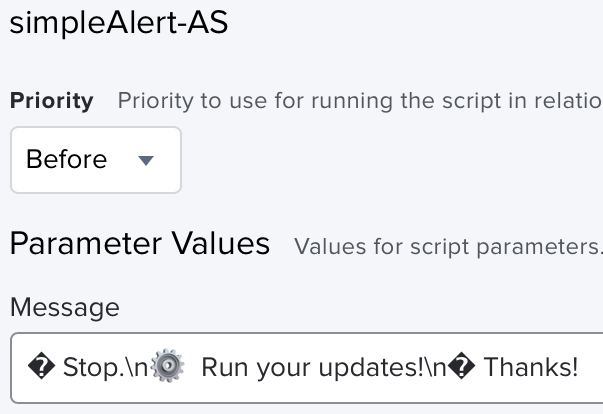
While AppleScript, Swift Dialog and JamfHelper can all handle Unicode, Jamf databases tables by default do not support 4-byte Unicode! I touched on this in my post: jpt 1.0 text encoding fun. While the database engine might support it, chances are your tables are Latin1 which top out at 3-byte UTF-8 encoded characters. 4-byte characters get mangled. Let’s take a look at this in action:

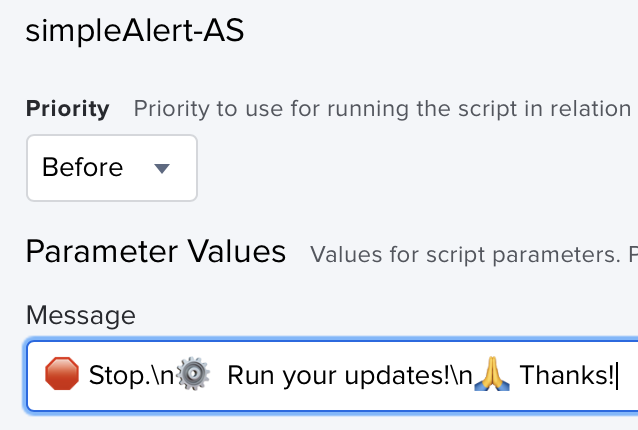
Looks good while editing…
Once saved, the mangling is clear

Only the gear makes it through because it’s actually two 3-byte characters (U+2699 ⚙ gear plus variation selector U+FE0F) but who has time to check which one is which? How about an encoding tool written in shell, that allows you to escape and format Unicode for shell scripts and/or Jamf script parameters that can make it through unscathed and un-mangled? Sound good? Great! I present shef, the Shell Encoder and Formatter!

Give it some text, specify an encoding scheme and/or quoting style and out comes your string ready for use! You can put the resulting string in your script as a variable or as a script parameter in a Jamf policy depending on quoting options. I’ve done the hard work of finding the various ways to escape special characters for shell and made this handy script for you!

shef Examples

First, let’s make a simple script for Jamf that processes the output of shef. I’ve chosen AppleScript so you can play along at home even if you don’t have Jamf installed, this can also be applied to “wrapper scripts” that leverage other tools like Swift Dialog or JamfHelper. At it’s heart is the simple technique of encoding the input with shef then decoding it in the script before presentation. If you use bash use echo -e if you use sh or zsh then just echo will work, it’s that simple. Our example script simpleAlert-AS.sh, keeps things small and as minimal as possible but keep in mind my fuller-featured tool shui for more robust scripts where you may need text or password entry, file picking, etc. without external dependencies but don’t want to bother learning AppleScript.

#!/bin/bash
#simpleAlert-AS - Copyright (c) 2023 Joel Bruner (https://github.com/brunerd)
#Licensed under the MIT License

#Simple Applescript alert dialog for Jamf - just a title, a message and an OK button
#Accepts hex (\xnn) and octal (\0nnn) escaped UTF-8 encoded characters (since the default Jamf db character set mangles 4 byte Unicode)
#Use shef to encode your strings/files for use in this script: https://github.com/brunerd/shef

#function to interpret the escapes and fixup characters that can screw up Applescript if unescaped \ and "
function interpretEscapesFixBackslashesAndQuotes()(echo -e "${@}" | sed -e 's/\\/\\\\/g' -e 's/"/\\"/g')

function jamflog(){
	local logFile="/var/log/jamf.log"
	#if we cannot write to the log or it does not exist, unset and tee simply echoes
	[ ! -w "${logFile}" ] && unset logFile
	#this will tee to jamf.log in the jamf log format: <Day> <Month> DD HH:MM:SS <Computer Name> ProcessName[PID]: <Message>
	echo "$(date +'%a %b %d %H:%M:%S') ${myComputerName:="$(scutil --get ComputerName)"} ${myName:="$(basename "${0}" | sed 's/\..*$//')"}[${myPID:=$$}]: ${1}" | tee -a "${logFile}" 2>/dev/null
}


#process our input then escape for AppleScript
message=$(interpretEscapesFixBackslashesAndQuotes "${4}")
title=$(interpretEscapesFixBackslashesAndQuotes "${5}")
#could be a path or a built-in icon (stop, caution, note)
icon="${6}"
#invoke the system open command with this argument (URL, preference pane, etc...)
open_item="${7}"

#these are the plain icons (Applescript otherwise badges them with the calling app)
case "${icon}" in
	"stop") icon="/System/Library/CoreServices/CoreTypes.bundle/Contents/Resources/AlertStopIcon.icns";;
	"caution") icon="/System/Library/CoreServices/CoreTypes.bundle/Contents/Resources/AlertCautionIcon.icns"
		#previous icon went away in later macOS RIP
		[ ! -f "${icon}" ] && icon="/System/Library/CoreServices/Problem Reporter.app/Contents/Resources/ProblemReporter.icns";;
	"note") icon="/System/Library/CoreServices/CoreTypes.bundle/Contents/Resources/AlertNoteIcon.icns";;
esac

#make string only if path is valid (otherwise dialog fails)
if [ -f "${icon}" ]; then
	withIcon_AS="with icon file (POSIX file \"${icon}\")"
fi

jamflog "Prompting user: $(stat -f %Su /dev/console)"

#prompt the user, giving up and moving on after 1 day (86400 seconds)
/usr/bin/osascript <<-EOF
activate
with timeout of 86400 seconds
	display dialog "${message}" with title "${title}" ${withIcon_AS} buttons {"OK"} default button "OK" giving up after "86400"
end timeout
EOF

if [ -n "${open_item}" ]; then
	jamflog "Opening: ${open_item}"
	open "${open_item}"
fi

exit 0

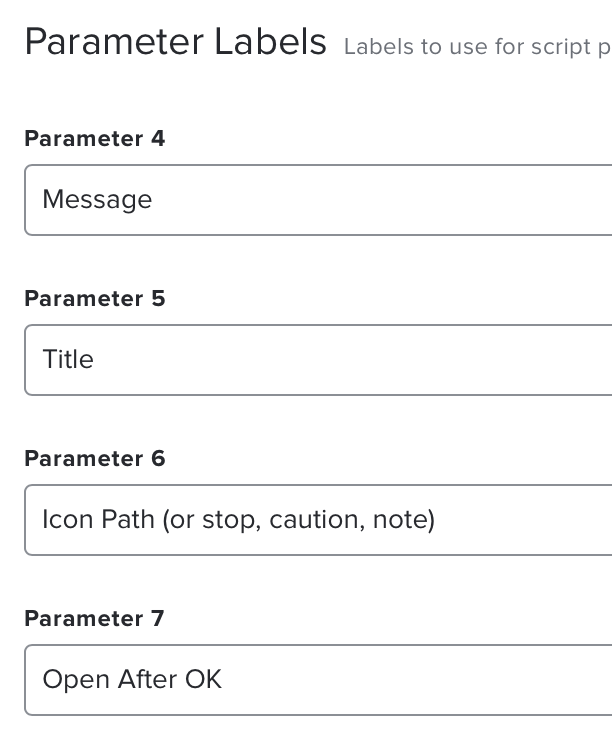
Upload the above script to your Jamf (if you have one), label parameters 4, 5, 6, and 7 as: Message, Title, Icon Path, an Open After OK, respectively. If running local keep this in mind and put 1, 2, 3 as place holder arguments for the first three parameters.

Jamf Script parameters names for

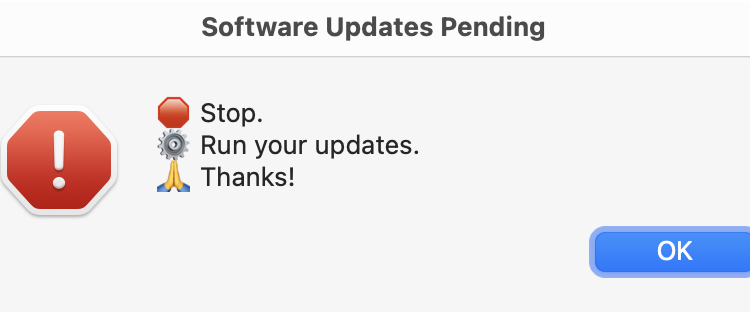
Let’s come up with an example message for our users. How about the common refrain coming from MacAdmins around the world:

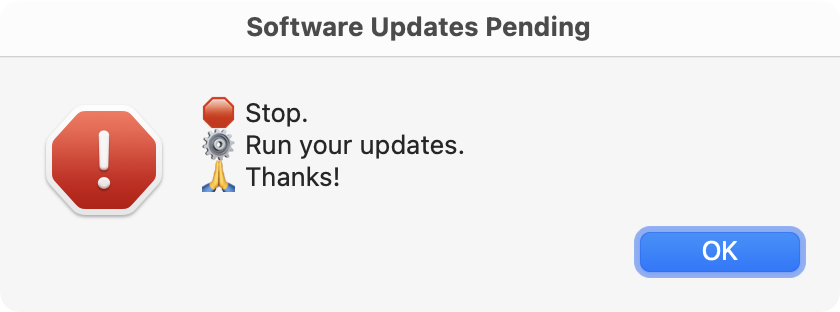
🛑 Stop.
⚙️ Run your updates.
🙏 Thanks!

Now if I tried to pass this text to a script within a Jamf policy, all those emoji would get mangled by Jamf as we saw above. Let’s use shef to encode the string for Jamf:

% shef <<'EOF'
heredoc> 🛑 Stop.
heredoc> ⚙️ Run your updates.
heredoc> 🙏 Thanks!
heredoc> EOF
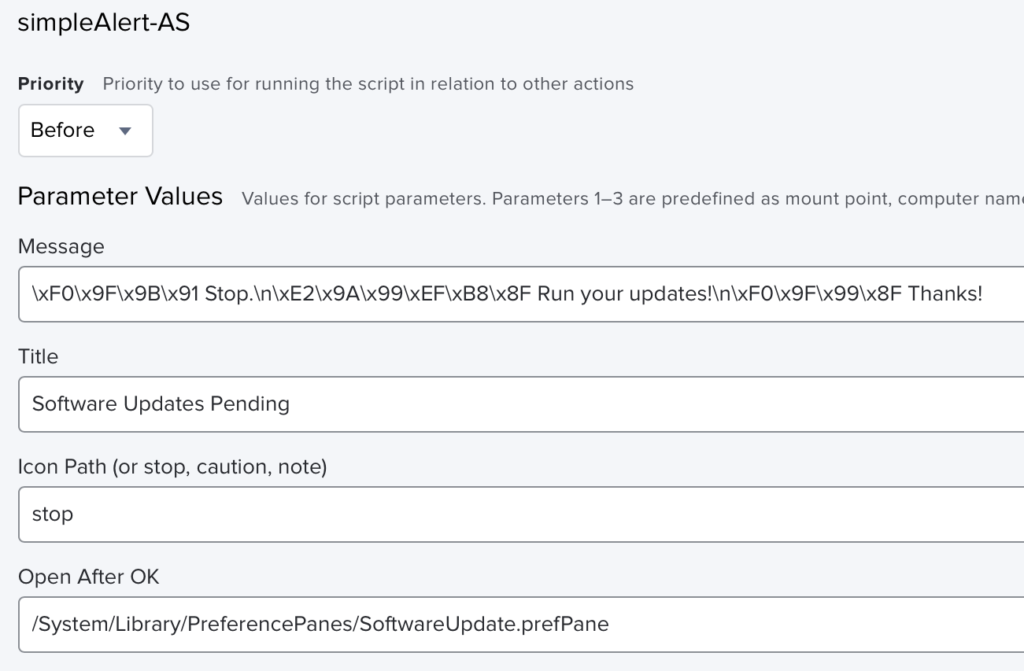
\xF0\x9F\x9B\x91 Stop.\n\xE2\x9A\x99\xEF\xB8\x8F Run your updates.\n\xF0\x9F\x99\x8F Thanks!

For the example above I am using a “here-doc”; in practice you can simply supply shef a file path. The output encodes all the newlines in the ANSI-C style of \n and the emoji have all been replaced by their UTF-8 encodings using the hexadecimal escaping of \x. We can take this output and use it in our Jamf policy. The message will get through both textually and symbolically. As an additional feature bonus I added a simple open action in the script. Supply the file path to the Software Update panel and after the user clicks OK, it will be opened. Scope a policy like this to anyone with pending updates with Daily frequency:

Escape the mangling in Jamf!

If you are just running the script locally and calling from the Terminal you’ll want to specify a quoting option. Exclamations are tricky and shells usually love to interpret trailing exclamations as a history expansion command, shef does its best to avoid this:

bash-3.2$ shef -Qd <<'EOF'
> 🛑 Stop.
> ⚙️ Run your updates.
> 🙏 Thanks!
> EOF
"\xF0\x9F\x9B\x91 Stop.\n\xE2\x9A\x99\xEF\xB8\x8F Run your updates.\n\xF0\x9F\x99\x8F Thanks"\!""

bash-3.2$ ./simpleAlert-AS.sh 1 2 3 "\xF0\x9F\x9B\x91 Stop.\n\xE2\x9A\x99\xEF\xB8\x8F Run your updates.\n\xF0\x9F\x99\x8F Thanks"\!"" "Software Updates Pending" stop "/System/Library/PreferencePanes/SoftwareUpdate.prefPane"
Our un-mangled output

Stop the Mangling Madness!

Wrapping things up: use shef to encode strings with Unicode so they survive storage in Jamf’s Latin1 encoded db tables. shui my fuller featured AppleScript dialog tool is ready to accept shef encoded strings. You can also use shef minify your text for your shell script. In fact, I used it to encode the help text file down to a single quoted line for use within itself. That’s 1 happy customer and counting, hope you find it useful too!

Determining eligible macOS versions via script

Every year Mac admins wonder which Macs will make the cut for the new MacOS. While it’s no mystery which models those are, if you’ve got Jamf you’ll be wondering how to best scope to those Macs so you can perhaps offer the upgrade in Self Service or alert the user to request a new Mac! One way to scope a Smart Group is with the Model Identifier criteria and the regex operator, like this one (I even chipped in!). It doesn’t require an inventory and results are near instant. Before I was any good at regex though, I took another route and made an Extension Attribute macOSCompatibility.sh, where the Mac reports back to Jamf. (It also has a CSV output mode for nerdy fun!) Both methods however require manual upkeep and are now somewhat complicated by Apple’s new use of the very generic Macxx,xx model identifier which doesn’t seem to follow the usual model name and number scheme of major version and minor form factor variants (on purpose me-thinks!). Let’s look at some new methods that don’t require future upkeep.

Using softwareupdate –list-full-installers

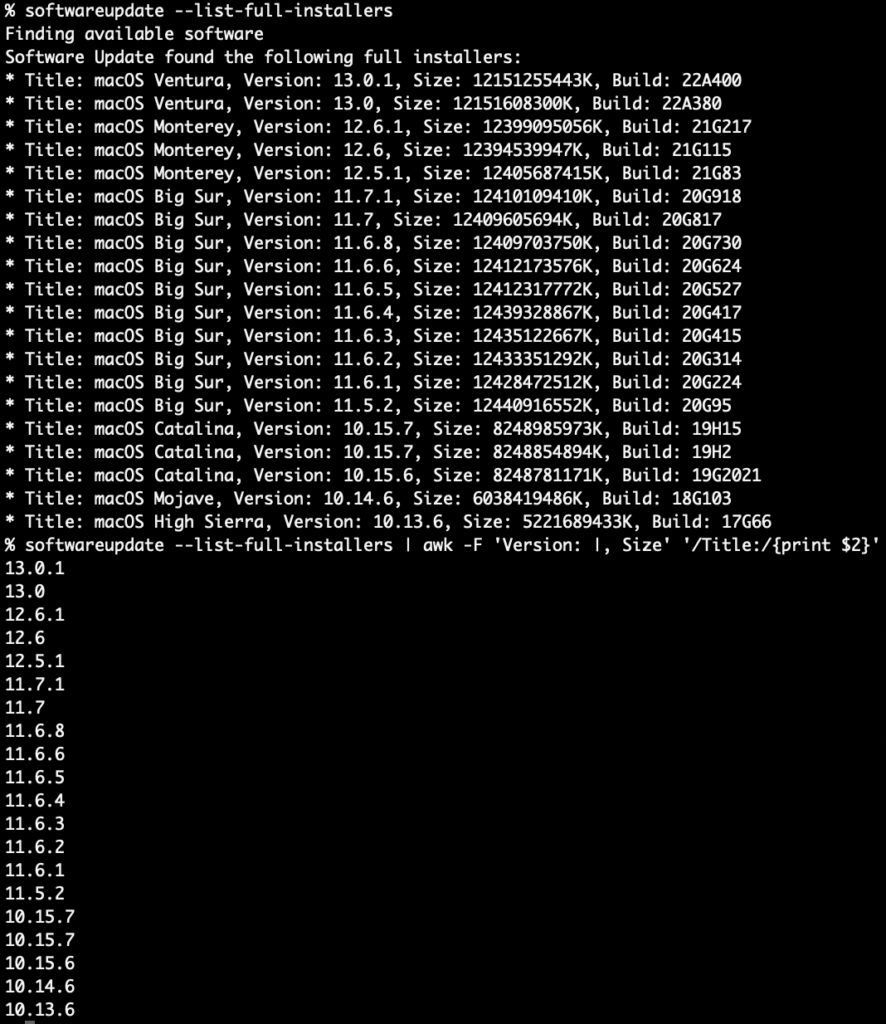
macOS Big Sur (11) introduced a new command softwareupdate --list-full-installers which shows all eligible installers available for download by the Mac running that command. The funny thing about this is that even though it is a Big Sur or newer feature, if the hardware is old enough, like a 2017, it offer versions all the way back to 10.13 High Sierra! Monterey added build numbers to the output and it can be easily reduced to just versions with awk:

softwareupdate --list-full-installers | awk -F 'Version: |, Size' '/Title:/{print $2}'

This one-liner can be made into a simple function. I’ve added a uniq at the end for case where two differing builds have the same version, like 10.15.7. Here’s that function in a script with a little version check: getSupportedMacOSVersions_SWU.sh

#!/bin/sh
: <<-LICENSE_BLOCK
getSupportedMacOSVersions_SWU - Copyright (c) 2022 Joel Bruner
Licensed under the MIT License
LICENSE_BLOCK

function getSupportedMacOSVersions_SWU()( 
#getSupportedMacOSVersions_SWU - uses softwareupdate to determine compatible macOS versions for the Mac host that runs this
	if [ "$(sw_vers -productVersion | cut -d. -f1)" -lt 11 ]; then echo "Error: macOS 11+ required" >&2; return 1; fi
	#get full installers and strip out all other columns
	softwareupdate --list-full-installers 2>/dev/null | awk -F 'Version: |, Size' '/Title:/{print $2}' | uniq
)

getSupportedMacOSVersions_SWU 
Output from Apple Silicon will never include 10.x versions

Software Update (SWU) Based Extension Attribute for Jamf

The possible inclusion of 10.x versions in the output complicates things a bit. In ye olden OS X days, the “minor version” (after the first period) acted more like the major versions of today! Still it can be done, and we will output any macOS 10.x versions, as if they are major versions like macOS 11, 12, 13, etc. Here’s getSupportedMacOSVersions-SWU-EA.sh

#!/bin/sh
: <<-LICENSE_BLOCK
getSupportedMacOSVersions-SWU-EA (Extension Attribute) - Copyright (c) 2022 Joel Bruner
Licensed under the MIT License
LICENSE_BLOCK

function getSupportedMacOSVersions_SWU()( 
#getSupportedMacOSVersions_SWU - uses softwareupdate to determine compatible macOS versions for the Mac host that runs this
	#[ "$(sw_vers -productVersion | cut -d. -f1)" -lt 11 ] && return 1
	if [ "$(sw_vers -productVersion | cut -d. -f1)" -lt 11 ]; then echo "Error: macOS 11+ required" >&2; return 1; fi
	#get full installers and strip out all other columns
	softwareupdate --list-full-installers 2>/dev/null | awk -F 'Version: |, Size' '/Title:/{print $2}'
)

#get our version
all_versions=$(getSupportedMacOSVersions_SWU)

#depending on the model (2020 and under) we might still get some 10.x versions 
if grep -q ^10 <<< "${all_versions}" ; then versions_10=$(awk -F. '/^10/{print $1"."$2}' <<< "${all_versions}")$'\n'; fi
#all the other major versions
version_others=$(awk -F. '/^1[^0]/{print $1}' <<< "${all_versions}")

#echo without double quotes to convert newlines to spaces
echo "<result>"$(sort -V <<< "${versions_10}${version_others}" | uniq)"</result>"
The venerable 2017 MacBook Pro has quite a span

Now if you wanted to make a Jamf Smart Group for those that could run macOS 13 you wouldn’t want to match 10.13 by accident. You could comment out the line in the script that matches versions beginning with ^10 or you could enclose everything in double quotes for the echo on the last line, so the newlines remained or you could use regex to match ([^.]|^)13 that is: not .13 or if the hardware is so new ^13 is at the very beginning of the string. As 10.x capable hardware fades away such regex sorcery shouldn’t be needed.

Using the Apple Software Lookup Service

“What’s the Apple Software Lookup Service?!”, you may be asking? I myself asked the same question! It’s a highly available JSON file that MDM servers can reference. If softwareupdate is acting up or hanging (and it’s been known to do so!), you have all you need in this JSON file to do a little sanity checking of softwareupdate too if you’d like. The URL is found in the Apple MDM Protocol Reference and it contains versions, models and their compatibility.

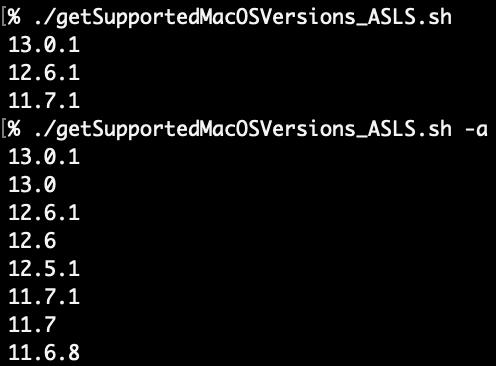
This method has far fewer patch and point versions than the softwareupdate method above and the OSes start with Big Sur (11). No 10.x versions are in the ASLS. There are two “sets” in ASLS, PublicAssetSets, which has only the newest release of each major version and AssetSets which has additional point releases (use the -a option for this one). plutil has quirky (IMO) rules for what it will and will not output as json but the raw output type can get around. It was introduced in Monterey and it can also be used to count array members, it’s goofy but manageable. Richard Purves has an article on that here. The code is generously commented, so I won’t expound upon it too much more, here’s getSupportedMacOSVersions_ASLS.sh

#!/bin/sh
: <<-LICENSE_BLOCK
getSupportedMacOSVersions_ASLS - Copyright (c) 2022 Joel Bruner
Licensed under the MIT License...
LICENSE_BLOCK

function getSupportedMacOSVersions_ASLS()( 
#getSupportMacOSVersions - uses Apple Software Lookup Service to determine compatible macOS versions for the Mac host that runs this
#  Options:
#  [-a] - to see "all" versions including prior point releases, otherwise only newest of each major version shown

	if [ "${1}" = "-a" ]; then
		setName="AssetSets"
	else
		setName="PublicAssetSets"
	fi

	#get Device ID for Apple Silicon or Board ID for Intel
	case "$(arch)" in
		"arm64")
			#NOTE: Output on ARM is Device ID (J314cAP) but on Intel output is Model ID (MacBookPro14,3)
			myID=$(ioreg -arc IOPlatformExpertDevice -d 1 | plutil -extract 0.IORegistryEntryName raw -o - -)
		;;
		"i386")
			#Intel only, Board ID (Mac-551B86E5744E2388)
			myID=$(ioreg -arc IOPlatformExpertDevice -d 1 | plutil -extract 0.board-id raw -o - - | base64 -D)
		;;
	esac	

	#get JSON data from "Apple Software Lookup Service" - https://developer.apple.com/business/documentation/MDM-Protocol-Reference.pdf
	JSONData=$(curl -s https://gdmf.apple.com/v2/pmv)

	#get macOS array count
	arrayCount=$(plutil -extract "${setName}.macOS" raw -o - /dev/stdin <<< "${JSONData}")

	#look for our device/board ID in each array member and add to list if found
	for ((i=0; i<arrayCount; i++)); do
		#if found by grep in JSON (this is sufficient)
		if grep -q \"${myID}\" <<< "$(plutil -extract "${setName}.macOS.${i}.SupportedDevices" json -o - /dev/stdin <<< "${JSONData}")"; then
			#add macOS version to the list
			supportedVersions+="${newline}$(plutil -extract "${setName}.macOS.${i}.ProductVersion" raw -o - /dev/stdin <<< "${JSONData}")"
			#only set for the next entry, so no trailing newlines
			newline=$'\n'
		fi
	done

	#echo out the results sorted in descending order (newest on top)
	sort -rV <<< "${supportedVersions}"
)

#pass possible "-a" argument
getSupportedMacOSVersions_ASLS "$@"
PublicAssetSets (top) vs. AssetSets (bottom)

The fact that this method requires Monterey for the plutil stuff didn’t agree with me, so I made a version that uses my JSON power tool (jpt) so it will work on all earlier OSes too. It’s a tad large (88k) but still runs quite fast: getSupportedMacOSVersions_ASLS-legacy.sh

Just as with the softwareupdate based function, the same can be done to reduce the output to only major versions and since it is v11 and up, a simple cut will do!

#major versions only, descending, line delimited
getSupportedMacOSVersions_ASLS | cut -d. -f1 | uniq

#major versions only ascending
echo $(getSupportedMacOSVersions_ASLS | cut -d. -f1 | sort -n | uniq)

ASLS Based Extension Attribute

The Apple Software Lookup Service (ASLS) JSON file itself doesn’t care what version of macOS a client is on, but the methods in plutil to work with JSON aren’t available until Monterey. So here’s the ASLS based Extension Attribute a couple ways: getSupportedMacOSVersions-ASLS-EA.sh and getSupportedMacOSVersions-ASLS-legacy-EA.sh both get the job done.

Same. Same.

Bonus Methods for Determining Board ID and Device ID

The ASLS method requires either the Board ID or the Device ID and in a way that worked across all macOS versions and hardware architectures. I’ve updated my gist for that (although gists are a worse junk drawer than a bunch of scripts in a repo if only because it’s hard to get an overall listing) and here’s a few callouts for what I came up with

#DeviceID - ARM, UNIVERSAL - uses xmllint --xpath
myDeviceID=$(ioreg -arc IOPlatformExpertDevice -d 1 | plutil -extract 0.IORegistryEntryName xml1 -o - - | xmllint --xpath '/plist/string/text()' - 2>/dev/null)
#DeviceID - ARM, macOS 12+ only, uses plutil raw output
myDeviceID=$(ioreg -arc IOPlatformExpertDevice -d 1 | plutil -extract 0.IORegistryEntryName raw -o - -)
#NOTE: Different output depending on platform! 
# ARM gets the Device ID - J314cAP
# Intel gets the Model ID - MacBookPro14,3

#Board ID - Intel ONLY, Mac-551B86E5744E2388
#Intel, UNIVERSAL - uses xmllint --xpath
myBoardID=$(ioreg -arc IOPlatformExpertDevice -d 1 | plutil -extract 0.board-id xml1 -o - - | xmllint --xpath '/plist/data/text()' - | base64 -D)
#Intel, macOS 12+ only - uses plutil raw output 
myBoardID=$(ioreg -arc IOPlatformExpertDevice -d 1 | plutil -extract 0.board-id raw -o - - | base64 -D)

Wrapping Up

This was all really an excuse to play around with the Apple Software Lookup Service JSON file, what can I say! And not just to plug jpt either! It was fun to use the new plutil raw type too (is fun the right word?) and “live off the land”. Be aware that the newest macOS version only appears once it’s publicly released, so keep that in mind when scoping. You can still keep scoping in Jamf via Model Identifier Regex or by my older extension attribute just keep in mind you’ll need to update them yearly. Whereas, these newer EAs based on either softwareupate (getSupportedMacOSVersions-SWU-EA.sh) or ASLS (getSupportedMacOSVersions-ASLS-EA.sh, getSupportedMacOSVersions-ASLS-legacy-EA.sh) should take care of themselves into the future.

Detecting and affecting Lockdown Mode in macOS Ventura

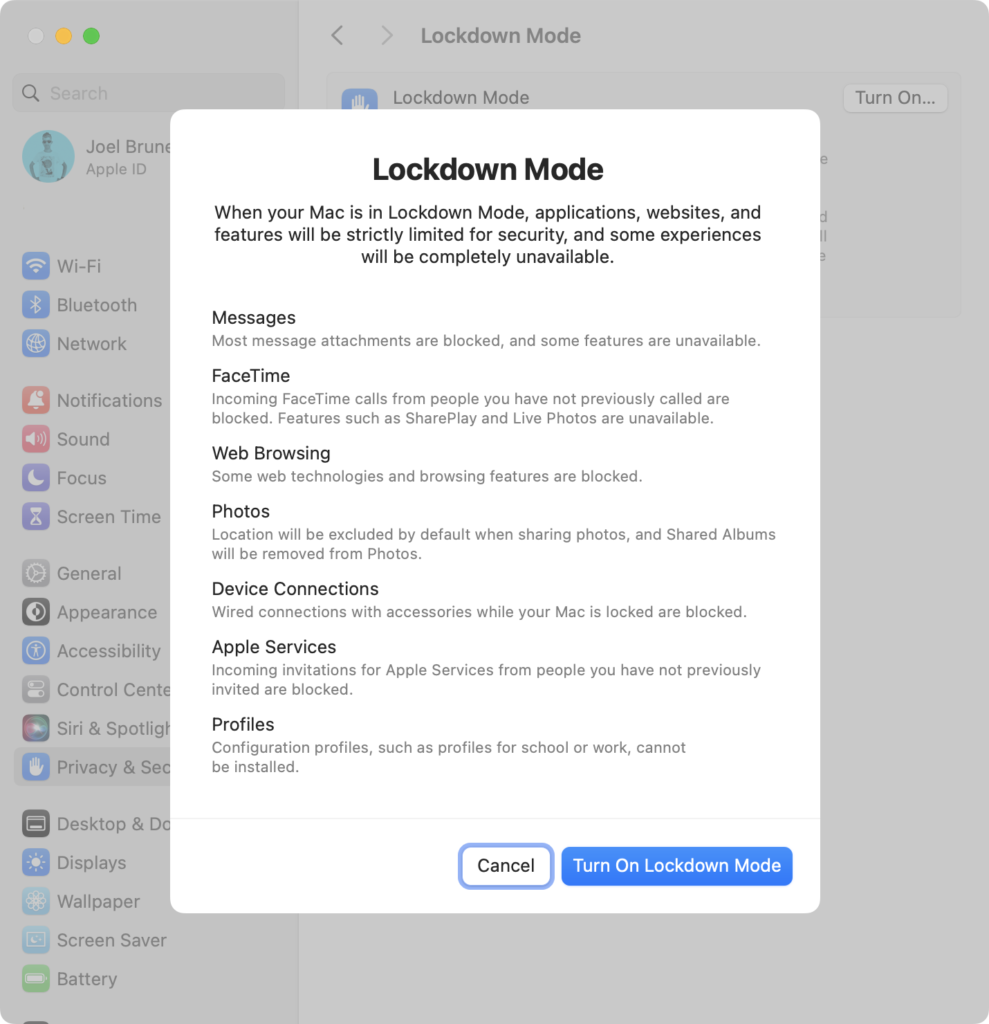
Lockdown mode is new feature for macOS Ventura and for many MacAdmins we’ve been wondering how to detect this state. Why? Lockdown mode affects how macOS and Mac apps behave. This is something a helpdesk might like to know when trying to troubleshoot an issue. Also, due to some ambiguous wording by Apple, they made it seem like MDM Config Profiles could not be installed at all when in Lockdown mode, however this is not always the case. The hunt was on!

Detecting Lockdown Mode

I was looking everywhere last week: ps process lists, nvram, system_profiler, kextstat, launchctl, sysdiagnose, a defaults read dump, etc. I was looking high and low for “lock” “down” and “mode” and I got a hit in the com.apple.Safari domain in the sandboxed ~/Library/Containers/Safari path. While it turns out that Safari will in some cases write the button label LockdownModeToolbarIdentifier to that pref domain, it requires Safari to be launched and for the toolbar to be in non-default layout, otherwise the label name is never written! So that was a dead end.

Then a little birdie on MacAdmins pointed me in the right direction and blogged about it and wrote a Jamf extension attribute! 😅 Turns out I had missed the value sitting at the top of the defaults read dump! (d’oh) It was there the whole time in .GlobalPreferences, I just hadn’t done a diff like I should have! That would have revealed the key uses the LDM acronym/mnemonic: LDMGlobalEnabled Funnily enough, when I searched for this key on Google I got 5 hits and all of them for iOS, like this one at the Apple dev forums. However they were all about Swift and iOS, here’s how to do it in shell for the current user:

defaults read .GlobalPreferences.plist LDMGlobalEnabled 2>/dev/null

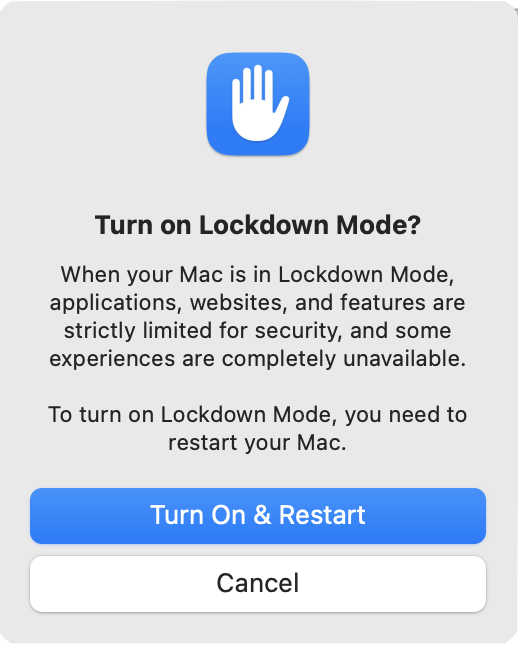
It’s a boolean value, that will not exist if Lockdown mode has never been enabled, when enabled it will report 1 from defaults and when disabled the key will remain and report 0. What stands out is that this is a per-user preference. Since it makes you reboot I had supposed it was a system-wide setting but sure enough if you log out and into another user, Lockdown mode is disabled. Perhaps that makes sense but I’m not quite sure about that?

Affecting Lockdown Mode

This totally blew me away: You can enable and disable macOS Lockdown mode by writing to your .GlobalPreferences preference domain!

#turn lockdown mode off
defaults write .GlobalPreferences.plist LDMGlobalEnabled -bool false
#turn lockdown mode on
defaults write .GlobalPreferences.plist LDMGlobalEnabled -bool true

That’s right, it’s not written to a rootless/SIP protected file like TCC.db! Just run the command as the user and it’ll turn toggle the behavior for most things. Here’s some details of my findings:

  • Configuration profiles – a restart of System Settings is not required, it will prohibit the manual installation of a .mobileconfig profile file. When Apple says “Configuration profiles can’t be installed” this is what they mean: User installed “double-click” installations of .mobileconfig files cannot be done. When they say “the device can’t be enrolled in Mobile Device Management or device supervision while in Lockdown Mode”, this only applies to these user-initiated MDM enrollments using a web browser that downloads .mobileconfig files. Lockdown mode does not prohibit enrollment into MDM that’s assigned via Apple Business Manager (ABM/DEP). You can initiate enrollment with the Terminal command: sudo profiles renew -type enrollment A Mac in Lockdown mode will be able to successfully enroll into an MDM assigned by ABM. Once enrolled, new Config Profiles can also be installed via that same MDM, even in Lockdown Mode.
  • Messages – a restart of Messages is not required, all messages will be blocked immediately, attachments or not. I’m not sure if that’s a bug or not since Apple only mentions attachments, not plain messages. It does not matter if the sender is in your Contacts or whether you have initiated contact with them before (like in Facetime). Messages will be delivered to any other devices not in Lockdown mode. If Lockdown mode is turned off, those blocked messages may be delivered if sent recently enough but will appear out of sequence. For example, a device that never had Lockdown Mode turned on would see messages: 1,2,3,4,5 while a device that turns it on and then off would see: 1,2,5,3,4
  • Facetime – restart not required, it will immediately begin blocking calls from anyone you have not called previously from that device. Unlike Messages though, it will show a Notification of the blockage.
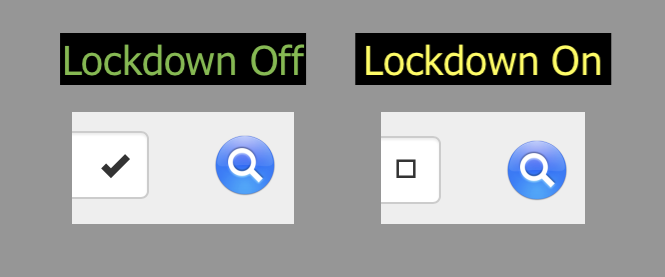
  • Safari – app restart required. This differs from everything else, however Safari also gives the best visual indications that Lockdown mode is enabled! On the Start Page you’ll see “Lockdown Ready”, once at at website you’ll likely see “Lockdown Enabled” unless you’ve uncheck Enable Lockdown Mode in the top menubar SafariSettings for <site>… in which case you’ll see “Lockdown Off” in red.
Safari’s Lockdown Mode Toolbar states
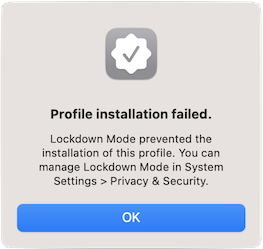
  • Safari – Another subtle visual cue of Lockdown mode, that aligns with Apple’s “web fonts might not be displayed” guidance, can be seen on a Jamf user-initiated MDM enrollment screen, instead of a check mark you’ll see a square, take heed and turn back now! Since once you get the .mobileconfig files and fumble your way to System SettingsPrivacy & Security, scroll to the bottom of the list to Profiles (UX gripe: it used to just open the dang panel when you double clicked on them!) you’ll be blocked from installing it as seen above.
  • System Settings – an app restart is required for Privacy & Security to reflect the current state of LDMGlobalEnabled, if it was on and you disable via defaults once you launch System Settings again, it’ll let you turn it back on with a reboot and everything!

Wrapping Up

I didn’t try out the other lockdown mode behaviors for things like new Home management invitations or Shared Albums in Photos. Still it’s quite surprising that despite the System Settings GUI making you reboot to turn it on, Lockdown mode is a per-user setting that can seemingly be enabled and disabled dynamically with a simple defaults command run by the user. With the exception of Safari and System Settings it does not require Messages and Facetime to restart! There might be other caveats, it’s hard to tell. Perhaps this is all in the realm of “works as designed” for Apple but when you, the customer, don’t know what that exact design is, it can be quite a surprise!

Update: Looks like they started explaining a bit more about what happens when you enabled Lockdown Mode in macOS Sonoma

One more (unrelated) thing…

Update: As of Dec 13, 2022 Bug 174931 – Implement RegExp lookbehind assertions has been marked “Resolved” and the extensive pull request has all the gory details of the extensive refactoring that was done to implement this. 🎉 Thanks Michael Saboff! 🙏 Now when this will make it into Safari…. we’ll see.

Update 2: Safari 16.4, released March 27, 2023, now supports RegExp lookbehind assertions!

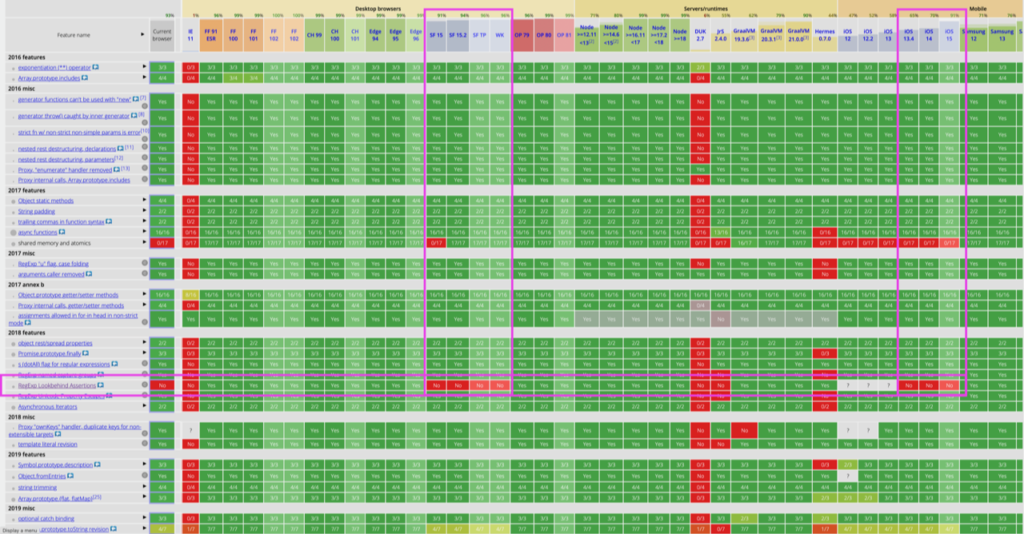
Since this post might get a few eyeballs, I’d also like to shine a light on the perplexing fact that Safari is the only browser that still doesn’t support the four year old ES2018 feature of RegExp lookbehind assertions?! I mean, sure it was a Google engineer who kindly filed this heads up to the WebKit team back in July of 2017 when it was a draft and a full year before it was ratified (Bug 174931 – Implement RegExp lookbehind assertions) but even a silly corporate rivalry couldn’t explain the seeming obstinance in letting this feature languish. I don’t get it, it just doesn’t make sense! There’s a nicely visualized page of where things stand and Safari is keeping company with IE 11 on this one.

Make these red islands green, Apple!

So take a look at the comments on the WebKit bug, some are quite funny, others just spot on, and there’s even one from yours truly. Perhaps add your own? Maybe when a bug gets 100 comments something special happens and we all get cake? 🎂

Determining Adobe Creative Cloud sign-in status on a Mac

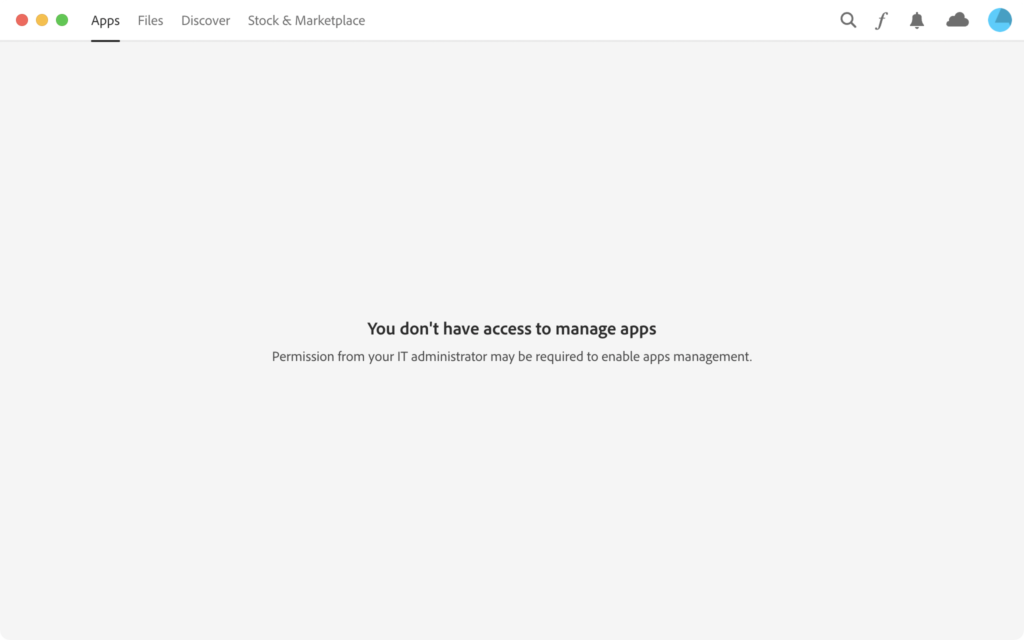
Adobe Creative Cloud app can get in weird state that blocks users from seeing their apps.

The official solution from Adobe is to delete the file /Library/Application Support/Adobe/OOBE/Configs/ServiceConfig.xml and “restart” Adobe CC, however in the real world you need to sign out and sign back in for the fix to take effect. The folks in the Adobe forums also found that you can change the value of the AppsPanel key from false to true and that does the trick too. Either way it still requires the user to sign-out of Adobe CC and back in.

Now, if you are a MacAdmin with a script that either deletes or modifies ServiceConfig.xml, you will ideally tell the user to Sign Out of Creative Cloud for the fix to take effect. Wouldn’t it be nice to be able to check they’ve done so and prompt them appropriately (or not)? For sure, right!?

There’s a per-user file with ideal behavior, that gets created upon sign-in and removed upon sign out: ~/Library/Application Support/Adobe/Creative Cloud\ Libraries/LIBS/librarylookupfile While its presence shouldn’t be taken as absolute proof that the sign-In is valid, it can be helpful when you need to alert the user what their next steps are. Here’s a simple example that just echoes out the status:

#!/bin/bash
#consoleHasAdobeCCSignIn - Copyright (c) 2022 Joel Bruner - MIT License

function consoleHasAdobeCCSignIn()(
	consoleUser=$(stat -f %Su /dev/console)

	#if root grab the last console user
	if [ "${consoleUser}" = "root" ]; then
		consoleUser=$(/usr/bin/last -1 -t console | awk '{print $1}')
	fi
	
	sudo -u ${consoleUser} sh -c 'ls ~/Library/Application\ Support/Adobe/Creative\ Cloud\ Libraries/LIBS/librarylookupfile &>/dev/null'
	return $?
)


if consoleHasAdobeCCSignIn; then
	result="Signed In"
else
	result="Signed Out"
fi

echo "Adobe CC status ($(stat -f %Su /dev/console)): $result"
Example output

In a fully fleshed out script you could use my shell function shui to pop-up a sharp looking AppleScript alert to your user if they need to sign out or just sign in. You can even use the icon in your pop-up.

You could also use the consoleHasAdobeCCSignIn function in a Jamf Extension Attribute for tracking which Macs have actually signed into Adobe CC and possibly reclaim unused licenses. I’ll leave the uses and script cobbling to you the reader, as an exercise. Thanks for reading!

Determining iCloud Drive and Desktop and Documents Sync Status in macOS

I’m on a roll with iCloud stuff. In this post I’d like to show you how you can determine if either iCloud Drive is enabled along with the “Desktop and Documents Folders” sync feature. While you can use MDM to turn these off, perhaps you like to know who you’d affect first! Perhaps the folks in your Enterprise currently using these features are in the C-Suite? I’m sure they’d appreciate a heads up before all their iCloud docs get removed from their Macs (when MDM disallowance takes affect it is swift and unforgiving).

iCloud Drive Status

When it comes to using on-disk artifacts to figure out the state of macOS I like to use the analogy of reading tea leaves. Usually it’s pretty straightforward but every now and then there’s something inscrutable and you have to take your best guess. For example iCloud Drive status is stored in your home folder at ~/Library/Preferences/MobileMeAccounts.plist but yet the Accounts key is an array. The question is how and why you could even have more than one iCloud account signed-in?! Perhaps a reader will tell me when and how you would ever have more than one? For now it seems inexplicable.

Update: It seems quite obvious now but as many folks did point out, of course you can add another iCloud account to Internet Accounts and it can sync Mail, Contacts, Calendars, Reminders, and Notes, just not iCloud Drive. Only one iCloud Drive user per user on a Mac. While I do have another AppleID I only use it for Media and Purchases and none of the other iCloud services. The code below stays the same as it is looking at all array entries. Aside: Boy, do I wish I could merge or transfer my old iTunes purchasing/media Apple ID with my main iCloud Apple ID! <weakly shakes fist at faceless Apple bureaucracy that for some reason hasn't solved the problem of merging Apple IDs>

Regardless of that mystery jpt can use the JSONPath query language to get us an answer in iCloudDrive_func.sh and the minified iCloudDrive_func.min.sh. Below is an edited excerpt:

#!/bin/bash
#Joel Bruner - iCloudDrive.func.sh - gets the iCloud Drive status for a console user

#############
# FUNCTIONS #
#############

function iCloudDrive()(

	#for brevity pretend we've pasted in the minified jpt function:
	#https://github.com/brunerd/jpt/blob/main/sources/jpt.min
	#for the full function see https://github.com/brunerd/macAdminTools/tree/main/Scripts

	consoleUser=$(stat -f %Su /dev/console)

	#if root grab the last console user
	if [ "${consoleUser}" = "root" ]; then
		consoleUser=$(/usr/bin/last -1 -t console | awk '{print $1}')
	fi

	userPref_json=$(sudo -u $consoleUser defaults export MobileMeAccounts - | plutil -convert json - -o -)

	#pref domain not found an empty object is returned
	if [ "${userPref_json}" = "{}" ]; then
		return 1
	else
		#returns the number paths that match
		matchingPathCount=$(jpt -r '$.Accounts[*].Services[?(@.Name == "MOBILE_DOCUMENTS" && @.Enabled == true)]' <<< "${userPref_json}" 2>/dev/null | wc -l | tr -d "[[:space:]]")
	
		if [ ${matchingPathCount:=0} -eq 0 ]; then
			return 1
		else
			return 0
		fi
	fi
)
########
# MAIN #
########

#example function usage, if leverages the return values
if iCloudDrive; then
	echo "iCloud Drive is ON"
	exit 0
else
	echo "iCloud Drive is OFF"
	exit 1
fi

The magic happens once we’ve gotten the JSON version of MobileMeAccount.plist I use jpt to see if there are any objects within the Accounts array with Services that have both a Name that matches MOBILE_DOCUMENTS and have an Enabled key that is set to true, the -r option on jpt tells it to output the the JSON Pointer path(s) the query matches. I could have used the -j option to output JSONPath(s) but either way a line is a line and that’s all we need. Altogether it looks like this: jpt -r '$.Accounts[*].Services[?(@.Name == "MOBILE_DOCUMENTS" && @.Enabled == true)]

Again because Accounts is an Array we have it look at all of them with $.Accounts[*]and in the off chance we get more than one we simply say if the number of matches is greater than zero then it’s on. This works very well in practice. This function could best be used as a JAMF Extension Attribute. I’ll leave that as a copy/paste exercise for the reader. Add it to your Jamf Pro EAs, let sit for 24-48 hours and check for results! ⏲ And while some of you might balk at a 73k Extensions Attribute, the execution time is on average a speedy .15s!

#!/bin/bash
#a pretend iCloudDrive Jamf EA 
#pretend we've pasted in the function iCloudDrive() above

if iCloudDrive; then
	result="ON"
else
	result="OFF"
fi

echo "<result>${result}</result>"

iCloud Drive “Desktop and Documents” status

Thankfully, slightly easier to determine yet devilishly subtle to discover, is determining the status of the “Desktop and Documents” sync feature of iCloud Drive. After searching in vain for plist artifacts, I discovered the clue is in the extended attributes of your Desktop (and/or Documents) folder! You can find the scripts at my GitHub here iCloudDriveDesktopSync_func.sh and the minified version iCloudDriveDesktopSync_func min.sh

#!/bin/bash
#Joel Bruner - iCloudDriveDesktopSync - gets the iCloud Drive Desktop and Document Sync Status for the console user

#############
# FUNCTIONS #
#############

#must be run as root
function iCloudDriveDesktopSync()(
	consoleUser=$(stat -f %Su /dev/console)

	#if root (loginwindow) grab the last console user
	if [ "${consoleUser}" = "root" ]; then
		consoleUser=$(/usr/bin/last -1 -t console | awk '{print $1}')
	fi

	#if this xattr exists then sync is turned on
	xattr_desktop=$(sudo -u $consoleUser /bin/sh -c 'xattr -p com.apple.icloud.desktop ~/Desktop 2>/dev/null')

	if [ -z "${xattr_desktop}" ]; then
		return 1
	else
		return 0
	fi
)

#example function usage, if leverages the return values
if iCloudDriveDesktopSync; then
	echo "iCloud Drive Desktop and Documents Sync is ON"
	exit 0
else
	echo "iCloud Drive Desktop and Documents Sync is OFF"
	exit 1
fi

The operation is pretty simple, it finds a console user or last user, then runs the xattr -p command as that user (anticipating this being run as root by Jamf) to see if the com.apple.icloud.desktop extended attribute exists on their ~/Desktop. In testing you’ll find if you toggle the “Desktop and Documents” checkbox in the iCloud Drive options, it will apply this to both of those folders almost immediately without fail. The function can be used in a Jamf Extension Attribute in the same way the iCloudDrive was above. Some assembly required. 💪

So, there you go! Another couple functions to read the stateful tea leaves of iCloud Drive settings. Very useful if you are about to disallow iCloud Drive and/or Desktop and Document sync via MDM but need to know who you are going to affect and let them know beforehand. Because I still stand by this sage advice: Don’t Be A Jerk. Thanks for reading you can find these script and more at my GitHub repo. Thanks for reading!

Determining “iCloud Private Relay” and “Limit IP tracking” status in macOS

If you are a Mac admin you might have noticed some Apple plists are more complex than others these days. As evidenced in my post Don’t Be a Jerk, getting the status of Do Not Disturb in Big Sur was a multi-step exercise. Check out this modified code excerpt from doNotDisturb‘s Big Sur handling

#!/bin/sh

#Big Sur DnD status, returns "true" or [blank] (to be run as console user)
dndStatus="$(/usr/libexec/PlistBuddy -c "print :userPref:enabled" /dev/stdin 2>/dev/null <<< "$(plutil -extract dnd_prefs xml1 -o - /dev/stdin <<< "$(defaults export com.apple.ncprefs.plist -)" | xmllint --xpath "string(//data)" - | base64 --decode | plutil -convert xml1 - -o -)")"

#if we have ANYTHING it is ON (return 0) otherwise fail (return 1)
[ -n "${dndStatus}" ] && { echo ON; exit 0; } || { echo OFF; exit 1; }

Why is it so complex? Well because with the user preference domain of com.apple.ncprefs there is a base64 encoded plist embedded in the dnd_prefs key and requires some massaging to get it to a state where PlistBuddy can read and then extract the status from the :userPref:enabled key. See it’s just that easy! 😅

In macOS Monterey and higher Apple is now using JSON for Focus status which is great because it can can be parsed much easier (perhaps using my ljt or jpt tools) but sometimes not even that is needed! Sometimes file presence or awking is sufficient to get a reliable result too. See the evolution of doNotDisturb.sh for macOS for the myriad techniques one can use.

Now, here we are at Monterey on the verge of Ventura and not all areas of macOS have seen the JSON light and are still using nested base64-encoded Plist blobs to store the states of new features like iCloud Private Relay but luckily not the per interface setting of Limit IP Tracking.

iCloud Private Relay Status

Now why would you want to know these statuses? Perhaps you have a VPN product that doesn’t work when Private Relay is turned on or if Limit IP Tracking is turned on for a particular interface and you need to alert the user. Additionally maybe there’s an issue if your VPN browser handshake fails when Safari is used, if so see: Determining URL scheme handlers in macOS. Back to the task at hand though let’s turn some prefs inside out and look at iCloud Relay status with iCloudPrivateRelayStatus.sh

#!/bin/bash
: <<-LICENSE_BLOCK
iCloud Private Relay Status Checker - (https://github.com/brunerd)
Copyright (c) 2022 Joel Bruner (https://github.com/brunerd)
Licensed under the MIT License

Permission is hereby granted, free of charge, to any person obtaining a copy of this software and associated documentation files (the "Software"), to deal in the Software without restriction, including without limitation the rights to use, copy, modify, merge, publish, distribute, sublicense, and/or sell copies of the Software, and to permit persons to whom the Software is furnished to do so, subject to the following conditions:
The above copyright notice and this permission notice shall be included in all copies or substantial portions of the Software.
THE SOFTWARE IS PROVIDED "AS IS", WITHOUT WARRANTY OF ANY KIND, EXPRESS OR IMPLIED, INCLUDING BUT NOT LIMITED TO THE WARRANTIES OF MERCHANTABILITY, FITNESS FOR A PARTICULAR PURPOSE AND NONINFRINGEMENT. IN NO EVENT SHALL THE AUTHORS OR COPYRIGHT HOLDERS BE LIABLE FOR ANY CLAIM, DAMAGES OR OTHER LIABILITY, WHETHER IN AN ACTION OF CONTRACT, TORT OR OTHERWISE, ARISING FROM, OUT OF OR IN CONNECTION WITH THE SOFTWARE OR THE USE OR OTHER DEALINGS IN THE SOFTWARE.
LICENSE_BLOCK

#############
# FUNCTIONS #
#############

#include this self-contained function in your script
function iCloudPrivateRelay(){

	#only for Moneterey and up, 11 and under need not apply
	[ "$(sw_vers -productVersion | cut -d. -f1)" -le 11 ] && return 1
	
	#parent pref domain
	domain="com.apple.networkserviceproxy"
	#key that contains base64 encoded Plist within parent domain
	key="NSPServiceStatusManagerInfo"

	#child key within base64 embedded plist
	childKey="PrivacyProxyServiceStatus"

	#get the top level data from the main domain
	parentData=$(launchctl asuser $(stat -f %u /dev/console) sudo -u $(stat -f %Su /dev/console) defaults export ${domain} -)

	#if domain does not exist, fail
	[ -z "${parentData}" ] && return 1

	#export the base64 encoded data within the key as PlistBuddy CF style for grepping (it resists JSON extraction)
	childData=$(/usr/libexec/PlistBuddy -c "print :" /dev/stdin 2>/dev/null <<< $(plutil -extract "${key}" xml1 -o - /dev/stdin <<< "${parentData}" | xmllint --xpath "string(//data)" - | base64 --decode | plutil -convert xml1 - -o -))

	#if child key does not exist, fail
	[ -z "${childData}" ] && return 1

	#match the status string, then get the value using awk (quicker than complex walk, this is sufficient), sometimes written in multiple places
	keyStatusCF=$(awk -F '= ' '/'${childKey}' =/{print $2}' <<< "${childData}" | uniq)
	
	#if we have differing results that don't uniq down to one line, throw an error
	[ $(wc -l <<< "${keyStatusCF}") -gt 1 ] && return 2
	
	#if true/1 it is on, 0/off (value is integer btw not boolean)
	[ "${keyStatusCF}" = "1" ] && return 0 || return 1
}

########
# MAIN #
########

#example - one line calling with && and ||
#iCloudPrivateRelay && echo "iCloud Private Relay is: ON" || echo "iCloud Private Relay is: OFF"

#example - multi-line if/else calling
if iCloudPrivateRelay; then
	echo "iCloud Private Relay is: ON"
	exit 0
else
	echo "iCloud Private Relay is: OFF"
	exit 1
fi

Even though we work really hard to get the plist data extracted we don’t need to walk the entire XML document (you will find PlistBuddy balks at exporting JSON for a number of reasons). Instead we look for the presence of the key name PrivacyProxyServiceStatus and that is sufficient to reliably detect the state. I have 2 versions in my GitHub iCloudPrivateRelayStatus.sh and the minified one line version iCloudPrivateRelayStatus.min.sh

Limit IP Tracking Status

Limit IP Tracking, is a per-interface setting that is on by default, however has no effect unless Private Relay is enabled. For this we will use ljt my Little JSON Tool to retrieve the value from the massaged JSON conversion of com.apple.wifi.known-networks.plist if on WiFi or if on Ethernet .../SystemConfiguration/preferences.plist

#!/bin/bash
: <<-LICENSE_BLOCK
Limit IP Tracking Status Checker - (https://github.com/brunerd)
Copyright (c) 2022 Joel Bruner (https://github.com/brunerd)
Licensed under the MIT License

Permission is hereby granted, free of charge, to any person obtaining a copy of this software and associated documentation files (the "Software"), to deal in the Software without restriction, including without limitation the rights to use, copy, modify, merge, publish, distribute, sublicense, and/or sell copies of the Software, and to permit persons to whom the Software is furnished to do so, subject to the following conditions:
The above copyright notice and this permission notice shall be included in all copies or substantial portions of the Software.
THE SOFTWARE IS PROVIDED "AS IS", WITHOUT WARRANTY OF ANY KIND, EXPRESS OR IMPLIED, INCLUDING BUT NOT LIMITED TO THE WARRANTIES OF MERCHANTABILITY, FITNESS FOR A PARTICULAR PURPOSE AND NONINFRINGEMENT. IN NO EVENT SHALL THE AUTHORS OR COPYRIGHT HOLDERS BE LIABLE FOR ANY CLAIM, DAMAGES OR OTHER LIABILITY, WHETHER IN AN ACTION OF CONTRACT, TORT OR OTHERWISE, ARISING FROM, OUT OF OR IN CONNECTION WITH THE SOFTWARE OR THE USE OR OTHER DEALINGS IN THE SOFTWARE.
LICENSE_BLOCK

#############
# FUNCTIONS #
#############

#include this self-contained function in your script
function limitIPTracking()(

	#only for Moneterey and up, 11 and under need not apply
	[ "$(sw_vers -productVersion | cut -d. -f1)" -le 11 ] && return 1

	#Little JSON Tool (ljt) - https://github.com/brunerd/ljt - MIT License
	function ljt () ( #v1.0.8 ljt [query] [file]
	{ set +x; } &> /dev/null; read -r -d '' JSCode <<-'EOT'
	try{var query=decodeURIComponent(escape(arguments[0]));var file=decodeURIComponent(escape(arguments[1]));if(query===".")query="";else if(query[0]==="."&&query[1]==="[")query="$"+query.slice(1);if(query[0]==="/"||query===""){if(/~[^0-1]/g.test(query+" "))throw new SyntaxError("JSON Pointer allows ~0 and ~1 only: "+query);query=query.split("/").slice(1).map(function(f){return"["+JSON.stringify(f.replace(/~1/g,"/").replace(/~0/g,"~"))+"]"}).join("")}else if(query[0]==="$"||query[0]==="."&&query[1]!=="."||query[0]==="["){if(/[^A-Za-z_$\d\.\[\]'"]/.test(query.split("").reverse().join("").replace(/(["'])(.*?)\1(?!\\)/g,"")))throw new Error("Invalid path: "+query);}else query=query.replace("\\.","\udead").split(".").map(function(f){return"["+JSON.stringify(f.replace("\udead","."))+"]"}).join("");if(query[0]==="$")query=query.slice(1);var data=JSON.parse(readFile(file));try{var result=eval("(data)"+query)}catch(e){}}catch(e){printErr(e);quit()}if(result!==undefined)result!==null&&result.constructor===String?print(result):print(JSON.stringify(result,null,2));else printErr("Path not found.")
	EOT
	queryArg="${1}"; fileArg="${2}";jsc=$(find "/System/Library/Frameworks/JavaScriptCore.framework/Versions/Current/" -name 'jsc');[ -z "${jsc}" ] && jsc=$(which jsc);[ -f "${queryArg}" -a -z "${fileArg}" ] && fileArg="${queryArg}" && unset queryArg;if [ -f "${fileArg:=/dev/stdin}" ]; then { errOut=$( { { "${jsc}" -e "${JSCode}" -- "${queryArg}" "${fileArg}"; } 1>&3 ; } 2>&1); } 3>&1;else [ -t '0' ] && echo -e "ljt (v1.0.8) - Little JSON Tool (https://github.com/brunerd/ljt)\nUsage: ljt [query] [filepath]\n  [query] is optional and can be JSON Pointer, canonical JSONPath (with or without leading $), or plutil-style keypath\n  [filepath] is optional, input can also be via file redirection, piped input, here doc, or here strings" >/dev/stderr && exit 0; { errOut=$( { { "${jsc}" -e "${JSCode}" -- "${queryArg}" "/dev/stdin" <<< "$(cat)"; } 1>&3 ; } 2>&1); } 3>&1; fi;if [ -n "${errOut}" ]; then /bin/echo "$errOut" >&2; return 1; fi
	)
		
	#test interface specified or fallback to default interface
	interfaceID=${1:-$(route get 0.0.0.0 2>/dev/null | awk '/interface: / {print $2}')}

	#WIFI: key: PrivacyProxyEnabled, file: /Library/Preferences/com.apple.wifi.known-networks.plist
	#if no error getting WiFi SSID, then we are WiFi
	if networksetup -getairportnetwork "${interfaceID}" &>/dev/null && wifiSSID=$(awk -F ': ' '{print $2}' <<< "$(networksetup -getairportnetwork "${interfaceID}" 2>/dev/null)"); then

		#key name inside plist
		keyName="wifi.network.ssid.${wifiSSID}"

		#oddly this file is only read-able by root
		if [ ! -r /Library/Preferences/com.apple.wifi.known-networks.plist ]; then
			echo "Insufficient preferences to determine WiFi state, run as root" >/dev/stderr
			exit 1
		fi

		#get JSON version, so much easier to get around, convert date and data types to strings
		wifiKnownNetworks_JSON=$(defaults export /Library/Preferences/com.apple.wifi.known-networks.plist - | sed -e 's,<date>,<string>,g' -e 's,</date>,</string>,g' -e 's,<data>,<string>,g' -e 's,</data>,</string>,g' | plutil -convert json -o - -)
		
		#if there is NO entry, then it is active, it is opt-out designed
		PrivacyProxyEnabled=$(ljt "/wifi.network.ssid.${wifiSSID}/PrivacyProxyEnabled" 2>/dev/null <<< "${wifiKnownNetworks_JSON}")
		
		if [ "${PrivacyProxyEnabled}" = "false" ]; then
			return 1
		fi
	#ETHERNET: key: DisablePrivateRelay, file: /Library/Preferences/SystemConfiguration/preferences.plist, 
	else
		#get JSON, easily converts with not data or date types within
		systemConfigPrefsJSON=$(plutil -convert json -o - /Library/Preferences/SystemConfiguration/preferences.plist)
		#get current set UUID
		currentSet=$(echo "${systemConfigPrefsJSON}" | ljt /CurrentSet 2>/dev/null)
		#get value for current default interface of current Location set
		DisablePrivateRelay=$(ljt "${currentSet}"/Network/Interface/${interfaceID}/DisablePrivateRelay  2>/dev/null <<< "${systemConfigPrefsJSON}")

		#if it is TRUE we are Disabled, then we are NOT ON, return fail code
		if [ "${DisablePrivateRelay}" = "1" ]; then
			return 1
		fi
	fi
)

########
# MAIN #
########

if [ ! -r /Library/Preferences/com.apple.wifi.known-networks.plist ]; then
	echo "Insufficient preferences to determine WiFi state, run as root" >/dev/stderr
	exit 1
fi

#use default interface if nothing is specified for argument $1
interface=${1:-$(route get 0.0.0.0 2>/dev/null | awk '/interface: / {print $2}')}

#returns 0 if ON and 1 if OFF, you may supply an interface or it will fall back to the default
limitIPTracking "${interface}" && echo "Limit IP tracking is ON for: ${interface}" || echo "Limit IP tracking is OFF for: ${interface}"

You can specify an interface or it will use the default interface (there’s a good one-liner to use route get 0.0.0.0 to figure that out). plutil is not initially used to convert com.apple.wifi.known-networks.plist to JSON as it will fail due to XML/plist data types like <date> and <data> that do not have JSON equivalents. First we use sed to change them to <string> types then plutil can convert to JSON. After that it’s a cake walk for ljt to get the value and report back. If the interface is not WiFi then /Library/Preferences/SystemConfiguration/preferences.plist has none of those conversion issues. Check out limitIPTrackingStatus.sh and the minified limitIPTrackingStatus.min.sh at my GitHub.

Thanks for reading! P.S. I won’t be at JNUC 2022, better luck next year!

Determining URL scheme handlers in macOS

If you’ve worked at a place that uses Outlook for email or Chrome for browsers, knowing is half the battle when it comes to helping out your users. For a long while you could easily determine the URL scheme handlers via the built-in Python or JXA, however things have changed.

For example this JXA used to work brilliantly in Mojave and under:

#!/bin/sh
URLScheme="${1}"

if [ -z "${URLScheme}" ]; then
    echo "Please provide a URL scheme name"
    exit 1
fi

osascript -l JavaScript <<< "ObjC.import('Cocoa'); $.LSCopyDefaultHandlerForURLScheme(\"${URLScheme}\")"

Nothing lasts forever though and all that broke in 10.15 when the result of [object Ref] became the taunting reply. Even if you could hit the juke box like the Fonz and recast the CF value you were getting back into an NS value (thanks for the link Pico), it was a moot point by Big Sur. Apple has killed off about every useful API to figure out what app handles a URL as others have noted.

So after you look at LSCopyDefaultHandlerForURLScheme at the  Dev Docs and then see the scores of other deprecated LaunchServices functions, you might make some joke like “I see dead people APIs” (a la Sixth Sense), but still you wonder: Is there a reliable way to divine this information without resorting to a hacky grep?

Why, yes there is, and it just so happens to use my tool ljt too! While definitely a step up from grepping the output it’s still kinda sad. What was once a few lines must now be accomplished by many more in getDefaultRoleHandler.sh and the minified version getDefaultRoleHandler.min.sh.

#!/bin/sh
: <<-LICENSE_BLOCK
getDefaultRoleHandler - (https://github.com/brunerd)
Copyright (c) 2022 Joel Bruner (https://github.com/brunerd)
Licensed under the MIT License

Permission is hereby granted, free of charge, to any person obtaining a copy of this software and associated documentation files (the "Software"), to deal in the Software without restriction, including without limitation the rights to use, copy, modify, merge, publish, distribute, sublicense, and/or sell copies of the Software, and to permit persons to whom the Software is furnished to do so, subject to the following conditions:
The above copyright notice and this permission notice shall be included in all copies or substantial portions of the Software.
THE SOFTWARE IS PROVIDED "AS IS", WITHOUT WARRANTY OF ANY KIND, EXPRESS OR IMPLIED, INCLUDING BUT NOT LIMITED TO THE WARRANTIES OF MERCHANTABILITY, FITNESS FOR A PARTICULAR PURPOSE AND NONINFRINGEMENT. IN NO EVENT SHALL THE AUTHORS OR COPYRIGHT HOLDERS BE LIABLE FOR ANY CLAIM, DAMAGES OR OTHER LIABILITY, WHETHER IN AN ACTION OF CONTRACT, TORT OR OTHERWISE, ARISING FROM, OUT OF OR IN CONNECTION WITH THE SOFTWARE OR THE USE OR OTHER DEALINGS IN THE SOFTWARE.
LICENSE_BLOCK

#############
# FUNCTIONS #
#############

#use this self-contained function in your script to detect the default role handle
function getDefaultRoleHandler() (
	#provide a URL scheme like: http, https, ftp, etc...
	URLScheme=${1}
	
	#fail quickly
	if [ -z "${URLScheme}" ]; then
		>/dev/stderr echo "No URL scheme specified"
		return 1
	fi

	#Little JSON Tool (ljt) v1.0.7 - https://github.com/brunerd/ljt - MIT License
	function ljt () ( 
	[ -n "${-//[^x]/}" ] && set +x; read -r -d '' JSCode <<-'EOT'
	try{var query=decodeURIComponent(escape(arguments[0])),file=decodeURIComponent(escape(arguments[1]));if("/"===query[0]||""===query){if(/~[^0-1]/g.test(query+" "))throw new SyntaxError("JSON Pointer allows ~0 and ~1 only: "+query);query=query.split("/").slice(1).map(function(a){return"["+JSON.stringify(a.replace(/~1/g,"/").replace(/~0/g,"~"))+"]"}).join("")}else if("$"===query[0]||"."===query[0]||"["===query[0]){if(/[^A-Za-z_$\d\.\[\]'"]/.test(query.split("").reverse().join("").replace(/(["'])(.*?)\1(?!\\)/g,"")))throw Error("Invalid path: "+query);}else query=query.replace("\\.","\udead").split(".").map(function(a){return"["+JSON.stringify(a.replace("\udead","."))+"]"}).join("");"$"===query[0]&&(query=query.slice(1,query.length));var data=JSON.parse(readFile(file));try{var result=eval("(data)"+query)}catch(a){}}catch(a){printErr(a),quit()}void 0!==result?null!==result&&result.constructor===String?print(result):print(JSON.stringify(result,null,2)):printErr("Path not found.");
	EOT
	queryArg="${1}"; fileArg="${2}";jsc=$(find "/System/Library/Frameworks/JavaScriptCore.framework/Versions/Current/" -name 'jsc');[ -z "${jsc}" ] && jsc=$(which jsc);[ -f "${queryArg}" -a -z "${fileArg}" ] && fileArg="${queryArg}" && unset queryArg;if [ -f "${fileArg:=/dev/stdin}" ]; then { errOut=$( { { "${jsc}" -e "${JSCode}" -- "${queryArg}" "${fileArg}"; } 1>&3 ; } 2>&1); } 3>&1;else [ -t '0' ] && echo -e "ljt (v1.0.7) - Little JSON Tool (https://github.com/brunerd/ljt)\nUsage: ljt [query] [filepath]\n  [query] is optional and can be JSON Pointer, canonical JSONPath (with or without leading $), or plutil-style keypath\n  [filepath] is optional, input can also be via file redirection, piped input, here doc, or here strings" >/dev/stderr && exit 0; { errOut=$( { { "${jsc}" -e "${JSCode}" -- "${queryArg}" "/dev/stdin" <<< "$(cat)"; } 1>&3 ; } 2>&1); } 3>&1; fi;if [ -n "${errOut}" ]; then /bin/echo "$errOut" >&2; return 1; fi
	)

	#in case being run as root get the current console user
	consoleUserHomeFolder=$(sudo -u "$(stat -f %Su /dev/console)" sh -c 'echo ~')
	#get the LaunchServices LSHandlers JSON of the console user
	launchServicesJSON=$(launchctl asuser "$(stat -f %u /dev/console)" sudo -u "$(stat -f %Su /dev/console)" plutil -extract LSHandlers json -o - "${consoleUserHomeFolder}"/Library/Preferences/com.apple.LaunchServices/com.apple.launchservices.secure.plist)

	#loop through JSON and try and find matching URLScheme within
	for ((i=0;;i++)); do
		#if we are at the END of the array or nothing exists bail
		if ! ljt "/$i" <<< "${launchServicesJSON}" &>/dev/null; then
			return 1
		elif [ "$(ljt "/$i/LSHandlerURLScheme" <<< "${launchServicesJSON}" 2>/dev/null)" = "$URLScheme" ]; then
			#run query, print result, errors go to /dev/null, if ljt fails to find something return non-zero
			if ! ljt "/$i/LSHandlerRoleAll" <<< "${launchServicesJSON}" 2>/dev/null; then
				#error
				return 1
			else
				#success
				return 0
			fi
		fi
	done
	
	#if we are here, we did NOT find a match
	return 1	
)

########
# MAIN #
########

getDefaultRoleHandler "$@"

We use plutil to extract the contents of the LSHandlers key as JSON from ~/Library/Preferences/com.apple.LaunchServices/com.apple.launchservices.secure.plist then we iterate over the array using a for loop and ljt until it finds a matching LSHandlerURLScheme and then it prints out the value of LSHandlerRoleAll. The operation and output are simple and no nonsense. Give it a URL scheme and it gives you the Bundle ID of the app which will open it or if not found, nothing. (Note: mailto will be blank by default, only after switching to another client will it return a result)

You can use this function in your scripts. Head over to my GitHub to download either getDefaultRoleHandler.sh or the minified getDefaultRoleHandler.min.sh. Perhaps you need to alert a user to change their application preferences after installation of an email client or web browser. You can use my shui function to alert them, btw. But I’m not getting into setting handlers via script in this post, writing to the plist can be a trick but the real trick is getting LaunchService to read from that plist (without asking for a reboot or logout, ick)! So for now “Knowing Is Half The Battle™

Post Posting Update

Armin Briegel, over at the wonderful wealth of aggregated MacAdmin knowledge that is scriptingosx.com, is always kind enough to post my articles and this very one appears in the Week of 2022-09-22. Along with this post is a link to a MacAdmins Slack thread where he kindly provided some JXA that returns the file path for a URL scheme handler (vs. the above Bundle ID), then Pico jumped in and crushed it down to a 1 liner! I’ve added the thinnest of function wrappers over top:

#!/bin/sh
#getDefaultRoleHandlerPath - Joel Bruner with 🙏 thanks to a couple stalwarts of the MacAdmin Slack Armin Briegel and Pico

function getDefaultRoleHandlerPath()(urlScheme="${1}"; [ -z "${urlScheme}" ] && return 1; osascript -l 'JavaScript' -e "ObjC.import('AppKit'); $.NSWorkspace.sharedWorkspace.URLForApplicationToOpenURL($.NSURL.URLWithString('${urlScheme}:')).path.js")

getDefaultRoleHandlerPath "$@"
exit $?

So it seems Apple has spared an API in AppKit’s NSWorkspace by the name of URLForApplicationToOpenURL, which has been around since macOS 10.6! Perhaps when I get over my trust issues with JXA, I’ll explore these APIs to see what else might be useful. For now though this does the trick of returning a filepath (not Bundle ID)

Listing All Schemes for User

I got a question about listing all the schemes a user might have registered. This is an example one-liner (granted jpt is embedded in the script or installed locally) to be run by the current user. If you want to run as root, cannibalize getDefaultRoleHandler.sh for code)

jpt -T '$.*.LSHandlerURLScheme' <<< $(plutil -extract LSHandlers json -o - ~/Library/Preferences/com.apple.LaunchServices/com.apple.launchservices.secure.plist)

The -T option will output text (vs. an array of double quoted JSON strings) .* looks at every array member to print out every LSHandlerURLScheme entry for the current console user. It’ll look something like this