Avoid Unicode Mangling in Jamf with shef

Computers are “the equivalent of a bicycle for our minds” as Steve Job once said. Sure enough, like a bicycle, they also require maintenance! Sometimes that requires soliciting the user to take action. Asking at the right time is very important (see my post Don’t Be a Jerk) and so is brevity. I’ve found a sprinkling of emoji and other symbols can help your message cut through the noise. A bright red stop sign πŸ›‘ can convey its meaning with only a glance, especially for non-native speakers of your language. Your tooling however, may trip you up and mangle your text.

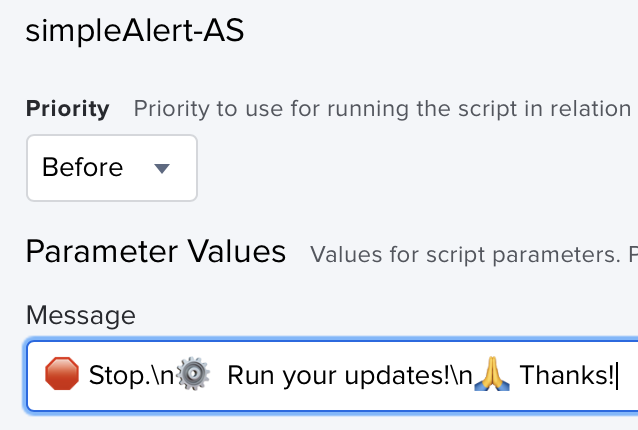
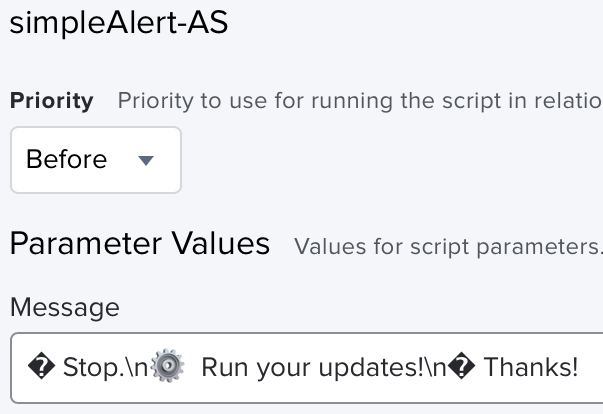
While AppleScript, Swift Dialog and JamfHelper can all handle Unicode, Jamf databases tables by default do not support 4-byte Unicode! I touched on this in my post: jpt 1.0 text encoding fun. While the database engine might support it, chances are your tables are Latin1 which top out at 3-byte UTF-8 encoded characters. 4-byte characters get mangled. Let’s take a look at this in action:

Looks good while editing…
Once saved, the mangling is clear

Only the gear makes it through because it’s actually two 3-byte characters (U+2699 βš™ gear plus variation selector U+FE0F) but who has time to check which one is which? How about an encoding tool written in shell, that allows you to escape and format Unicode for shell scripts and/or Jamf script parameters that can make it through unscathed and un-mangled? Sound good? Great! I present shef, the Shell Encoder and Formatter!

Give it some text, specify an encoding scheme and/or quoting style and out comes your string ready for use! You can put the resulting string in your script as a variable or as a script parameter in a Jamf policy depending on quoting options. I’ve done the hard work of finding the various ways to escape special characters for shell and made this handy script for you!

shef Examples

First, let’s make a simple script for Jamf that processes the output of shef. I’ve chosen AppleScript so you can play along at home even if you don’t have Jamf installed, this can also be applied to “wrapper scripts” that leverage other tools like Swift Dialog or JamfHelper. At it’s heart is the simple technique of encoding the input with shef then decoding it in the script before presentation. If you use bash use echo -e if you use sh or zsh then just echo will work, it’s that simple. Our example script simpleAlert-AS.sh, keeps things small and as minimal as possible but keep in mind my fuller-featured tool shui for more robust scripts where you may need text or password entry, file picking, etc. without external dependencies but don’t want to bother learning AppleScript.

#!/bin/bash
#simpleAlert-AS - Copyright (c) 2023 Joel Bruner (https://github.com/brunerd)
#Licensed under the MIT License

#Simple Applescript alert dialog for Jamf - just a title, a message and an OK button
#Accepts hex (\xnn) and octal (\0nnn) escaped UTF-8 encoded characters (since the default Jamf db character set mangles 4 byte Unicode)
#Use shef to encode your strings/files for use in this script: https://github.com/brunerd/shef

#function to interpret the escapes and fixup characters that can screw up Applescript if unescaped \ and "
function interpretEscapesFixBackslashesAndQuotes()(echo -e "${@}" | sed -e 's/\\/\\\\/g' -e 's/"/\\"/g')

function jamflog(){
	local logFile="/var/log/jamf.log"
	#if we cannot write to the log or it does not exist, unset and tee simply echoes
	[ ! -w "${logFile}" ] && unset logFile
	#this will tee to jamf.log in the jamf log format: <Day> <Month> DD HH:MM:SS <Computer Name> ProcessName[PID]: <Message>
	echo "$(date +'%a %b %d %H:%M:%S') ${myComputerName:="$(scutil --get ComputerName)"} ${myName:="$(basename "${0}" | sed 's/\..*$//')"}[${myPID:=$$}]: ${1}" | tee -a "${logFile}" 2>/dev/null
}


#process our input then escape for AppleScript
message=$(interpretEscapesFixBackslashesAndQuotes "${4}")
title=$(interpretEscapesFixBackslashesAndQuotes "${5}")
#could be a path or a built-in icon (stop, caution, note)
icon="${6}"
#invoke the system open command with this argument (URL, preference pane, etc...)
open_item="${7}"

#these are the plain icons (Applescript otherwise badges them with the calling app)
case "${icon}" in
	"stop") icon="/System/Library/CoreServices/CoreTypes.bundle/Contents/Resources/AlertStopIcon.icns";;
	"caution") icon="/System/Library/CoreServices/CoreTypes.bundle/Contents/Resources/AlertCautionIcon.icns"
		#previous icon went away in later macOS RIP
		[ ! -f "${icon}" ] && icon="/System/Library/CoreServices/Problem Reporter.app/Contents/Resources/ProblemReporter.icns";;
	"note") icon="/System/Library/CoreServices/CoreTypes.bundle/Contents/Resources/AlertNoteIcon.icns";;
esac

#make string only if path is valid (otherwise dialog fails)
if [ -f "${icon}" ]; then
	withIcon_AS="with icon file (POSIX file \"${icon}\")"
fi

jamflog "Prompting user: $(stat -f %Su /dev/console)"

#prompt the user, giving up and moving on after 1 day (86400 seconds)
/usr/bin/osascript <<-EOF
activate
with timeout of 86400 seconds
	display dialog "${message}" with title "${title}" ${withIcon_AS} buttons {"OK"} default button "OK" giving up after "86400"
end timeout
EOF

if [ -n "${open_item}" ]; then
	jamflog "Opening: ${open_item}"
	open "${open_item}"
fi

exit 0

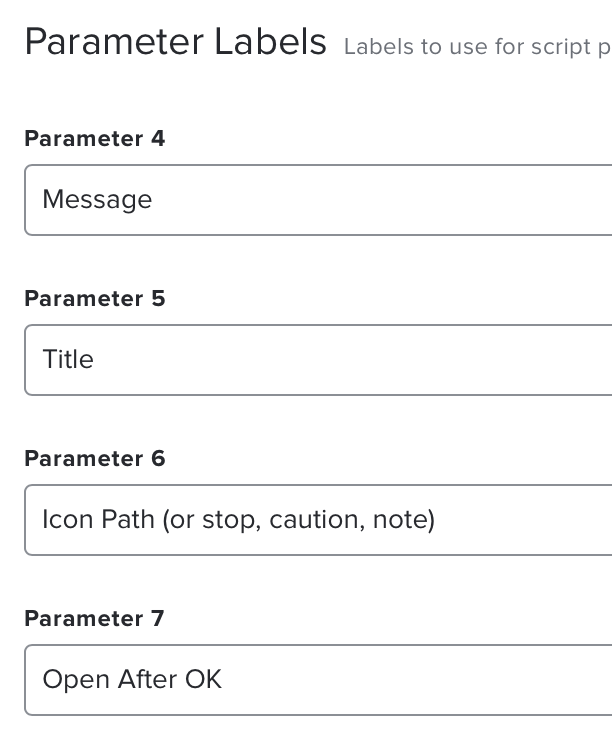
Upload the above script to your Jamf (if you have one), label parameters 4, 5, 6, and 7 as: Message, Title, Icon Path, an Open After OK, respectively. If running local keep this in mind and put 1, 2, 3 as place holder arguments for the first three parameters.

Jamf Script parameters names for

Let’s come up with an example message for our users. How about the common refrain coming from MacAdmins around the world:

πŸ›‘ Stop.
βš™οΈ Run your updates.
πŸ™ Thanks!

Now if I tried to pass this text to a script within a Jamf policy, all those emoji would get mangled by Jamf as we saw above. Let’s use shef to encode the string for Jamf:

% shef <<'EOF'
heredoc> πŸ›‘ Stop.
heredoc> βš™οΈ Run your updates.
heredoc> πŸ™ Thanks!
heredoc> EOF
\xF0\x9F\x9B\x91 Stop.\n\xE2\x9A\x99\xEF\xB8\x8F Run your updates.\n\xF0\x9F\x99\x8F Thanks!

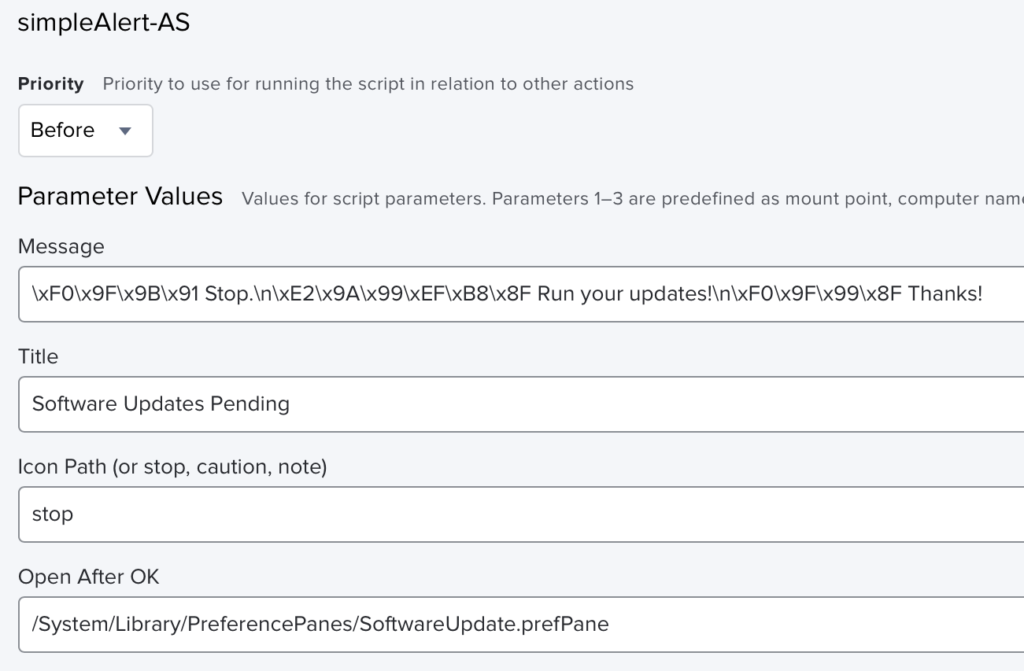
For the example above I am using a “here-doc”; in practice you can simply supply shef a file path. The output encodes all the newlines in the ANSI-C style of \n and the emoji have all been replaced by their UTF-8 encodings using the hexadecimal escaping of \x. We can take this output and use it in our Jamf policy. The message will get through both textually and symbolically. As an additional feature bonus I added a simple open action in the script. Supply the file path to the Software Update panel and after the user clicks OK, it will be opened. Scope a policy like this to anyone with pending updates with Daily frequency:

Escape the mangling in Jamf!

If you are just running the script locally and calling from the Terminal you’ll want to specify a quoting option. Exclamations are tricky and shells usually love to interpret trailing exclamations as a history expansion command, shef does its best to avoid this:

bash-3.2$ shef -Qd <<'EOF'
> πŸ›‘ Stop.
> βš™οΈ Run your updates.
> πŸ™ Thanks!
> EOF
"\xF0\x9F\x9B\x91 Stop.\n\xE2\x9A\x99\xEF\xB8\x8F Run your updates.\n\xF0\x9F\x99\x8F Thanks"\!""

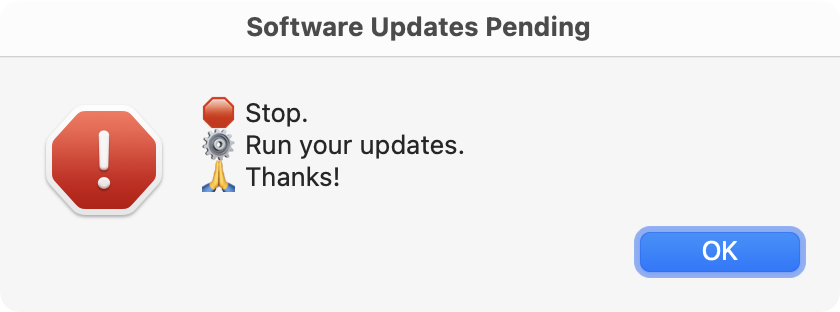
bash-3.2$ ./simpleAlert-AS.sh 1 2 3 "\xF0\x9F\x9B\x91 Stop.\n\xE2\x9A\x99\xEF\xB8\x8F Run your updates.\n\xF0\x9F\x99\x8F Thanks"\!"" "Software Updates Pending" stop "/System/Library/PreferencePanes/SoftwareUpdate.prefPane"
Our un-mangled output

Stop the Mangling Madness!

Wrapping things up: use shef to encode strings with Unicode so they survive storage in Jamf’s Latin1 encoded db tables. shui my fuller featured AppleScript dialog tool is ready to accept shef encoded strings. You can also use shef minify your text for your shell script. In fact, I used it to encode the help text file down to a single quoted line for use within itself. That’s 1 happy customer and counting, hope you find it useful too!

Determining eligible macOS versions via script

Every year Mac admins wonder which Macs will make the cut for the new MacOS. While it’s no mystery which models those are, if you’ve got Jamf you’ll be wondering how to best scope to those Macs so you can perhaps offer the upgrade in Self Service or alert the user to request a new Mac! One way to scope a Smart Group is with the Model Identifier criteria and the regex operator, like this one (I even chipped in!). It doesn’t require an inventory and results are near instant. Before I was any good at regex though, I took another route and made an Extension Attribute macOSCompatibility.sh, where the Mac reports back to Jamf. (It also has a CSV output mode for nerdy fun!) Both methods however require manual upkeep and are now somewhat complicated by Apple’s new use of the very generic Macxx,xx model identifier which doesn’t seem to follow the usual model name and number scheme of major version and minor form factor variants (on purpose me-thinks!). Let’s look at some new methods that don’t require future upkeep.

Using softwareupdate –list-full-installers

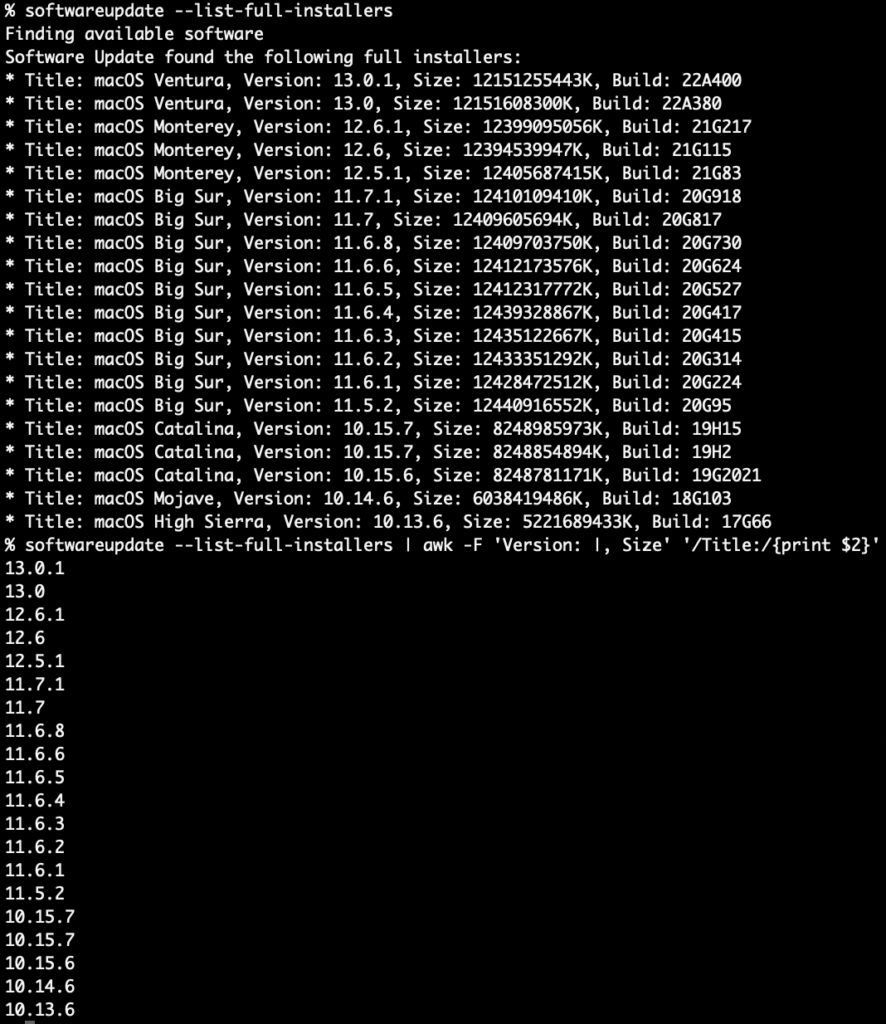
macOS Big Sur (11) introduced a new command softwareupdate --list-full-installers which shows all eligible installers available for download by the Mac running that command. The funny thing about this is that even though it is a Big Sur or newer feature, if the hardware is old enough, like a 2017, it offer versions all the way back to 10.13 High Sierra! Monterey added build numbers to the output and it can be easily reduced to just versions with awk:

softwareupdate --list-full-installers | awk -F 'Version: |, Size' '/Title:/{print $2}'

This one-liner can be made into a simple function. I’ve added a uniq at the end for case where two differing builds have the same version, like 10.15.7. Here’s that function in a script with a little version check: getSupportedMacOSVersions_SWU.sh

#!/bin/sh
: <<-LICENSE_BLOCK
getSupportedMacOSVersions_SWU - Copyright (c) 2022 Joel Bruner
Licensed under the MIT License
LICENSE_BLOCK

function getSupportedMacOSVersions_SWU()( 
#getSupportedMacOSVersions_SWU - uses softwareupdate to determine compatible macOS versions for the Mac host that runs this
	if [ "$(sw_vers -productVersion | cut -d. -f1)" -lt 11 ]; then echo "Error: macOS 11+ required" >&2; return 1; fi
	#get full installers and strip out all other columns
	softwareupdate --list-full-installers 2>/dev/null | awk -F 'Version: |, Size' '/Title:/{print $2}' | uniq
)

getSupportedMacOSVersions_SWU 
Output from Apple Silicon will never include 10.x versions

Software Update (SWU) Based Extension Attribute for Jamf

The possible inclusion of 10.x versions in the output complicates things a bit. In ye olden OS X days, the “minor version” (after the first period) acted more like the major versions of today! Still it can be done, and we will output any macOS 10.x versions, as if they are major versions like macOS 11, 12, 13, etc. Here’s getSupportedMacOSVersions-SWU-EA.sh

#!/bin/sh
: <<-LICENSE_BLOCK
getSupportedMacOSVersions-SWU-EA (Extension Attribute) - Copyright (c) 2022 Joel Bruner
Licensed under the MIT License
LICENSE_BLOCK

function getSupportedMacOSVersions_SWU()( 
#getSupportedMacOSVersions_SWU - uses softwareupdate to determine compatible macOS versions for the Mac host that runs this
	#[ "$(sw_vers -productVersion | cut -d. -f1)" -lt 11 ] && return 1
	if [ "$(sw_vers -productVersion | cut -d. -f1)" -lt 11 ]; then echo "Error: macOS 11+ required" >&2; return 1; fi
	#get full installers and strip out all other columns
	softwareupdate --list-full-installers 2>/dev/null | awk -F 'Version: |, Size' '/Title:/{print $2}'
)

#get our version
all_versions=$(getSupportedMacOSVersions_SWU)

#depending on the model (2020 and under) we might still get some 10.x versions 
if grep -q ^10 <<< "${all_versions}" ; then versions_10=$(awk -F. '/^10/{print $1"."$2}' <<< "${all_versions}")$'\n'; fi
#all the other major versions
version_others=$(awk -F. '/^1[^0]/{print $1}' <<< "${all_versions}")

#echo without double quotes to convert newlines to spaces
echo "<result>"$(sort -V <<< "${versions_10}${version_others}" | uniq)"</result>"
The venerable 2017 MacBook Pro has quite a span

Now if you wanted to make a Jamf Smart Group for those that could run macOS 13 you wouldn’t want to match 10.13 by accident. You could comment out the line in the script that matches versions beginning with ^10 or you could enclose everything in double quotes for the echo on the last line, so the newlines remained or you could use regex to match ([^.]|^)13 that is: not .13 or if the hardware is so new ^13 is at the very beginning of the string. As 10.x capable hardware fades away such regex sorcery shouldn’t be needed.

Using the Apple Software Lookup Service

“What’s the Apple Software Lookup Service?!”, you may be asking? I myself asked the same question! It’s a highly available JSON file that MDM servers can reference. If softwareupdate is acting up or hanging (and it’s been known to do so!), you have all you need in this JSON file to do a little sanity checking of softwareupdate too if you’d like. The URL is found in the Apple MDM Protocol Reference and it contains versions, models and their compatibility.

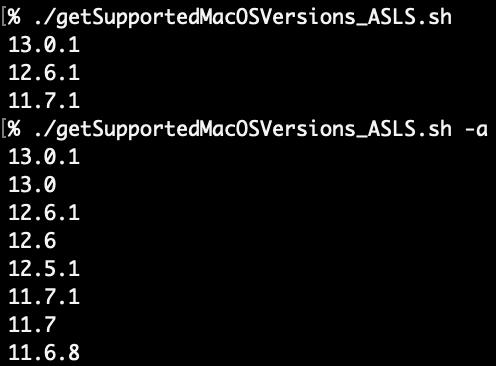
This method has far fewer patch and point versions than the softwareupdate method above and the OSes start with Big Sur (11). No 10.x versions are in the ASLS. There are two “sets” in ASLS, PublicAssetSets, which has only the newest release of each major version and AssetSets which has additional point releases (use the -a option for this one). plutil has quirky (IMO) rules for what it will and will not output as json but the raw output type can get around. It was introduced in Monterey and it can also be used to count array members, it’s goofy but manageable. Richard Purves has an article on that here. The code is generously commented, so I won’t expound upon it too much more, here’s getSupportedMacOSVersions_ASLS.sh

#!/bin/sh
: <<-LICENSE_BLOCK
getSupportedMacOSVersions_ASLS - Copyright (c) 2022 Joel Bruner
Licensed under the MIT License...
LICENSE_BLOCK

function getSupportedMacOSVersions_ASLS()( 
#getSupportMacOSVersions - uses Apple Software Lookup Service to determine compatible macOS versions for the Mac host that runs this
#  Options:
#  [-a] - to see "all" versions including prior point releases, otherwise only newest of each major version shown

	if [ "${1}" = "-a" ]; then
		setName="AssetSets"
	else
		setName="PublicAssetSets"
	fi

	#get Device ID for Apple Silicon or Board ID for Intel
	case "$(arch)" in
		"arm64")
			#NOTE: Output on ARM is Device ID (J314cAP) but on Intel output is Model ID (MacBookPro14,3)
			myID=$(ioreg -arc IOPlatformExpertDevice -d 1 | plutil -extract 0.IORegistryEntryName raw -o - -)
		;;
		"i386")
			#Intel only, Board ID (Mac-551B86E5744E2388)
			myID=$(ioreg -arc IOPlatformExpertDevice -d 1 | plutil -extract 0.board-id raw -o - - | base64 -D)
		;;
	esac	

	#get JSON data from "Apple Software Lookup Service" - https://developer.apple.com/business/documentation/MDM-Protocol-Reference.pdf
	JSONData=$(curl -s https://gdmf.apple.com/v2/pmv)

	#get macOS array count
	arrayCount=$(plutil -extract "${setName}.macOS" raw -o - /dev/stdin <<< "${JSONData}")

	#look for our device/board ID in each array member and add to list if found
	for ((i=0; i<arrayCount; i++)); do
		#if found by grep in JSON (this is sufficient)
		if grep -q \"${myID}\" <<< "$(plutil -extract "${setName}.macOS.${i}.SupportedDevices" json -o - /dev/stdin <<< "${JSONData}")"; then
			#add macOS version to the list
			supportedVersions+="${newline}$(plutil -extract "${setName}.macOS.${i}.ProductVersion" raw -o - /dev/stdin <<< "${JSONData}")"
			#only set for the next entry, so no trailing newlines
			newline=$'\n'
		fi
	done

	#echo out the results sorted in descending order (newest on top)
	sort -rV <<< "${supportedVersions}"
)

#pass possible "-a" argument
getSupportedMacOSVersions_ASLS "$@"
PublicAssetSets (top) vs. AssetSets (bottom)

The fact that this method requires Monterey for the plutil stuff didn’t agree with me, so I made a version that uses my JSON power tool (jpt) so it will work on all earlier OSes too. It’s a tad large (88k) but still runs quite fast: getSupportedMacOSVersions_ASLS-legacy.sh

Just as with the softwareupdate based function, the same can be done to reduce the output to only major versions and since it is v11 and up, a simple cut will do!

#major versions only, descending, line delimited
getSupportedMacOSVersions_ASLS | cut -d. -f1 | uniq

#major versions only ascending
echo $(getSupportedMacOSVersions_ASLS | cut -d. -f1 | sort -n | uniq)

ASLS Based Extension Attribute

The Apple Software Lookup Service (ASLS) JSON file itself doesn’t care what version of macOS a client is on, but the methods in plutil to work with JSON aren’t available until Monterey. So here’s the ASLS based Extension Attribute a couple ways: getSupportedMacOSVersions-ASLS-EA.sh and getSupportedMacOSVersions-ASLS-legacy-EA.sh both get the job done.

Same. Same.

Bonus Methods for Determining Board ID and Device ID

The ASLS method requires either the Board ID or the Device ID and in a way that worked across all macOS versions and hardware architectures. I’ve updated my gist for that (although gists are a worse junk drawer than a bunch of scripts in a repo if only because it’s hard to get an overall listing) and here’s a few callouts for what I came up with

#DeviceID - ARM, UNIVERSAL - uses xmllint --xpath
myDeviceID=$(ioreg -arc IOPlatformExpertDevice -d 1 | plutil -extract 0.IORegistryEntryName xml1 -o - - | xmllint --xpath '/plist/string/text()' - 2>/dev/null)
#DeviceID - ARM, macOS 12+ only, uses plutil raw output
myDeviceID=$(ioreg -arc IOPlatformExpertDevice -d 1 | plutil -extract 0.IORegistryEntryName raw -o - -)
#NOTE: Different output depending on platform! 
# ARM gets the Device ID - J314cAP
# Intel gets the Model ID - MacBookPro14,3

#Board ID - Intel ONLY, Mac-551B86E5744E2388
#Intel, UNIVERSAL - uses xmllint --xpath
myBoardID=$(ioreg -arc IOPlatformExpertDevice -d 1 | plutil -extract 0.board-id xml1 -o - - | xmllint --xpath '/plist/data/text()' - | base64 -D)
#Intel, macOS 12+ only - uses plutil raw output 
myBoardID=$(ioreg -arc IOPlatformExpertDevice -d 1 | plutil -extract 0.board-id raw -o - - | base64 -D)

Wrapping Up

This was all really an excuse to play around with the Apple Software Lookup Service JSON file, what can I say! And not just to plug jpt either! It was fun to use the new plutil raw type too (is fun the right word?) and “live off the land”. Be aware that the newest macOS version only appears once it’s publicly released, so keep that in mind when scoping. You can still keep scoping in Jamf via Model Identifier Regex or by my older extension attribute just keep in mind you’ll need to update them yearly. Whereas, these newer EAs based on either softwareupate (getSupportedMacOSVersions-SWU-EA.sh) or ASLS (getSupportedMacOSVersions-ASLS-EA.sh, getSupportedMacOSVersions-ASLS-legacy-EA.sh) should take care of themselves into the future.

jpt 1.0 text encoding fun

Besides JSON, jpt (the JSON power tool) can also output strings and numbers in a variety of encodings that the sysadmin or programmer might find useful. Let’s look at the encoding options from the output of jpt -h

% jpt -h
...
-T textual output of all data (omits property names and indices)
  Options:
	-e Print escaped characters literally: \b \f \n \r \t \v and \\ (escapes formats only)
	-i "<value>" indent spaces (0-10) or character string for each level of indent
	-n Print null values as the string 'null' (pre-encoding)

	-E "<value>" encoding options for -T output:

	  Encodes string characters below 0x20 and above 0x7E with pass-through for all else:
		x 	"\x" prefixed hexadecimal UTF-8 strings
		O 	"\nnn" style octal for UTF-8 strings
		0 	"\0nnn" style octal for UTF-8 strings
		u 	"\u" prefixed Unicode for UTF-16 strings
		U 	"\U "prefixed Unicode Code Point strings
		E 	"\u{...}" prefixed ES2016 Unicode Code Point strings
		W 	"%nn" Web encoded UTF-8 string using encodeURI (respects scheme and domain of URL)
		w 	"%nn" Web encoded UTF-8 string using encodeURIComponent (encodes all components URL)

		  -A encodes ALL characters
	
	  Encodes both strings and numbers with pass-through for all else:
		h 	"0x" prefixed lowercase hexadecimal, UTF-8 strings
		H 	"0x" prefixed uppercase hexadecimal, UTF-8 strings
		o 	"0o" prefixed octal, UTF-8 strings
		6 	"0b" prefixed binary, 16 bit _ spaced numbers and UTF-16 strings
		B 	"0b" prefixed binary, 8 bit _ spaced numbers and UTF-16 strings
		b 	"0b" prefixed binary, 8 bit _ spaced numbers and UTF-8 strings

		  -U whitespace is left untouched (not encoded)

Strings

While the above conversion modes will do both number and string types, these options will work only on strings (numbers and booleans pass-through). If you work with with shell scripts these techniques may be useful.

If you store shell scripts in a database that’s not using utf8mb4 table and column encodings then you won’t be able to include snazzy emojis to catch your user’s attention! In fact this WordPress install was so old (almost 15 years!) the default encoding was still latin1_swedish_ci, which an odd but surprisingly common default for many old blogs. Also if you store your scripts in Jamf (still in v10.35 as of this writing) it uses latin1 encoding and your 4 byte characters will get mangled. Below you can see in Jamf things look good while editing, fails once saved, and the eventual workaround is to use an coding like \x escaped hex (octal is an alternate)

Let’s use the red “octagonal sign” emoji, which is a stop sign to most everyone around the world, with the exception of Japan and Libya (thanks Google image search). Let’s look at some of the way πŸ›‘ can be encoded in a shell script

#reliable \x hex notation for bash and zsh
% jpt -STEx <<< "Alert πŸ›‘"
Alert \xf0\x9f\x9b\x91

#above string can be  in both bash and zsh
% echo $'Alert \xf0\x9f\x9b\x91'
Alert πŸ›‘

#also reliable, \nnn octal notation
% jpt -STEO <<< "Alert πŸ›‘"
Alert \360\237\233\221

#works in both bash and zsh
% echo $'Alert \360\237\233\221'
Alert πŸ›‘

#\0nnn octal notation
% jpt -STE0 <<< "Alert πŸ›‘"
Alert \0360\0237\0233\0221

#use with shell builtin echo -e and ALWAYS in double quotes
#zsh does NOT require -e but bash DOES, safest to use -e
% echo -e "Alert \0360\0237\0233\0221"
Alert πŸ›‘

#-EU code point for zsh only
% jpt -STEU <<< "Alert πŸ›‘"
Alert \U0001f6d1

#use in C-style quotes in zsh
% echo $'Alert \U0001f6d1'
Alert πŸ›‘

The -w/-W flags can encode characters for use in URLs

#web/percent encoded output in the case of non-URLs -W and -w are the same
% jpt -STEW <<< πŸ›‘  
%F0%9F%9B%91

#-W URL example (encodeURI)
jpt -STEW <<< http://site.local/page.php?wow=πŸ›‘
http://site.local/page.php?wow=%F0%9F%9B%91

#-w will encode everything (encodeURIComponent)
% jpt -STEw <<< http://site.local/page.php?wow=πŸ›‘
http%3A%2F%2Fsite.local%2Fpage.php%3Fwow%3D%F0%9F%9B%91

And a couple other oddballs…

#text output -T (no quotes), -Eu for \u encoding
#not so useful for the shell scripter
#zsh CANNOT handle multi-byte \u character pairs
% jpt -S -T -Eu <<< "Alert πŸ›‘"
Alert \ud83d\uded1

#-EE for an Javascript ES2016 style code point
% jpt -STEE <<< "Alert πŸ›‘"
Alert \u{1f6d1}

You can also \u encode all characters above 0x7E in JSON with the -u flag

#JSON output (not using -T)
% jpt <<< '"Alert πŸ›‘"'
"Alert πŸ›‘"

#use -S to treat input as a string without requiring hard " quotes enclosing
% jpt -S <<< 'Alert πŸ›‘'
"Alert πŸ›‘"

#use -u for JSON output to encode any character above 0x7E
% jpt -Su <<< 'Alert πŸ›‘'
"Alert \ud83d\uded1"

#this will apply to all strings, key names and values
% jpt -u <<< '{"πŸ›‘":"stop", "message":"Alert πŸ›‘"}' 
{
  "\ud83d\uded1": "stop",
  "message": "Alert \ud83d\uded1"
}

Whew! I think I covered them all. If there are newlines, tabs and other invisibles you can choose to output them or leave them encoded when you are outputting to text with -T

#JSON in, JSON out
jpt <<< '"Hello\n\tWorld"'
"Hello\n\tWorld"

#ANSI-C string in, -S to treat as string despite lack of " with JSON out
% jpt -S <<< $'Hello\n\tWorld' 
"Hello\n\tWorld"

#JSON in, text out: -T alone prints whitespace characters
% jpt -T <<< '"Hello\n\tWorld"'
Hello
	World

#use the -e option with -T to encode whitespace
% jpt -Te <<< '"Hello\n\tWorld"'
Hello\n\tWorld

Numbers

Let’s start simply with some numbers. First up is hex notation in the style of 0xhh and 0XHH. This encoding has been around since ES1, use the -Eh and -EH respectively to do so. All alternate output (i.e. not JSON) needs the -T option. In shell you can combine multiple options/flags together except only the last flag can have an argument, like -E does below.

#-EH uppercase hex
% jpt -TEH <<< [255,256,4095,4096] 
0xFFa
0x100
0xFFF
0x1000

#-Eh lowecase hex
% jpt -TEh <<< [255,256,4095,4096]
0xff
0x100
0xfff
0x1000

Next up are ye olde octals. Use the -Eo option to convert numbers to ye olde octals except using the more modern 0o prefix introduced in ES6

-Eo ES6 octals
% jpt -TEo <<< [255,256,4095,4096]    
0o377
0o400
0o7777
0o10000

Binary notation debuted in the ES6 spec, it used a 0b prefix and allows for _ underscore separators

#-E6 16 bit wide binary
% jpt -TE6 <<< [255,256,4095,4096]
0b0000000011111111
0b0000000100000000
0b0000111111111111
0b0001000000000000

#-EB 16 bit minimum width with _ separator per 8
% jpt -TEB <<< [255,256,4095,4096]
0b00000000_11111111
0b00000001_00000000
0b00001111_11111111
0b00010000_00000000

#-Eb 8 bit minimum width with _ separator per 8
% jpt -TEb <<< [15,16,255,256,4095,4096]
0b00001111
0b00010000
0b11111111
0b00000001_00000000
0b00001111_11111111
0b00010000_00000000

If you need to encode strings or numbers for use in scripting or programming, then jpt might be a handy utility for you and your Mac and if your *nix has jsc then it should work also. Check the jpt Releases page for Mac installer package download.

macOS Compatibility Fun!

Compatibility Questions

If you work with Macs and Jamf then you know every year there’s a new per OS Extension Attribute (EA) or Smart Group (SG) recipe to determine if macOS will run on your fleets hardware. However I asked myself: What if a single Extension Attribute script could fill the need, requiring only a periodic updating of Model IDs and the addition of new macOSes?

Then I also asked: Could this same script be re-purposed to output both text and CSV, not just for the script’s running host but for a list of Model IDs? And the answer was a resounding yes on all fronts!

EA Answers

So, my fellow Jamf admin I present to you macOSCompatibility.sh in its simplest form you just run the script and it will provide ultra-sparse EA output like: <result>10.14 10.15 11</result> this could then be used as a Smart Group criteria. Something like “macOS Catalina Compatible” would then match all Macs using LIKE 10.15 or “Big Sur Incompatible” would use NOT LIKE 11, of course care would be taken if you were also testing for 10.11 compatibility, however the versionsToCheck variable in the script can limit the default range to something useful and speeds things up the less version there are. I hope this helps Jamf admins who have vast unwieldy fleets where hardware can vary wildly across regions or departments,

CSV Answers

Now if you provide a couple arguments like so: ./macOSCompatibility.sh -c -v ALL ALL > ~/Desktop/macOSCompatibilityMatrix.csv you will get a pretty spiffy CSV that let’s you visualize which Mac models over the years have enjoyed the most and least macOS compatibility. This is my favorite mode, you can use it to assess the OS coverage of past Macs.

See macOSCompatibilityMatrix.csv for an example of the output. If you bring that CSV into Numbers or Excel you can surely liven it up with some Conditional Formatting! This is the barest of examples:

Can you spot the worst and best values?

Text Answers

If you don’t use the -c flag then it’ll just output in plain or text, like so: ./macOSCompatibility.sh -v ALL ALL

iMacPro1,1: 10.13 10.14 10.15 11
MacBook1,1: 10.4 10.5 10.6
MacBook2,1: 10.4 10.5 10.6 10.7
MacBook3,1: 10.5 10.6 10.7
MacBook4,1: 10.5 10.6 10.7
MacBook5,1: 10.5 10.6 10.7 10.8 10.9 10.10 10.11
MacBook6,1: 10.6 10.7 10.8 10.9 10.10 10.11 10.12 10.13
MacBook7,1: 10.6 10.7 10.8 10.9 10.10 10.11 10.12 10.13
MacBook8,1: 10.10 10.11 10.12 10.13 10.14 10.15 11
MacBook9,1: 10.11 10.12 10.13 10.14 10.15 11
MacBook10,1: 10.12 10.13 10.14 10.15 11
MacBookAir1,1: 10.5 10.6 10.7
MacBookAir2,1: 10.5 10.6 10.7 10.8 10.9 10.10 10.11

Wrapping Up

Now, it’s not totally perfect since some models shared Model IDs (2012 Retina and Non-Retina MacBook Pros for example) but for the most part the Intel Mac Model IDs were sane compared to the PPC hardware Model IDs: abrupt jumps, overlaps, and re-use across model familes. Blech! I’m glad Apple “got religion” for Model IDs (for the most part) when Intel CPUs came along. I did attempt to go back to 10.1-10.3 with PPC hardware but it was such a mess it wasn’t worth it. However testing Intel, Apple Silicon and VMs against macOS 10.4 – 11+ seems to have some real use and perhaps you think so too? Thanks for reading!

jpt + jamf uapi = backupJamf-scripts

Jamf UAPI: JSON Only

I am a creature of habit, no doubt, however sometimes you must get out of your comfort zone. The Jamf Universal API (UAPI) is one such case, it is JSON only and not XM. Those tried and true xpath snippets will no longer work with JSON, in fact what tool do you use with JSON? macOS really doesn’t have a good built-in JSON tool and if your scripts are client side do you really want to have jq as a dependency? Good thing I wrote a JSON parser you can embed in your scripts this summer! In fact, when I finished writing my JSON power tool jpt, I needed to find some practical examples to demonstrate its utility. Looking at the UAPI it’s clear some parts are still a work-in-progress, however the endpoint for scripts is actually really good. It gives you everything in one go almost like a database query. That should made backing up scripts a breeze!

backupJamf-scripts. boom.

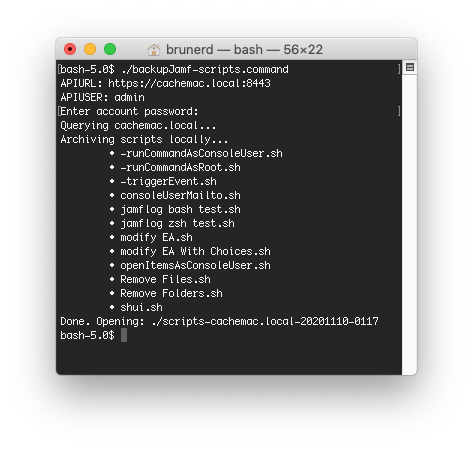
If you’ve used the Classic API from Jamf, it is a 1:1 ratio of scripts to API calls: 2 scripts? 2 API calls via curl. 200 scripts? 200 API calls via curl. The new Universal API reduces that down to 1 call to get everything (plus one call to get the token), it’s super fast and I love it. Check out backupJamf-scripts.command in my newly minted jamfTools repo on GitHub for a working demostration of both the Jamf UAPI and jpt’s in-script JSON handling. I hope you like it!

jpt + jamf uapi = scripts downloading scripts

Jamf & FileVault 2: Tips & Tricks (and more)

Raiders of the Lost Feature Requests

So there’s this old feature request at Jamf Nation (stop me if you’ve heard this one…) it’s almost 6 years old: Add ability to report on FV2 Recovery Keys (and/or access them via API) In fact, maybe you came here from there, watch out don’t loop! Continue!

The pain point is this: Keys are sent back to Jamf Pro (JSS) but then can only be gotten at manually/interactively through the web interface, not via API nor another method. For cases of mass migration to another JSS it sure would be nice to move those keys over rather than decrypt/re-encrypt. Well, I’ve got a few insights regarding this that I’d like to share that may help. ‘Cuz hey it’s 2020 and we’ve learned that hoarding is just silly.

Firstly, it should be pointed out that neither ye olde “Recovery Key Redirection” payload nor it’s replacement “Recovery Key Escrow” are needed to get keys to the JSS. There is another method and it’s what is used by the built-in “Filevault Encryption” policy payload to get the keys back to your JSS. Jamf references this method in this old script at their GitHub. I revamped the core bits a couple years ago in a (nearly 7 year old) feature request: Manually Edit FileVault 2 Recovery Key

Telling the JSS Your Secrets

The takeaway from that is to realize we have a way to explicitly send keys to the JSS by placing 2 XML files in the /Library/Application Support/JAMF/run folder: file_vault_2_id.xml and file_vault_2_recovery_key.xml. Also note, Jamf has updated the process for the better in the last two years: a jamf recon (or two) is no longer required to send the key and validate it, instead JamfDaemon will send it immediately when both the files are detected. Which is nice, but it’s the subsequent recon validations where we have an opportunity to get grabby.

Cold Lamping, Hard Linking

So here’s the fun part: When recon occurs there’s lots of file traffic in /Library/Application Support/JAMF/tmp all sorts of transient scripts hit this folder. What we can do is make hard links to these files as they come in so when the link is removed in tmp another exists elsewhere and the file remains (just in our new location). EAGrabber.sh does exactly that (and a little bit more)

EAGrabber.sh can be easily modified to narrow it’s focus to the FileVault 2 key only, deleting the rest. What you do with the key is up to you: Send it somewhere else for safe keeping or keep it on device temporarily for a migration to another Jamf console. A script on the new JSS could then put that key on-disk into file_vault_2_recovery_key.xml file which will then import and validate, no decrypt/recrypt necessary. Hope this helps.

Cuidado Β‘ Achtung ! Alert

Jamf admins take note: Do you have hard coded passwords in your extension attributes or scripts? If so, then all your scripts are belong to us. Now, go read Obfuscation vs. Encryption from Richard Purves. Read it? OK, now consider what happens if you were to add a routine to capture the output of ps aww along with a hard-linking loop like in EAGraber.sh. If you are passing API credentials from policies via parameter, then ps can capture those parameters and even if you try and obscure them, if we’ve captured the script we can de-obfuscate them. This is a good reason to be really careful with what your API accounts can do. If you have an API account with Computer record Read rights that gets passed into a script via policy and you use LAPS, then captured API credentials could be used to harvest LAPS passwords via API. Keep this in mind and we’ll see if any meaningful changes will occur in recon and/or the script running process in the future (if you open a ticket you can reference PI-006270 regarding API credentials in the process list). In the meantime make API actions as short lived as possible and cross your fingers that only you, good and noble #MacAdmins read this blog. 🀞

jpt: jamf examples pt. 2

Over in the MacAdmins’ #bash channel I saw a I question regarding how to get the Sharing states of Bluetooth devices from system_profiler. The most succinct answer was to awk out the values:

system_profiler SPBluetoothDataType 2> /dev/null | awk '/State: / {print $2}'
Disabled
Disabled
Disabled

If you are using this for a Jamf Extension Attribute, I suppose it’ll do if you never want to allow any of them to be Enabled, but what if Internet Sharing was OK but not File Sharing? How would you match your Smart Group to multiple lines of unlabeled values? How would you match the first two but not the last two… and what if there was another USB Bluetooth device, that would add extra rows. Hmmm…

The answer for me, outputting the service name and the state on the same line. Since there isn’t a consistent line count from State: going back the service name, using something like grep -B n to include n lines of preceding data isn’t going to work.

      Services:
          Bluetooth File Transfer:
              Folder other devices can browse: ~/Public
              When receiving items: Accept all without warning
              State: Disabled
          Bluetooth File Exchange:
              Folder for accepted items: ~/Downloads
              When other items are accepted: Save to location
              When receiving items: Accept all without warning
              State: Disabled
          Bluetooth Internet Sharing:
              State: Disabled

So you know what I say the answer to that is? That’s right, jpt the JSON Power Tool! It can parse the -json output from system_profiler in a more structured way and it allows for the discovery of as many applicable Bluetooth devices might be on the system.

Here’s a sample run with Internet Sharing turned On as well as Bluetooth Sharing turned On

file_browsing: disabled
object_push: enabled
internet_sharing: enabled

File Browsing is set to “Never Allow” but File Receiving is in the affirmative (Accept and Open, Accept and Save, or Ask). The addition of labels gives us the ability to create a Smart Group to match specific services like “file_browing: enabled” or any other combination thereof (perhaps internet_sharing should always be enabled, who am I to say what your requirements are!).

About the jpt

The JSON Power Tool (jpt) is a parser/manipulator for JSON documents written in Javascript and shell and can run standalone or embedded in your scripts bash or zsh and all the way back to OS X 10.4 Tiger! Check it out at: https://github.com/brunerd/jpt

jpt: jamf examples

jpt has some practical applications for the Jamf admin

Sanitizing Jamf Reports

Let’s say you’ve exported an Advanced Search, it’s got some interesting data you’d like to share, however there is personal data in it. Rather than re-running the report, why not blank out or remove those fields?

Here’s a sample file: advancedcomputersearch-2-raw.json

This an excerpt from one of the computer record:

{
"name": "Deathquark",
"udid": "2ca8977b-05a1-4cf0-9e06-24c4aa8115bc",
"Managed": "Managed",
"id": 2,
"Computer_Name": "Deathquark",
"Last_Inventory_Update": "2020-11-04 22:01:09",
"Total_Number_of_Cores": "8",
"Username": "Professor Frink",
"FileVault_2_Status": "Encrypted",
"JSS_Computer_ID": "2",
"Number_of_Available_Updates": "1",
"Model_Identifier": "MacBookPro16,1",
"Operating_System": "Mac OS X 10.15.7",
"Model": "MacBook Pro (16-inch, 2019)",
"MAC_Address": "12:34:56:78:9A:BC",
"Serial_Number": "C02K2ND8CMF1",
"Email_Address": "frink@hoyvin-glavin.com",
"IP_Address": "10.0.1.42",
"FileVault_Status": "1/1",
"Processor_Type": "Intel Core i9",
"Processor_Speed_MHz": "2457",
"Total_RAM_MB": "65536"
}

Now let’s say the privacy standards for this place is GDPR on steroids and all personally identifiable information must be removed, including serials, IPs, UUIDs, almost everything (but you don’t want to run the report again because it took ages to get the output)!

Here’s what that command would look like: jpt -o replace -v '"REDACTED"' -p '$["advanced_computer_search"]["computers"][*]["name","udid","Username","Computer_Name","MAC_Address","Serial_Number","Email_Address","IP_Address"]' ./advancedcomputersearch-2-raw.json

Here’s what that same computer looks like in the resulting output (as well as all others in the document):

  {
    "name": "REDACTED",
    "udid": "REDACTED",
    "Managed": "Managed",
    "id": 2,
    "Computer_Name": "REDACTED",
    "Architecture_Type": "i386",
    "Make": "Apple",
    "Service_Pack": "",
    "Last_Inventory_Update": "2020-11-04 22:01:09",
    "Active_Directory_Status": "Not Bound",
    "Total_Number_of_Cores": "8",
    "Username": "REDACTED",
    "FileVault_2_Status": "Encrypted",
    "JSS_Computer_ID": "254",
    "Number_of_Available_Updates": "1",
    "Model_Identifier": "MacBookPro16,1",
    "Operating_System": "Mac OS X 10.15.7",
    "Model": "MacBook Pro (16-inch, 2019)",
    "MAC_Address": "REDACTED",
    "Serial_Number": "REDACTED",
    "Email_Address": "REDACTED",
    "IP_Address": "REDACTED",
    "FileVault_Status": "1/1",
    "Processor_Type": "Intel Core i9",
    "Processor_Speed_MHz": "2457",
    "Total_RAM_MB": "65536"
  }

What we did was use the -o replace operation with a -v <value> of the JSON string "REDACTED" to all the paths matched by the JSONPath union expression (the comma separated property names in brackets) of the -p option. JSON Pointer can only act on one value at a time, this is where JSONPath can save you time and really shines.

jpt is fast because WebKit’s JavascriptCore engine is fast, for instance there is a larger version of that search that has 15,999 computers, it took only 11 seconds to redact every record.

jpt -l $.advanced_computer_search.computers ./advancedcomputersearch.json
15999

time jpt -o replace -v '"REDACTED"' -p '$.advanced_computer_search.computers[*]["name","udid","Username","Computer_Name","MAC_Address","Serial_Number","Email_Address","IP_Address"]' ./advancedcomputersearch.json > /dev/null 

11.14s user 0.35s system 104% cpu 11.030 total

Put Smart Computer Groups on a diet

When you download Smart Groups via the API, you will also get an array of all the computers objects that match at that moment in time. If you just want to back up the logic or upload to another system, you don’t want all those computers in there.

Sample file: smartgroup-1-raw.json

{
  "computer_group": {
    "id": 12,
    "name": "All 10.15.x Macs",
    "is_smart": true,
    "site": {
      "id": -1,
      "name": "None"
    },
    "criteria": [
      {
        "name": "Operating System Version",
        "priority": 0,
        "and_or": "and",
        "search_type": "like",
        "value": "10.15",
        "opening_paren": false,
        "closing_paren": false
      }
    ],
    "computers": [
      {
        "id": 1,
        "name": "mac1",
        "mac_address": "12:34:56:78:9A:BC",
        "alt_mac_address": "12:34:56:78:9A:BD",
        "serial_number": "Z18D132XJTQD"
      },
      {
        "id": 2,
        "name": "mac2",
        "mac_address": "12:34:56:78:9A:BE",
        "alt_mac_address": "12:34:56:78:9A:BF",
        "serial_number": "Z39VM86X01MZ"
      }
    ]
  }
}

Lets’ remove those computers with jpt and the JSON Patch remove operartion:
jpt -o remove -p '$.computer_group.computers' ./smartgroup-1-raw.json

Since the target is a single property name, JSON Pointer can also be used:
jpt -o remove -p /computer_group/computers ./smartgroup-1-raw.json

{
  "computer_group": {
    "id": 12,
    "name": "All 10.15.x Macs",
    "is_smart": true,
    "site": {
      "id": -1,
      "name": "None"
    },
    "criteria": [
      {
        "name": "Operating System Version",
        "priority": 0,
        "and_or": "and",
        "search_type": "like",
        "value": "10.15",
        "opening_paren": false,
        "closing_paren": false
      }
    ]
  }
}

Further Uses

Using only JSON Patch replace and remove operations this JSON could have its id removed to prep it for an API POST on another JSS to create a new group or the name and value could be modified in a looping script to create multiple JSON files for every macOS version. The jpt is flexible enough to handle most anything you throw at it, whether you are using the standalone version or have embedded it in your scripts.

Stop by the jpt GitHub page to get your copy