Hey there, it’s summer 2022 and I wanted to share some updates on my shell tools for Mac admins.
No breaking changes or anything huge, but some nice incremental improvements all the same. When the JSONPath spec is finalized I’ll give jpt a more considerable under the hood improvement. For now though, I’m pretty happy with tweaking their behaviors to act like you’d expect (print help and exit if no input detected), to get out of your way when you need to debug your scripts (xtrace is now disabled inside them) and to try to understand what you mean when you ask them a question (key path queries now accepted). Because the tools and technologies we make should serve us, not the other way around. I hope these tools can save you time, energy, sanity or all the above!
• jpt the “JSON Power Tool” has been updated to v1.0.2 with all the nice additions mentioned. If you don’t know already jpt can parse, query, and modify JSON every which way. It can be used as both a standalone utility as well as a function to be embedded into your shell scripts, without any other dependencies.
• ljt the “little JSON tool” is jpt‘s smaller sibling weighing in at only 2k. While it lacks the transformational powers of jpt it can easily pluck a value out of JSON up to 2GB big and output results up to 720MB. It has been updated to v1.0.7 because dang it, even a small script can have just as many bugs as the big ones. Sometimes more if you’re not careful!
Both jpt and ljt now accept ye olde NextStep “keypath” expressions to help win over masochists who might still use plutil to work with JSON! (I kid, I kid!)
• jse, the “JSON string encoder” does this one thing and does it well. It can be used in conjunction with jpt when taking in arbitrary data that needs encoding only. It’s a svelte 1.4k (in minified form) and runs considerably faster that jpt, so it’s ideal for multiple invocations, such as when preparing input data for a JSON Patch document. v1.0.2 is available here
• shui lets you interact with your users with AppleScript but in the comfort of familiar shell syntax! You don’t need to know a line of AppleScript, although it does have the option to output it if you want to learn. Save time, brain cells and hair with shui, while you keep on trucking in shell script. It has been updated to v20220704.
P.S. All these tools still work in the macOS Ventura beta
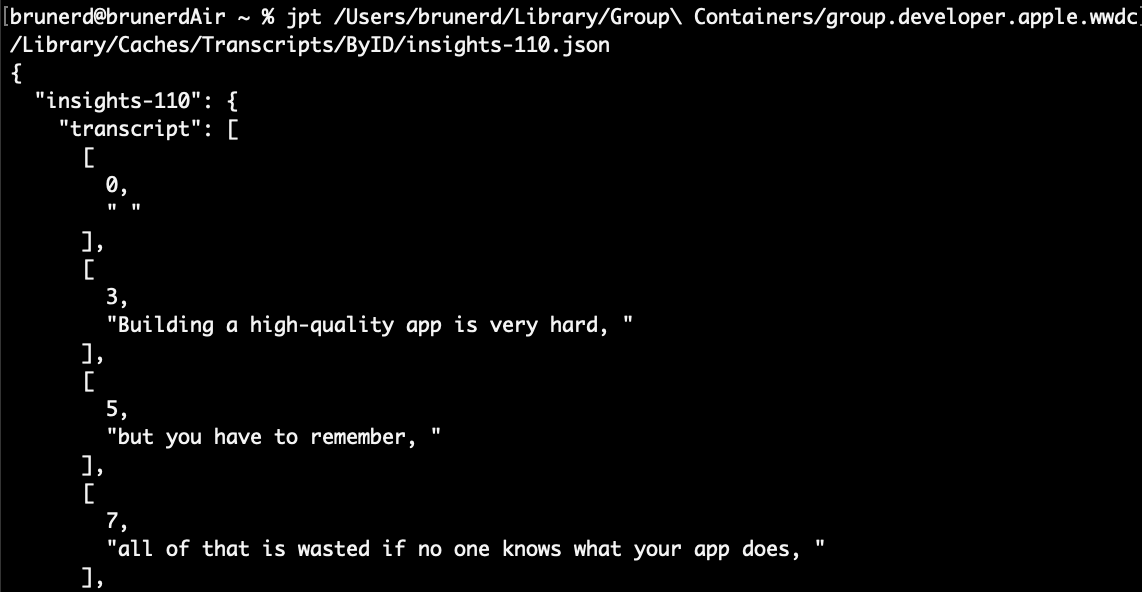
If you’ve downloaded the Developer app for the Mac there’s a trove of JSON transcripts cached in your home folder at ~/Library/Group Containers/group.developer.apple.wwdc/Library/Caches/Transcripts
Being curious I took a look at them using my JSON Power Tool jpt. In it’s default mode it will “pretty print” JSON or in Javascript parlance “stringify” them with a two space indent per nesting level. Inside it can be seen the transcripts are arrays of arrays inisde a uniquely named object. The 1st entry of the array is the time in seconds and the 2nd entry is the string we want.
Arrays of arrays
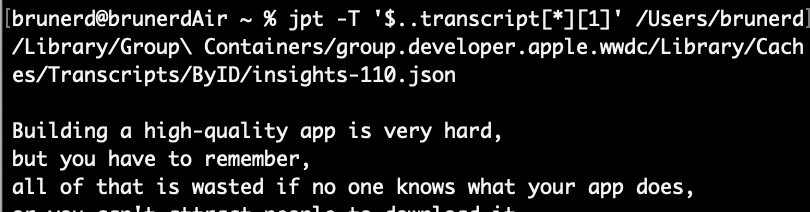
One of jpt’s cool features is that it supports the venerable yet nascent JSONPath query syntax. Using JSONPath we can use the recursive operator .. to go straight to the transcript object without needing determine the unique name of the parent object, then we want all the array within there [*]and inside those array we want the second entry of the 0 based array [1]. The query looks like this $..transcript[*][1]
Just text please
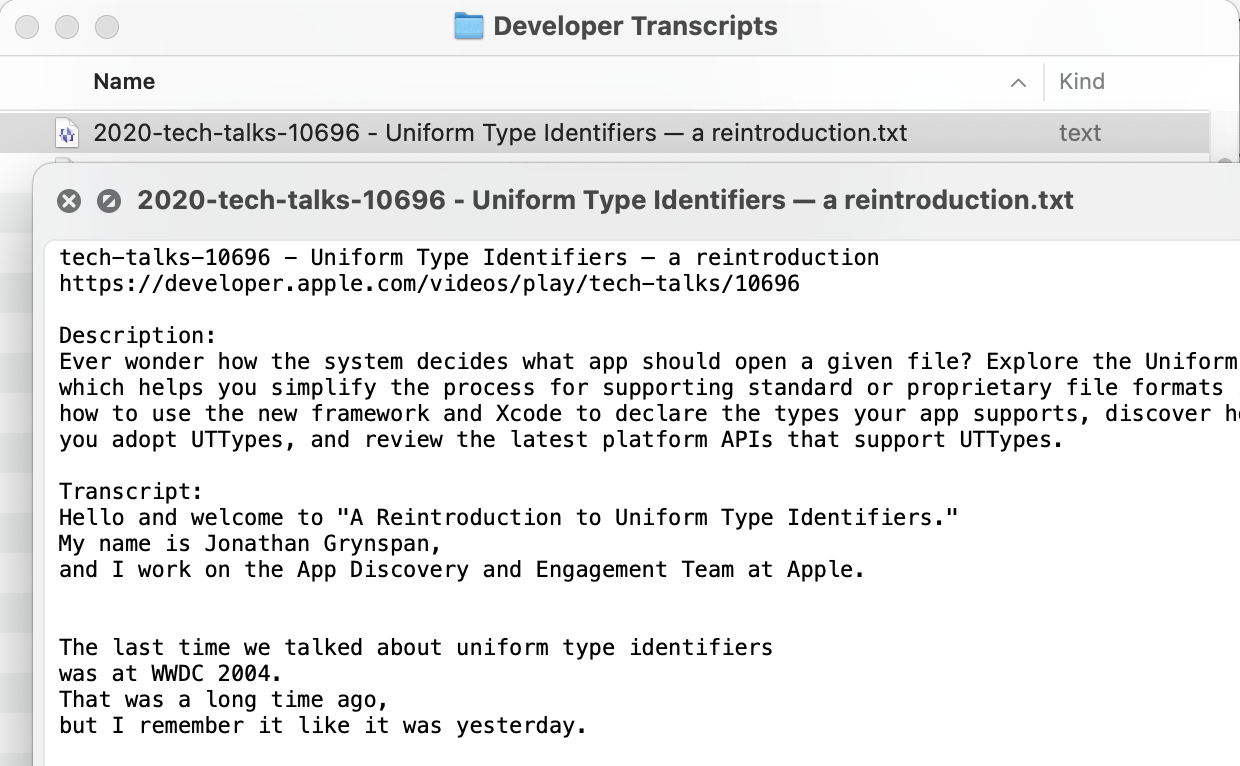
The query is single quoted so the shell doesn’t interpret the $ as the beginning of a variable name. The -T option for jpt it outputs text without quotes. The default output mode for jpt is JSON (double quoted strings). I added all sorts of other niceties to the script, as you’ll see below. The results are output to your ~/Desktop in a folder called Developer Transcripts
#!/bin/bash:<<-LICENSE_BLOCK
Developer Transcript Extractor Copyright (c) 2022 Joel Bruner. Licensed under the MIT License. Permission is hereby granted, free of charge, to any person obtaining a copy of this software and associated documentation files (the "Software"), to deal in the Software without restriction, including without limitation the rights to use, copy, modify, merge, publish, distribute, sublicense, and/or sell copies of the Software, and to permit persons to whom the Software is furnished to do so, subject to the following conditions: The above copyright notice and this permission notice shall be included in all copies or substantial portions of the Software. THE SOFTWARE IS PROVIDED "AS IS", WITHOUT WARRANTY OF ANY KIND, EXPRESS OR IMPLIED, INCLUDING BUT NOT LIMITED TO THE WARRANTIES OF MERCHANTABILITY, FITNESS FOR A PARTICULAR PURPOSE AND NONINFRINGEMENT. IN NO EVENT SHALL THE AUTHORS OR COPYRIGHT HOLDERS BE LIABLE FOR ANY CLAIM, DAMAGES OR OTHER LIABILITY, WHETHER IN AN ACTION OF CONTRACT, TORT OR OTHERWISE, ARISING FROM, OUT OF OR IN CONNECTION WITH THE SOFTWARE OR THE USE OR OTHER DEALINGS IN THE SOFTWARE.
LICENSE_BLOCK############# VARIABLES #############destinationFolderName="Developer Transcripts"destinationPath="${HOME}/Desktop/${destinationFolderName}"#you'll need to download the Developer app and launch it: https://apps.apple.com/us/app/apple-developer/id640199958transcriptPaths=$(find"${HOME}/Library/Group Containers/group.developer.apple.wwdc/Library/Caches/Transcripts/ByID" -name '*json')contentsJSON="${HOME}/Library/Group Containers/group.developer.apple.wwdc/Library/Caches/contents.json"######### MAIN ##########either jpt should be installed or the function jpt.min can be pasted in hereif!which jpt &>/dev/null;thenecho"Please install jpt or embed jpt.min in this script: https://github.com/brunerd/jpt"exit1fi#ensure the destination folder exists[! -d "${destinationPath}"]&&mkdir"${destinationPath}"#ignore spaces in file pathsIFS=$'\n'#loop through each transcript json filefortranscriptPathin${transcriptPaths};do#id is just the file name without the path and extensionid=$(cut -d. -f1 <<<"${transcriptPath##*/}")#a couple of nice-to-havestitle=$(jpt -T '$.contents[?(@.id == "'"${id}"'")].title' "${contentsJSON}")description=$(jpt -T '$.contents[?(@.id == "'"${id}"'")].description' "${contentsJSON}")#change \ (disallowed in Unix) to : (Disallowed in Finder byt allowed in Unix)title=${title//\//:}url=$(jpt -T '$.contents[?(@.id == "'"${id}"'")].webPermalink' "${contentsJSON}")#"wwdc" always has the year in the id but not tech-talks or insightsif!grep -q -i wwdc <<<"$id";thenyear="$(jpt '$.contents[?(@.id == "'"${id}"'")].originalPublishingDate' "${contentsJSON}" | date -j -r 1593018000 +"%Y")-"filename="${year}${id} - ${title}.txt"elsefilename="${id} - ${title}.txt"fi#put the ID and Title, the URL and Description at the top of the transcriptecho"${id} - ${title}">"${destinationPath}"/"${filename}"echo -e "${url}\n">>"${destinationPath}"/"${filename}"echo -e "Description:\n${description}\n\nTranscript:">>"${destinationPath}"/"${filename}"#append the transcript extract
jpt -T '$..transcript[*][1]'"${transcriptPath}">>"${destinationPath}"/"${filename}"#just echo out our progressecho"${destinationPath}"/"${filename}"done
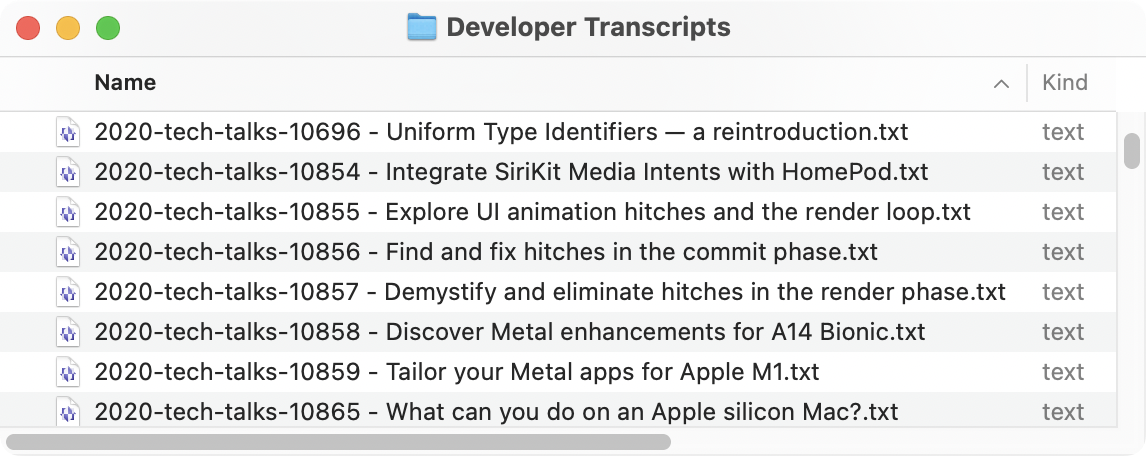
The final result is sortable folder of text files that you can easily QuickLook through.
Some serviceably readable contents!
So there you go! Some surprise JSON transcript files from the Apple Developer app, made me wonder how someone would turn them into human readable files. It turned out it was a fun and practical use of jpt and it’s support for JSONPath. You can download an installer package from the Releases page to try it out.
In four words Barbara Krueger distills the Golden Rule into an in-your-face admonishment: Don’t be a jerk. It makes for a great coffee mug but how does this relate to shell scripting for a Mac admin and engineer? Well, sometimes a script can only go so far and you need userconsent and cooperation to get the job done. Not being a jerk about it can pay off!
A good way to get cooperation from your users is to build upon a foundation of trust and respect. While IT has a long list of to-dos for users: “Did you reboot? Did you run updates? Did you open a ticket? Did you really reboot?” the users might have one for us: “Respect our screens when we’re in the middle of a client meeting and respect when Focus mode is turned on.” And they are right. That’s also two things. “Give an inch and they take a mile” I tell ya!
So how can we in IT can be considerate of our users? First, don’t do anything Nick Burns from SNL does. Second, use the functions below (and in my GitHub) to check if a Zoom, Teams, Webex, or Goto meeting is happening or if Do Not Disturb/Focus mode is on. When non-user-initiated scripts (i.e. daily pop-ups/nags/alerts) run they can bail or wait if the user is busy. If it were real life (and it is!) we wouldn’t walk into a meeting and bug a user, in front of everyone, to run update. If we did, they’d be more likely to remember how rude we were rather than actually running the updates. So let’s get their attention when they will be most receptive to what we have to say.
Detecting Online Meetings Apps
First up is inMeeting_Zoom which simply checks for the CptHost process and returns success or fail. Notice how this simple behavior can be used with an if/then statement. The return code is evaluated by the if, a zero is success and a non-zero is a failure. && is a logical AND and || is a logical OR
#!/bin/sh#inMeeting_Zoom (20220227) Copyright (c) 2022 Joel Bruner (https://github.com/brunerd)#Licensed under the MIT LicensefunctioninMeeting_Zoom{#if this process exists, there is a meeting, return 0 (sucess), otherwise 1 (fail)
pgrep "CptHost"&>/dev/null &&return0||return1}if inMeeting_Zoom;thenecho"In Zoom meeting... don't be a jerk"elseecho"Not in Zoom meeting"fi
Next is another process checker for Webex: inMeetng_Webex. What is a bit more unique is the process appears in psin parentheses as (WebexAppLauncher)however pgrep cannot find this process (because the actual name has been rewritten by the Meeting Center process). We instead use a combination of ps and grep. A neat trick with grep is to use a [] regex character class to surround a single character, this keeps grep from matching itself in the process list. That way you don’t need to have an extra grep -v grep to clean up the output.
#!/bin/sh#inMeeting_Webex (20220227) Copyright (c) 2022 Joel Bruner (https://github.com/brunerd)#Licensed under the MIT LicensefunctioninMeeting_Webex{#if this process exists, there is a meeting, return 0 (sucess), otherwise 1 (fail)ps auxww |grep -q "[(]WebexAppLauncher)"&&return0||return1}if inMeeting_Webex;thenecho"In Zoom meeting... don't be a jerk"elseecho"Not Webex in meeting"fi
Goto Meeting is more straightforward, although it should be noted that regardless of quote type, single or double, the parentheses must be escaped with a backslash. Otherwise, it’s the same pattern, look for the process name which only appears during a meeting or during the meeting preview and return 0 or 1 for if to evaluate, find it here: inMeeting_Goto
#!/bin/sh#inMeeting_Goto (20220227) Copyright (c) 2022 Joel Bruner (https://github.com/brunerd)#Licensed under the MIT LicensefunctioninMeeting_Goto(){#if this process exists, there is a meeting, return 0 (sucess), otherwise 1 (fail)
pgrep "GoTo Helper \(Plugin\)"&>/dev/null &&return0||return1}if inMeeting_Goto;thenecho"In Goto meeting... don't be a jerk"elseecho"Not in Goto meeting"fi
Lastly, Teams is a bit more complex, rather than looking for the presence of a process, we instead look for a JSON file in the user’s /Library/Application Support/Microsoft/Teams folder which has the current call status for both the app and the web plugin (the other methods above are for the app only). We’ll use the ljt to extract the value from the JSON. In fact I wrote ljt after starting to write this blog last week and realizing that jpt (weighing in at 64k) was just overkill. As a bonus to doing that, I just realized that bash functions can contain functions! Long ago I ditched using () in shell function declarations and just used the function keyword. Empty parentheses seemed decorative rather than functional since it’s not like it’s a C function that needs parameter names and types. However the lack of parentheses () apparently, prevents a function from being declared inside a function! Below I just wanted to make sure ljt doesn’t get separated from inMeetings_Teams
#!/bin/bash#inMeeting_Teams (20220227) Copyright (c) 2022 Joel Bruner (https://github.com/brunerd)#Licensed under the MIT Licensefunction inMeeting_Teams ()(function ljt ()(#v1.0.3[ -n "${-//[^x]/}"]&&set +x;read -r -d '' JSCode <<-'EOT'
try {var query=decodeURIComponent(escape(arguments[0]));var file=decodeURIComponent(escape(arguments[1]));if(query[0]==='/'){ query = query.split('/').slice(1).map(function (f){return "["+JSON.stringify(f)+"]"}).join('')}if(/[^A-Za-z_$\d\.\[\]'"]/.test(query.split('').reverse().join('').replace(/(["'])(.*?)\1(?!\\)/g, ""))){throw new Error("Invalid path: "+ query)};if(query[0]==="$"){query=query.slice(1,query.length)};var data=JSON.parse(readFile(file));var result=eval("(data)"+query)}catch(e){printErr(e);quit()};if(result !==undefined){result!==null&&result.constructor===String?print(result): print(JSON.stringify(result,null,2))}else{printErr("Node not found.")}
EOT
queryArg="${1}";fileArg="${2}";jsc=$(find"/System/Library/Frameworks/JavaScriptCore.framework/Versions/Current/" -name 'jsc');[ -z "${jsc}"]&&jsc=$(which jsc);[ -f "${queryArg}" -a -z "${fileArg}"]&&fileArg="${queryArg}"&&unset queryArg;if[ -f "${fileArg:=/dev/stdin}"];then{errOut=$({{"${jsc}" -e "${JSCode}" -- "${queryArg}""${fileArg}";}1>&3;}2>&1);}3>&1;else{errOut=$({{"${jsc}" -e "${JSCode}" -- "${queryArg}""/dev/stdin"<<<"$(cat)";}1>&3;}2>&1);}3>&1;fi;if[ -n "${errOut}"];then /bin/echo "$errOut">&2;return1;fi)consoleUser=$(stat -f %Su /dev/console)consoleUserHomeFolder=$(dscl . -read /Users/"${consoleUser}" NFSHomeDirectory |awk -F ': ''{print $2}')storageJSON_path="${consoleUserHomeFolder}/Library/Application Support/Microsoft/Teams/storage.json"#no file, no meeting[! -f "${storageJSON_path}"]&&return1#get both statesappState=$(ljt /appStates/states "${storageJSON_path}"|tr , $'\n'|tail -n 1)webappState=$(ljt /webAppStates/states "${storageJSON_path}"|tr , $'\n'|tail -n 1)#determine app stateif["${appState}"="InCall"]||["${webAppState}"="InCall"];thenreturn0elsereturn1fi)if inMeeting_Teams;thenecho"In Teams Meeting... don't be a jerk"elseecho"Not in Teams Meeting"fi
Detecting Focus (formerly Do Not Disturb)
Last but not least is determining Focus (formerly Do Not Disturb) with doNotDisturb. As you can see there’s been a few different ways this has been implemented over the years. In macOS 10.13-11 the state was stored inside of a plist. For macOS 12 Monterey they’ve switched from a plist to a JSON file. A simple grep though is all that’s needed to find the key name storeAssertionRecords. If it is off, that string is nowhere to be find, when it’s on it’s there. Simple (as in Keep it Simple Stoopid)
#!/bin/bash#doNotDisturb (grep) (20220227) Copyright (c) 2022 Joel Bruner (https://github.com/brunerd)#Licensed under the MIT License#An example of detecting Do Not Disturb (macOS 10.13-12)function doNotDisturb()(OS_major="$(sw_vers -productVersion |cut -d. -f1)"consoleUserID="$(stat -f %u /dev/console)"consoleUser="$(stat -f %Su /dev/console)"#get Do Not Disturb statusif["${OS_major}"="10"];then#returns c-cstyle boolean 0 (off) or 1 (on)dndStatus="$(launchctl asuser ${consoleUserID}sudo -u ${consoleUser} defaults -currentHost read com.apple.notificationcenterui doNotDisturb 2>/dev/null)"#eval c-style boolean and return shell style value["${dndStatus}"="1"]&&return0||return1#this only works for macOS 11 - macOS12 does not affect any of the settings in com.apple.ncprefselif["${OS_major}"="11"];then#returns "true" or [blank]dndStatus="$(/usr/libexec/PlistBuddy -c "print :userPref:enabled" /dev/stdin 2>/dev/null <<< "$(plutil -extract dnd_prefs xml1 -o - /dev/stdin <<< "$(launchctl asuser ${consoleUserID}sudo -u ${consoleUser} defaults export com.apple.ncprefs.plist -)"| xmllint --xpath "string(//data)" - | base64 --decode | plutil -convert xml1 - -o -)")"#if we have ANYTHING it is ON (return 0) otherwise fail (return 1)[ -n "${dndStatus}"]&&return0||return1elif["${OS_major}" -ge "12"];thenconsoleUserHomeFolder=$(dscl . -read /Users/"${consoleUser}" NFSHomeDirectory |awk -F ': ''{print $2}')file_assertions="${consoleUserHomeFolder}/Library/DoNotDisturb/DB/Assertions.json"#if Assertions.json file does NOT exist, then DnD is OFF[! -f "${file_assertions}"]&&return1#simply check for storeAssertionRecords existence, usually found at: /data/0/storeAssertionRecords (and only exists when ON)!grep -q "storeAssertionRecords""${file_assertions}"2>/dev/null &&return1||return0fi)if doNotDisturb;thenecho"DnD/Focus is ON... don't be a jerk"elseecho"DnD/Focus is OFF"fi
Since Focus can remain on indefinitely an end user may never see your pop-up. If so, build a counter with a local plist to record and increment the number of attempts. After a threshold has been reached you can then break through to the user (I certainly do).
Detecting Apps in Presentation Mode
A newer addition to this page is some code to detect fullscreen presentation apps that I cannot take credit for. Adam Codega, one of the contributors to Installomator hipped me to a cool line of code that was added in PR 268. It leverages pmset to see what assertions have been made to the power management subsystem. It uses awk to look for the IOPMAssertionTypes named NoDisplaySleepAssertion and PreventUserIdleDisplaySleep with some additional logic to throw out false positives from coreaudiod. In testing I’ve found this able to detect the presentation modes of Keynote, Powerpoint and Google Slides in Slideshow mode in Chrome (but not Safari), your mileage may vary for other apps. Another caveat is that when a YouTube video is playing in a visible tab, it will assert a NoDisplaySleepAssertion, however these will be named “Video Wake Lock” whereas a Slideshow presentation mode will have its name assertions named “Blink Wake Lock”. So I am adding an additional check to throw our “Video Wake Locks”. This may be more of a can of worms than you’d like, if so, user education to set Focus mode may be the way to go. A functionalized version can be found here: inPresentationMode
#!/bin/sh#inPresentationMode (20220319) Copyright (c) 2022 Joel Bruner (https://github.com/brunerd)#with code from Installomator (PR 268) (https://github.com/Installomator/Installomator) Copyright 2020 Armin Briegel#Licensed under the MIT LicensefunctioninPresentationMode{#Apple Dev Docs: https://developer.apple.com/documentation/iokit/iopmlib_h/iopmassertiontypes#ignore assertions without the process in parentheses, any coreaudiod procs, and "Video Wake Lock" is just Chrome playing a Youtube vid in the foregroundassertingApps=$(/usr/bin/pmset -g assertions | /usr/bin/awk '/NoDisplaySleepAssertion | PreventUserIdleDisplaySleep/ && match($0,/\(.+\)/)&&! /coreaudiod/ &&! /Video\ Wake\ Lock/ {gsub(/^.*\(/,"",$0); gsub(/\).*$/,"",$0); print};')
[ -n "${assertingApps}" ] && return 0 || return 1
}
if inPresentationMode; then
echo "In presentation mode... don't be a jerk"
else
echo "Not in presentation mode..."
fi
All together now
Putting it all together here’s how you can test multiple functions in a single if statement, just chain them together with a bunch of || ORs
#!/bin/bash#Joel Bruner - demo of meeting/focus aware functions for your script#pretend we've declared all the functions above and copy and pasted them in herefunction doNotDisturb()(:)function inMeeting_Teams()(:)functioninMeeting_Zoom(){:}functioninMeeting_Goto(){:}functioninMeeting_Webex(){:}functioninPresentationMode(){:}#test each one with || OR conditionals#the FIRST successful test will "short-circuit" and no more functions will be runif doNotDisturb || inPresentationMode || inZoomMeeting || inMeeting_Goto || inMeeting_Webex || inMeeting_Teams;thenecho"In a meeting, presentation, or Focus is On... don't be a jerk"#do something else, like wait elseecho"Not in a meeting..."#alert the user or do whatever you needed to do that might impact themfi
Using these functions in your scripts can help respect your users’ online meeting times and Focus states. Also it doesn’t hurt to document it somewhere and toot your own horn in a user facing KB or wiki. If and when a user complains about that pop-up that destroyed their concentration and their world, you can show them the forethought and effort you’ve taken to be as considerate as possible regarding this perceived incursion. This usually has the effect of blowing their mind that someone in IT is actually trying to be considerate!
P.S. I’m pretty stoked that Prism.js can really jazz up my normally dreary grey code blocks! I found a good WordPress tutorial here
ljt, the Little JSON Tool, is a concise and focused tool for quickly getting values from JSON and nothing else. It can be used standalone or embedded in your shell scripts. It requires only macOS 10.11+ or a *nix distro with jsc installed. It has no other dependencies.
You might have also seen my other project jpt, the JSON Power Tool. It too can be used standalone or embedded in a script however its features and size (64k) might be overkill in some case and I get it! I thought the same thing too after I looked at work of Mathew Warren, Paul Galow, and Richard Purves. Sometimes you don’t need to process JSON Text Sequences, use advanced JSONPath querying, modify JSON, or encode the output in a myriad of ways. Maybe all you need is something to retrieve a JSON value in your shell script.
Where jpt was an exercise in maximalism, ljt is one of essential minimalism – or at least as minimal as this CliftonStrengths Maximizer can go! The minified version is mere 1.2k and offers a bit more security and functionality than a one-liner.
ljt features: • Query using JSON Pointer or JSONPath (canonical only, no filters, unions, etc) • Javascript code injection prevention for both JSON and the query • Multiple input methods: file redirection, file path, here doc, here string and Unix pipe • Output of JSON strings as regular text and JSON for all others • Maximum input size of 2GB and max output of 720MB (Note: functions that take JSON data as an environment variable or an argument are limited to a maximum of 1MB of data) • Zero and non-zero exit statuses for success and failure, respectively
Swing by the ljt Github page and check it out. There are two versions of the tool one is fully commented for studying and hacking (ljt), the other is a “minified” version without any comments meant for embedding into your shell scripts (ljt.min). The Releases page has a macOS pkg package to install and run ljt as a standalone utility.
Besides JSON, jpt (the JSON power tool) can also output strings and numbers in a variety of encodings that the sysadmin or programmer might find useful. Let’s look at the encoding options from the output of jpt -h
% jpt -h
...
-T textual output of all data (omits property names and indices)
  Options:
	-e Print escaped characters literally: \b \f \n \r \t \v and \\ (escapes formats only)
	-i "<value>" indent spaces (0-10) or character string for each level of indent
	-n Print null values as the string 'null' (pre-encoding)

	-E "<value>" encoding options for -T output:

	  Encodes string characters below 0x20 and above 0x7E with pass-through for all else:
		x 	"\x" prefixed hexadecimal UTF-8 strings
		O 	"\nnn" style octal for UTF-8 strings
		0 	"\0nnn" style octal for UTF-8 strings
		u 	"\u" prefixed Unicode for UTF-16 strings
		U 	"\U "prefixed Unicode Code Point strings
		E 	"\u{...}" prefixed ES2016 Unicode Code Point strings
		W 	"%nn" Web encoded UTF-8 string using encodeURI (respects scheme and domain of URL)
		w 	"%nn" Web encoded UTF-8 string using encodeURIComponent (encodes all components URL)

		  -A encodes ALL characters

	  Encodes both strings and numbers with pass-through for all else:
		h 	"0x" prefixed lowercase hexadecimal, UTF-8 strings
		H 	"0x" prefixed uppercase hexadecimal, UTF-8 strings
		o 	"0o" prefixed octal, UTF-8 strings
		6 	"0b" prefixed binary, 16 bit _ spaced numbers and UTF-16 strings
		B 	"0b" prefixed binary, 8 bit _ spaced numbers and UTF-16 strings
		b 	"0b" prefixed binary, 8 bit _ spaced numbers and UTF-8 strings

		  -U whitespace is left untouched (not encoded)
Strings
While the above conversion modes will do both number and string types, these options will work only on strings (numbers and booleans pass-through). If you work with with shell scripts these techniques may be useful.
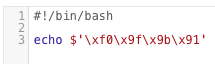
If you store shell scripts in a database that’s not using utf8mb4 table and column encodings then you won’t be able to include snazzy emojis to catch your user’s attention! In fact this WordPress install was so old (almost 15 years!) the default encoding was still latin1_swedish_ci, which an odd but surprisingly common default for many old blogs. Also if you store your scripts in Jamf (still in v10.35 as of this writing) it uses latin1 encoding and your 4 byte characters will get mangled. Below you can see in Jamf things look good while editing, fails once saved, and the eventual workaround is to use an coding like \x escaped hex (octal is an alternate)
Left to Right: Put 4 byte Unicode in Jamf, Saved and mangled, \x escaping workaround
Let’s use the red “octagonal sign” emoji, which is a stop sign to most everyone around the world, with the exception of Japan and Libya (thanks Google image search). Let’s look at some of the way can be encoded in a shell script
#reliable \x hex notation for bash and zsh
% jpt -STEx <<< "Alert "
Alert \xf0\x9f\x9b\x91

#above string can be  in both bash and zsh
% echo $'Alert \xf0\x9f\x9b\x91'
Alert

#also reliable, \nnn octal notation
% jpt -STEO <<< "Alert "
Alert \360\237\233\221

#works in both bash and zsh
% echo $'Alert \360\237\233\221'
Alert

#\0nnn octal notation
% jpt -STE0 <<< "Alert "
Alert \0360\0237\0233\0221

#use with shell builtin echo -e and ALWAYS in double quotes
#zsh does NOT require -e but bash DOES, safest to use -e
% echo -e "Alert \0360\0237\0233\0221"
Alert

#-EU code point for zsh only
% jpt -STEU <<< "Alert "
Alert \U0001f6d1

#use in C-style quotes in zsh
% echo $'Alert \U0001f6d1'
Alert
The -w/-W flags can encode characters for use in URLs
#web/percent encoded output in the case of non-URLs -W and -w are the same
% jpt -STEW <<<
%F0%9F%9B%91

#-W URL example (encodeURI)
jpt -STEW <<< http://site.local/page.php?wow=
http://site.local/page.php?wow=%F0%9F%9B%91

#-w will encode everything (encodeURIComponent)
% jpt -STEw <<< http://site.local/page.php?wow=
http%3A%2F%2Fsite.local%2Fpage.php%3Fwow%3D%F0%9F%9B%91
And a couple other oddballs…
#text output -T (no quotes), -Eu for \u encoding
#not so useful for the shell scripter
#zsh CANNOT handle multi-byte \u character pairs
% jpt -S -T -Eu <<< "Alert "
Alert \ud83d\uded1

#-EE for an Javascript ES2016 style code point
% jpt -STEE <<< "Alert "
Alert \u{1f6d1}
You can also \u encode all characters above 0x7E in JSON with the -u flag
#JSON output (not using -T)
% jpt <<< '"Alert "'
"Alert "

#use -S to treat input as a string without requiring hard " quotes enclosing
% jpt -S <<< 'Alert '
"Alert "

#use -u for JSON output to encode any character above 0x7E
% jpt -Su <<< 'Alert '
"Alert \ud83d\uded1"

#this will apply to all strings, key names and values
% jpt -u <<< '{"":"stop", "message":"Alert "}'
{
  "\ud83d\uded1": "stop",
  "message": "Alert \ud83d\uded1"
}
Whew! I think I covered them all. If there are newlines, tabs and other invisibles you can choose to output them or leave them encoded when you are outputting to text with -T
#JSON in, JSON out
jpt <<< '"Hello\n\tWorld"'
"Hello\n\tWorld"

#ANSI-C string in, -S to treat as string despite lack of " with JSON out
% jpt -S <<< $'Hello\n\tWorld'
"Hello\n\tWorld"

#JSON in, text out: -T alone prints whitespace characters
% jpt -T <<< '"Hello\n\tWorld"'
Hello
	World

#use the -e option with -T to encode whitespace
% jpt -Te <<< '"Hello\n\tWorld"'
Hello\n\tWorld
Numbers
Let’s start simply with some numbers. First up is hex notation in the style of 0xhh and 0XHH. This encoding has been around since ES1, use the -Eh and -EH respectively to do so. All alternate output (i.e. not JSON) needs the -T option. In shell you can combine multiple options/flags together exceptonly the last flag can have an argument, like -E does below.
Binary notation debuted in the ES6 spec, it used a 0b prefix and allows for _ underscore separators
#-E6 16 bit wide binary
% jpt -TE6 <<< [255,256,4095,4096]
0b0000000011111111
0b0000000100000000
0b0000111111111111
0b0001000000000000

#-EB 16 bit minimum width with _ separator per 8
% jpt -TEB <<< [255,256,4095,4096]
0b00000000_11111111
0b00000001_00000000
0b00001111_11111111
0b00010000_00000000

#-Eb 8 bit minimum width with _ separator per 8
% jpt -TEb <<< [15,16,255,256,4095,4096]
0b00001111
0b00010000
0b11111111
0b00000001_00000000
0b00001111_11111111
0b00010000_00000000
If you need to encode strings or numbers for use in scripting or programming, then jpt might be a handy utility for you and your Mac and if your *nix has jsc then it should work also. Check the jpt Releases page for Mac installer package download.
I’m happy to announce that jpt, the JSON power tool, has been updated to 1.0 and is available on my GitHubReleases page! It’s been over a year since the last release and I’ve been of working on, learning, and pondering what a really useful JSON tool could be and then working like heck to make it a reality.
jpt is a command line utility for formatting, querying, and modifying JSON. It can run on any version of macOS and most any Unix/Linux with jsc (JavaScriptCore) installed, otherwise it’s dependency free! For systems administrators and MacAdmins who need first class JSON tooling in their own shell scripts it can be embedded as a shell function in either bash or zsh. jpt was built to stand the test of time, needing only jsc and a shell, it will work on the newest macOS all the way back to OS X 10.4 Tiger!
There’s a year’s worth of bug fixes, improvements, and new features, let’s take a look at some of them.
Notable Features and Improvement
• jpt can now input and output multi-JSON documents like JSON Text Sequences (RFC 7464) plus other non-standard formats like NDJSON and JSON Lines and concatenated JSON. See: jpt 1.0 can deal with multiple JSON texts
• Truncated JSON can be de detected in concatenated/lines JSON and repaired by closing up open strings, arrays and objects. See: Helping truncated JSON data with jpt 1.0
• jpt can now fully rehabilitate JSON5 back to standard JSON. As I learned last year, there’s more mutant JSON than I realized! See: jpt 1.0 and JSON5 rehab
• jpt can query JSON using both JSON Pointer, IETF RFC 6901 and JSONPath, a nascent draft RFC with powerful recursive search and filtering features.
• jpt can manipulate JSON using JSONPatch, JSON Merge Patch, and some new merge modes not found anywhere else. See: merging JSON objects with jpt 1.0
• shell scripters and programmers may find it useful that jpt has extensive string and number encoding capabilities. From classic encodings like hex, octal, and binary to more recent ones like URL/”percent” encoding and Unicode code points. See: jpt 1.0 text encoding fun
• Need help finding visualizing JSON in new ways? jpt can output the structure of JSON in ways not seen, like JSONPath Object Literals which are simply the JSONPath, an equal sign, and the JSON value (e.g. $.ok="got it"). This simple and powerful declarative syntax can help find the exact path to a particular value and can also be used to quickly prototype a JSON object. See: jpt: see JSON differently
Try it out
There’s a lot to explore in jpt 1.0, download it from my GitHub with a macOS installer package in the Releases page. Check out my other jpt blog entries here at brunerd. As the IETF JSONPath standard takes shape I’ll be updating jpt to accomodate that standard. Until then, I hope this tool helps you in your JSON work, play, or research!
In my previous post, Automating automatic login, we looked at how to create the /etc/kcpassword file used for automatic login by using only shell script and built-in command line tools. Why shell only? In preparation for the great scripting runtime deprecation yet to come, I say! Now it’s time to do the reverse for auto login. Let’s get those details back out! Who would need to do such a thing? Imagine a scenario where you the hapless Mac admin have inherited a bunch of Zoom Room Mac minis with auto-login enabled yet no one has documented the passwords used for them! If they are enrolled in Jamf there’s no need to guess what annoying l33t sp3@k password was used, let’s leverage our XOR’ing skills and knowledge of how kcpassword works to send those details back to Jamf.
To get the password back out of /etc/kcpassword we XOR the password again with the same cipher used to obfuscate it originally however but instead of padding it in multiples of 12, we will stop when a character is the same as the current cipher character. FYI when you XOR a value with itself the result is 00 but that’s an unnecessary operation, we can just compare the characters. Voilá, that’s it.
This file contains hidden or bidirectional Unicode text that may be interpreted or compiled differently than what appears below. To review, open the file in an editor that reveals hidden Unicode characters.
Learn more about bidirectional Unicode characters
Now for something a bit more useful to those with Jamf or other management tools: getAutoLogin. It reports the auto login username, if set, and the decodes the /etc/kcpassword file, if present. Note that until macOS 12 Monterey /etc/kcpassword was not removed when Automatic Login was turned off in System Preferences! Here’s what getAutoLogin looks in the Jamf policy logs:
Plaintext passwords in your logs are probably not the best, but hey, how else you gonna figure out your dang Zoom Room passwords? After retrieving the credentials and storing somewhere more secure, like a password manager, make sure to Flush the policy logs! Thanks for reading, I hope this comes in handy or at the very least was informative and mildly entertaining.
I recently had some Zoom Room Macs that needed some automation love and I thought I’d share how you can enable Automatic Login via script, perhaps you have several dozen and use Jamf or some other Mac management tool? Interested? Read on! Currently what’s out there are either standalone encoders only or part of larger packaging workflow to create a new user. The standalone encoders lacked some niceties like logging or account password verification and the package method added the required dependency of packaging if any changes were required. Above all, every script required Python, perl or Ruby, which are all on Apple’s hit list for removal in an upcoming OS release. For now macOS Monterey still has all of these runtimes but there will come a day when macOS won’t and will you really want to add 3rd party scripting runtimes and weaken your security by increasing attack surface when you can weaken your security using just shell? So for some fun, I re-implemented the /etc/kcpassword encoder in shell so it requires only awk, sed, and xxd, all out of the box installs. I also added some bells and whistles too.
Some of the features are:
If the username is empty, it will fully disable Automatic Login. Since turning it off via the System Preferences GUI does not remove the /etc/kcpassword file if it has been enabled (!)
Ensures the specified user exists
Verifies the password is valid for the specified user
Can handle blank passwords
Works on OS X 10.5+ including macOS 12 Monterey
For the Jamf admin the script is setAutomaticLogin.jamf.sh and for standalone usage get setAutomaticLogin.sh, both take a username and password, in that order and then enable Automatic Login if it all checks out. The difference with the Jamf script is that the first parameter is ${3} versus ${1} for the standalone version.
Also here’s a well commented Gist as a little show and tell for what the shell only version of the kcpassword encoder looks like. Enjoy!
This file contains hidden or bidirectional Unicode text that may be interpreted or compiled differently than what appears below. To review, open the file in an editor that reveals hidden Unicode characters.
Learn more about bidirectional Unicode characters
Update: I meant to expound on how it didn’t seem that padding kcpassword to a length multiple of 12 was necessary, since it had been working fine on the versions I was testing with but then I tested on Catalina (thinking of this thread) and was proven wrong by Catalina. I then padded with 0x00 with HexFiend in a successful test but was reminded that bash can’t handle that character in strings, instead I padded with 0x01, which worked on some macOS versions but not others. Finally, I settled on doing on what macOS does somewhat, whereas it pads with the next cipher character then seemingly random data, I pad with the cipher characters for the length of the padding. This works for Catalina and other of macOS versions.
Big Hat Tip to Pico over at MacAdmins Slack for pointing out this issue in pycreateuserpkg where it’s made clear that passwords with a lengths of 12 or multiples thereof, need another 12 characters of padding (or in some newer OSes at least one cipher character terminating the kcpassword data, thanks!
If you work with Macs and Jamf then you know every year there’s a new per OS Extension Attribute (EA) or Smart Group (SG) recipe to determine if macOS will run on your fleets hardware. However I asked myself: What if a single Extension Attribute script could fill the need, requiring only a periodic updating of Model IDs and the addition of new macOSes?
Then I also asked: Could this same script be re-purposed to output both text and CSV, not just for the script’s running host but for a list of Model IDs? And the answer was a resounding yes on all fronts!
EA Answers
So, my fellow Jamf admin I present to you macOSCompatibility.sh in its simplest form you just run the script and it will provide ultra-sparse EA output like: <result>10.14 10.15 11</result> this could then be used as a Smart Group criteria. Something like “macOS Catalina Compatible” would then match all Macs using LIKE 10.15 or “Big Sur Incompatible” would use NOT LIKE 11, of course care would be taken if you were also testing for 10.11 compatibility, however the versionsToCheck variable in the script can limit the default range to something useful and speeds things up the less version there are. I hope this helps Jamf admins who have vast unwieldy fleets where hardware can vary wildly across regions or departments,
CSV Answers
Now if you provide a couple arguments like so: ./macOSCompatibility.sh -c -v ALL ALL > ~/Desktop/macOSCompatibilityMatrix.csv you will get a pretty spiffy CSV that let’s you visualize which Mac models over the years have enjoyed the most and least macOS compatibility. This is my favorite mode, you can use it to assess the OS coverage of past Macs.
See macOSCompatibilityMatrix.csv for an example of the output. If you bring that CSV into Numbers or Excel you can surely liven it up with some Conditional Formatting! This is the barest of examples:
Can you spot the worst and best values?
Text Answers
If you don’t use the -c flag then it’ll just output in plain or text, like so: ./macOSCompatibility.sh -v ALL ALL
Now, it’s not totally perfect since some models shared Model IDs (2012 Retina and Non-Retina MacBook Pros for example) but for the most part the Intel Mac Model IDs were sane compared to the PPC hardware Model IDs: abrupt jumps, overlaps, and re-use across model familes. Blech! I’m glad Apple “got religion” for Model IDs (for the most part) when Intel CPUs came along. I did attempt to go back to 10.1-10.3 with PPC hardware but it was such a mess it wasn’t worth it. However testing Intel, Apple Silicon and VMs against macOS 10.4 – 11+ seems to have some real use and perhaps you think so too? Thanks for reading!
I am a creature of habit, no doubt, however sometimes you must get out of your comfort zone. The Jamf Universal API (UAPI) is one such case, it is JSON only and not XM. Those tried and true xpath snippets will no longer work with JSON, in fact what tool do you use with JSON? macOS really doesn’t have a good built-in JSON tool and if your scripts are client side do you really want to have jq as a dependency? Good thing I wrote a JSON parser you can embed in your scripts this summer! In fact, when I finished writing my JSON power tool jpt, I needed to find some practical examples to demonstrate its utility. Looking at the UAPI it’s clear some parts are still a work-in-progress, however the endpoint for scripts is actually really good. It gives you everything in one go almost like a database query. That should made backing up scripts a breeze!
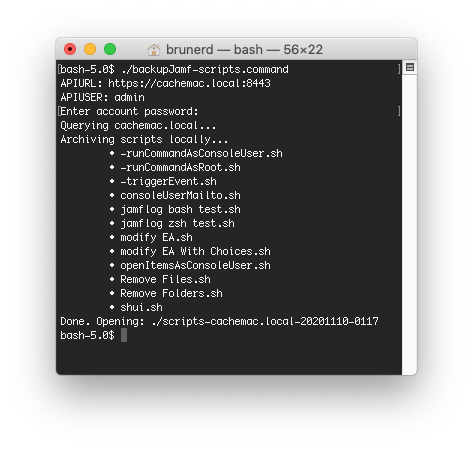
backupJamf-scripts. boom.
If you’ve used the Classic API from Jamf, it is a 1:1 ratio of scripts to API calls: 2 scripts? 2 API calls via curl. 200 scripts? 200 API calls via curl. The new Universal API reduces that down to 1 call to get everything (plus one call to get the token), it’s super fast and I love it. Check out backupJamf-scripts.command in my newly minted jamfTools repo on GitHub for a working demostration of both the Jamf UAPI and jpt’s in-script JSON handling. I hope you like it!
 (I kid, I kid!)

 that someone in IT is actually trying to be considerate!
 I found a good WordPress tutorial
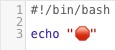

 can be encoded in a shell script
 by
by 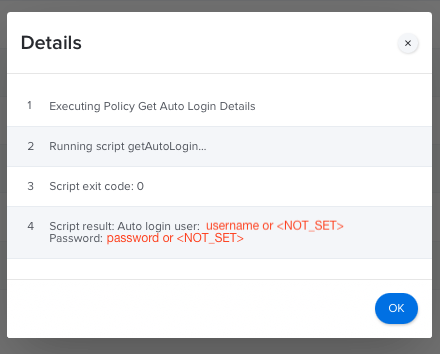
 So for some fun, I re-implemented the