There’s a few methods floating out on the web, but I’d just like to point out a quick and reliable way to get the current console user on macOS using stat. This works great with Fast User Switching and if the mac is at the login screen it will return root as the user
consoleUser=$(stat -f %Su /dev/console)
There you go! Now go forth and script.
Also, if you are using backticks ` to capture output (a.k.a. command substitution) then consider using the more modern and nest-able $(…) method, here’s a good reason why: Why is $(…) preferred over `…` (backticks)?
The brunerd blog has been a whole lot of nothing lately, so let’s commemorate and celebrate with an entry featuring the premiere of the bash tag and category… hmm, which one is more useful? We’ll find out. Now as for nothing, there’s a legit command, special built-in to do nothing in bash!
man page for bash command :
: [arguments]
No effect; the command does nothing beyond expanding arguments and performing any specified redirections. A zero exit code is returned.
Isn’t that lovely? When you need to do nothing, you can call :
Perhaps you are writing a script and aren’t sure what you’ll do for that if statement —
if [ "${this}" == "that" ]; then

#actually not sure what to do here, let's do nothing

:

else

echo "This else, I'll do"

fi
I made a gist here and I think I’ll keep making more. I’ll feature them here with the bash tag, if only as an auxillary backup of my brain and to add to the collective patchwork quilt of code we all use to get our ideas off the ground, when our reach is just a hare shy of grasp and we need a little help.
Also in the gist was a snippet of a novel use by kbeck at Extensis in his UTC removal script to use : to redirect a here document into itself and server as a comment block that doesn’t need # on every line to be treated as a comment —
: <<COMMENTBLOCK
[ ] 2016-0324: enclose me; love me. i am a block of comments
** Update: Recovery HD updaters packages for 10.11 will only work when run in OS X 10.11, previous packages could run in different OSesnot so for 10.11
Building off the previous work the updated script will now create a nicely named dmg
Containing both an interactive script for updating disks and a new script to create a .pkg!
The fruits of RecoveryHD PKG Maker.command:
Custom Bundle ID is interactively provided, the PackageVersion is matched to the OS release. Signing identity is asked for in the script but not tested (my cert might be broken, YMMV). The target of the package is always / – an exercise for the reader to change the postinstall script to use Installer’s variables to affect the target The exercise to make the .pkg targetable has been exercised by me… Enjoy!
Some exercises in handling parameters in a script:
Using BASH_ARGV to loop through all arguments
#!/bin/bash

#debugging output

[ -f /tmp/debug ] && set -x
#Loop Though the arguments provided
#BASH places arguments in reverse order in BASH_ARGV array
#Start at end of array (ARGC – 1)
for (( i=$(( $BASH_ARGC – 1 )); i>=0; i– )); do
item=”${BASH_ARGV[$i]}”
echo “\$$(( $BASH_ARGC – $i )): $item”
done
Loop through all arguments with special handling of first and last only
#!/bin/bash

[ -f /tmp/debug ] && set -x

##loop through parameters, start with end of BASH_ARGV

for (( loopNumber=1, i=$(( $BASH_ARGC - 1 )); i>=0; i--, loopNumber++ )); do

#do something special for first and last

if [ $i -eq $(( $BASH_ARGC - 1 )) ]; then

conditionalString="(I am the first one!)"

elif [ $i -eq 0 ]; then

conditionalString="(I am the last one!)"

else

unset conditionalString

fi

echo Arg $loopNumber: ${BASH_ARGV[$i]} $conditionalString

done
Loop through all arguments with special handling of first and everything else
#!/bin/bash

[ -f /tmp/debug ] && set -x
##loop through parameters, start with end of BASH_ARGV
for (( loopNumber=1, i=$(( $BASH_ARGC – 1 )); i>=0; i–, loopNumber++ )); do
#if not the last don’t restart dock
if [ $i -eq $(( $BASH_ARGC – 1 )) ]; then
unset conditionalString
conditionalString=”(I am the first)”
else
conditionalString=”(I am not the first)”
fi
Loop through all arguments with special handling of the last and everything else
#!/bin/bash

[ -f /tmp/debug ] && set -x
##loop through parameters, start with end of BASH_ARGV
for (( loopNumber=1, i=$(( $BASH_ARGC – 1 )); i>=0; i–, loopNumber++ )); do
#if not the last don’t restart dock
if [ ! $i -eq 0 ]; then
conditionalString=”(I am not the last)”
else
unset conditionalString
#conditionalString=”(I am the last)”
fi
So when Safari 6 came out, Apple did away with download links from their Support site.
Why? Who knows. But it’s a real pain when you have børked install or install a Developer preview (which sometimes will not register in Software Updates and need to get up to the latest release.)
I contributed this tip to Apple Discussions in the HT5275 Safari 6 download thread and am reposting here as well since I repeatedly keep going back to get the command I authored! (No I don’t run Apple Software Update server, I have my own distribution methods for work that don’t involve merging software update catalogs and other ridiculous things OS X Server requires you to do if you dare run various OS X versions and don’t run the latest server). I parenthetically digress.
Here’s the Terminal command to spit out some Safari6 URLs (OS X 10.6-10.8):
It’ll give you something like this: <string>http://swcdn.apple.com/content/downloads/18/32/041-6651/147ugedbeiqpz43czixlgawayfoa7tjyjv/Safari6.1MountainLion.pkg</string><string>http://swcdn.apple.com/content/downloads/47/40/041-6648/a9y00qwi8esz3gl5v2gfik1p3rgvn7zftz/Safari6.1Lion.pkg</string>
I know, not pretty right? But what you can do then is copy and paste the URL into Safari’s Address/Search bar and hit Option-Enter which will then download it.
Viola. A Safari 6 package.
Update for 10.9:
Now when you grep SoftwareUpdate there are multiple URLs for the seed programs, the easiest way to deal with this and still be generic is to loop through all the URLs grepping for Safari
for URL in $(strings /System/Library/PrivateFrameworks/SoftwareUpdate.framework/SoftwareUpdate | grep http | grep sucatalog); do curl -s "$URL" | grep Safari | grep pkg; done
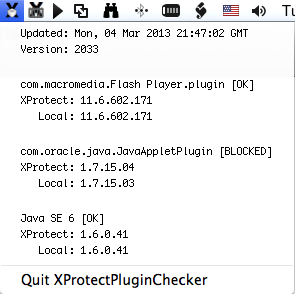
Written in BASH, sprinkled with PlistBuddy/awk/sed-Fu with a dash of mdfind magic, and wrapped with Platypus, the aim is for XProtect Plugin Checker to be able to dynamically accommodate any additions Apple might make to the Plugin Blacklist, although only Flash and Java seem to be in their crosshairs right now, who knows? Silverlight might be next, given its lack of updates (going on 10 months).
A bonus idea for making this more useful is to make a launchd script that watches the XProtect plist file(s) then fires off the XProtectPluginChecker script when they change, emailing the results to you, because knowing is half the battle!
If you find this useful or if you have some hiccups with it, let me know. UPDATE: Now with comments enabled! :]
Also related, myXProtectStatus is a similar style menu status script that lists the malware threats Apple is blocking.
Apple recently announced that certain iMacs with 1TB Seagate hard drives are eligible for replacement. If you have one iMac it’s easy to check it on their website here.
However if you have a lot of iMacs at your company you might prefer to do this a bit more quickly! The following command can be sent via ARD:
To explain: It’s using curl to send a request to the Apple URL, the sn= field is populated with the results of the ioreg command, which is cleaned up with awk (thanks OS X Hints), stderr of curl is sent to /dev/null so you don’t get the download/progress output that curl usually displays.
Another variation is if you already have a list of serial numbers, separated with some sort of whitespace. You can put them in a bash variable and loop though them locally:
serialNumbers="QP0231XXXPK
QP0240XXYRU
D25FP1TXXXJT
QP6481XXXUW"

for number in $serialNumbers; do echo $number $(curl "https://supportform.apple.com/201107/SerialNumberEligibilityAction.do?cb=iMacHDCheck.response&sn=$number" 2>/dev/null); done
This outputs the serial number queried and the response from the Apple server on each line. E03 the response you’ll be looking for. I’ll leave it to you the reader if you want to do any additional cleanup of the output, here’s a sample:
QP0231XXXPK iMacHDCheck.response({"ERROR_CODE":"E08","ERROR_DESC":"Valid iMac SN but WoM is outside of program range"})
QP0240XXXRU iMacHDCheck.response({"ERROR_CODE":"E03","ERROR_DESC":"Valid iMac SN has Seagate HDD - covered by program"})
D25FP1TXXXJT iMacHDCheck.response({"ERROR_CODE":"E07","ERROR_DESC":"Valid iMac SN with NO Seagate HDD"})
QP6481XXXUW iMacHDCheck.response({"ERROR_CODE":"E02","ERROR_DESC":"Serial ID is not iMac."})
The latest Java update for Lion 2012-003 ( which after 3 revisions is still called JavaForOSX-1.0 in Software Update – oh, Apple! But I digress…) will turn off Java if it hasn’t been used in 30 days (or so I hear). It accomplishes this by writing a value to the WebComponentsLastUsed in ~/Library/Preferences/ByHost/com.apple.java.JavaPreferences.UUID.plist.
It used to be enough to have WebComponentsEnabled set to True, but now WebComponentsLastUsed is required or the unclickable “Plugin-Disabled” button will be shown in Safari’s lower right corner (it totally looks clickable yeah?)
If you work at a company that requires Java web components to be on for things like timesheets, making sure Java stays on helps to avoid getting help desk calls.
So I needed to figure out how this value was computed, it was too small to be the Unix epoch (seconds since January 1, 1970), so I did some sleuthing, some comparitive analysis (just to sound fancy), and figured out it is the number of seconds since January 1, 2001. To get this value you just need to get the Unix epoch and subtract the number of seconds since Jan 1, 2001.
Here’s the way to get this value in a BASH Terminal:
echo $(( $(date "+%s") - 978307200 ))
Toggling the check box in /Applications/Utilities/Java Preferences will reset the WebComponentsLastUsed value and you will find it very close to the value from Terminal.
Wasn’t that fun? The Der Flounder blog has a script using this method to turn on Java. He was a good sport to incorporate my code, too. He enlightened me with his UUID scripting code, so share and share alike, I say.
Bonus link for Apple’s other epoch time, for iTunes’ XML Play Date field: January 1, 1904 – that’s the first year of the last century with a leap year, so says Filemaker! ;)
Apple released the Lion Recovery Update in October, 2011, and, after they updated the Lion recovery partition to 10.7.2, there was a great hint from Clay Caviness who dug into the update and highlighted the the relevant files and commands that it used to accomplish this update.
Recently, 10.7.3 came out, however, and the RecoveryHD partition is not updated if you use Software Update; it will stay at 10.7.2. This is probably not a big deal, as Apple didn’t deem it necessary to update, but for some users, this may not be good enough.
Note: Running the full 10.7.3 installer from the App Store will update the partition; this is fine for your home computer but not practical for large deployments.
Script Workflow:
Asks for locations of Recovery Update, Install OS X Lion.app, and destination
Expands and collects the dmtest tool from the Lion Recovery Update
Collects the hidden Basesystem chunklist and dmg found in the InstallESD.dmg inside “Install Mac OS X Lion.app”
The script making the Disk Image
Puts it all neatly into a self-contained disk image along with the script RecoveryHD Updater.command which can be used to easily create or update the RecoveryHD partition, even on the disk you are currently booted from; don’t worry dmtest takes care of all the logic to create or update.
The final disk image
Requirements:
Download the latest version of Install OS X Lion.app. Option-click the Purchases tab in the App Store and you will be able to “Install” (download) the latest version available
#!/bin/bash

#this script will make a disk image with the tools needed to update your Recovery HD with the newest OS X Lion release

#Required components:
#Lion Recovery Update v1.0 - http://support.apple.com/downloads/DL1464/en_US/RecoveryHDUpdate.dmg
#"Install Mac OS X Lion.app" - App Store

###########################
# RecoveryHD Updater.command
###########################

#this script that will be saved to the disk image that is created
RecoveryHDUpdaterScript='#!/bin/bash
clear;
MYPATH="$(dirname "$0")"

#get destination drive
if [ "$1" == "" ]; then
echo -n "Please drag in DESTINATION disk for Recovery HD partition and press Enter: "
while [ -z "$DEST" ]; do
read DEST
done
if [ ! -d "$DEST" ]; then echo "$DEST not found"; exit; fi
else
DEST="$1"
fi

#create Recovery partition
sudo "$MYPATH"/bin/dmtest ensureRecoveryPartition "$DEST" "$MYPATH"/etc/BaseSystem.dmg 0 0 "$MYPATH"/etc/BaseSystem.chunklist
'
######
# END
######

###########################
# VARIABLES
###########################

#IMAGETEMP is the pathname for the disk image being built, will the OS and Build appended to the name later
IMAGETEMP="/tmp/Recovery HD Updater"

#temp folder for package expansion
RECOVERY_EXPANDED="/tmp/RecoveryHDUpdate"

#Mounted disk image paths
ESDPATH="/Volumes/Mac OS X Install ESD"
RECOVERYPATH="/Volumes/Mac OS X Lion Recovery HD Update"

#############
# MAIN SCRIPT
#############
clear;
#get Recovery Update dmg path
if [ "$1" == "" ]; then
echo -n "Please drag in RecoveryHDUpdate.dmg and press enter: "
while [ -z "$RECOVERYHDUPDATE" ]; do
read RECOVERYHDUPDATE
done
if [ ! -f "$RECOVERYHDUPDATE" ]; then echo "$RECOVERYHDUPDATE not found"; exit; fi
else
RECOVERYHDUPDATE="$1"
fi

#get Lion Installer path
if [ "$2" == "" ]; then
echo -n "Please drag in \"Install Mac OS X Lion.app\" and press enter: "
while [ -z "$LION" ]; do
read LION
done
if [ ! -d "$LION" ]; then echo "$LION not found"; exit; fi
else
LION="$2"
fi

#get destination path for disk image to be created at
if [ "$3" == "" ]; then
echo -n "Please drag in Destination folder for disk image: "
while [ -z "$DEST" ]; do
read DEST
done
if [ ! -d "$DEST" ]; then echo "$DEST is not a valid path"; exit; fi
else
DEST="$3"
fi

#mount Recovery Update image
hdiutil attach "$RECOVERYHDUPDATE"

#expand packge inside to temp folder (contains dmtest)
pkgutil --expand "$RECOVERYPATH"/RecoveryHDUpdate.pkg "$RECOVERY_EXPANDED"

#if we were using what's inside the chunklist and recovery inside the update we would mount this
#RecoveryHDMeta="/Volumes/Recovery HD Update"
#hdiutil attach "$RECOVERY_EXPANDED"/RecoveryHDUpdate.pkg/RecoveryHDMeta.dmg

#open Lion install ESD image for the newest files
hdiutil attach "$LION"/Contents/SharedSupport/InstallESD.dmg

#get OS version from Lion Installer ESD
OSVER=$(defaults read "$ESDPATH"/System/Library/CoreServices/SystemVersion ProductUserVisibleVersion)
OSBUILD=$(defaults read "$ESDPATH"/System/Library/CoreServices/SystemVersion ProductBuildVersion)

#append info to path so disk image volume name is informative and useful
IMAGETEMP="$IMAGETEMP $OSVER $OSBUILD"

#make work the folder
mkdir -p "$IMAGETEMP"/etc/
mkdir "$IMAGETEMP"/bin/

#copy dmtest to IMAGETEMP
if [ -f "$RECOVERY_EXPANDED"/RecoveryHDUpdate.pkg/Scripts/Tools/dmtest ]; then
cp "$RECOVERY_EXPANDED"/RecoveryHDUpdate.pkg/Scripts/Tools/dmtest "$IMAGETEMP"/bin/
else
echo "$RECOVERY_EXPANDED/RecoveryHDUpdate.pkg/Scripts/Tools/dmtest not found, exiting"
exit 1
fi

#copy the BaseSystem dmg and chunklist to destination/etc
if [ -f "$ESDPATH"/BaseSystem.chunklist -o -f "$ESDPATH"/BaseSystem.dmg  ]; then
cp "$ESDPATH"/BaseSystem.chunklist "$ESDPATH"/BaseSystem.dmg "$IMAGETEMP"/etc/
#unhide BaseSystem
chflags -R nohidden "$IMAGETEMP"
else
echo "$ESDPATH/BaseSystem* not found, exiting"
fi

#put script in folder root
echo "$RecoveryHDUpdaterScript" > "$IMAGETEMP"/"RecoveryHD Updater.command"
#set permissions
chmod ugo+x "$IMAGETEMP"/"RecoveryHD Updater.command"

#create disk image from folder
hdiutil create -srcfolder "$IMAGETEMP" "$DEST"/RecoveryHDUpdater_$OSVER_$OSBUILD.dmg
if [ $? -eq 0 ]; then
echo "Success! Created: $DEST/RecoveryHDUpdater_$OSVER_$OSBUILD.dmg"
echo "Now opening "$DEST"/RecoveryHDUpdater_$OSVER_$OSBUILD.dmg"
hdiutil attach "$DEST"/RecoveryHDUpdater_$OSVER_$OSBUILD.dmg
else
echo "Disk Image failed"
fi

echo "Cleaning Up"
#delete temp folders
rm -rf "$IMAGETEMP" "$RECOVERY_EXPANDED"

#eject the volumes
hdiutil eject "$RECOVERYPATH"
hdiutil eject "$ESDPATH"

echo "Done."

exit
The script can also be run with command line arguments:
As well as the script that is put in the created disk image:
$ ./RecoveryHD\ Updater.command [Destination]
Otherwise just double-click it in the Finder and it will ask you for the files and paths which you can just drag into the Terminal window and press Enter (don’t worry about the trailing spaces it adds)
When you run the script in the disk image you will be prompted for an admin password and away it goes, with all sorts of ugly output because it never thought a human would gaze upon it’s hidden ways…
dmtest updating the RecoveryHD partition
Update: Just tested with 10.7.4 and this script still works correctly, nothing has changed in the structure of the updated Install OS X Lion.app from the App store, note that the 10.7.4 installer is version 1.0.21 (10.7.2=1.0.13 and 10.7.3=1.0.16)
Update: Script will work on 10.8 without modification, however I have updated the script anyway to be a bit quieter when mounting the various DMGs, to accept tilde paths, accept the RecoveryHDUpdater as either a DMG or PKG, and changed prompt phrasing to include Mountain Lion.
 Click to download.


